Git
The Basics
Branches
git branch <branch-name>: creates a new branch starting at the new commitgit branch: lists all the branches in your repogit branch -D <branch>: deletes the specified branchgit branch -m <branch-name>: renames the current branch you are on to the specified name.git merge <branch>: merges the specified branch into the current branch you are on
switching
You can use the git switch command to switch branches:
git switch <branch>: switches to the specified branchgit switch -c <branch>: creates and switches to the specified branchgit switch -: switches to the last branch you were previously on.
Referring to commits
When doing stuff like traveling back to previous commits or undoing changes, you need a way to reference those commits. In fact, there are two ways to do so:
- relative to HEAD: The
HEADreference just refers to the current commit you are on, and theHEAD~<n>way of referencing refers to the commit from HEADncommits ago. - commit hash: Each commit has a commit hash that you can use to refer to.
Here are some examples of referring to a commit:
HEAD # refers to current commit
HEAD~1 # refers to 1 commit ago
Undoing changes
git checkout
The git checkout command is used to go into detached head mode, where you can move the HEAD pointer to different commits, branches, etc.
The basic syntax is as like so, where this goes back in time to view the specified commit. Changes are reflected in the working directory and detaches the head.
git checkout <commit>
To reattach from detached head mode, you need to switch to a branch using git switch.
To undo changes with git checkout, you need to refer to a specific file to undo the changes. The below code is used to revert the specified file to the state it had in the specified commit:
git checkout <commit> <file>
git checkout HEAD <filename>: reverts changes in unstaged files back to the most recent commit, where HEAD is.git checkout -- <filename>: reverts changes in unstaged files back to the most recent commit, where HEAD is.
git restore
git restore is syntactic sugar over undoing changes with git checkout. The most basic use is reverting the contents of a file back to how it was in the most recent commit, HEAD.
git restore <filename>
To refer to the a specific commit to revert to, you would use the --source option:
git restore --source <commit-hash> <filename>
To unstage a specific file, you can use the --staged option:
git restore --staged <filename> to unstage the specified file.
git commit --amend
If you made a mistake on the message your most recent commit, you can fix it by doing git commit --amend to change that message. This only works for the most recent commit, however.
git commit --amend -m "new message"
git reset
The git reset command allows you to undo commits with three different behaviors:
- unstaging files: Running
git resetby itself with no options just unstages any files you accidentally staged. - soft reset: A soft reset is when you delete commits but you don't undo the changes, useful for cleaning up history.
- hard reset: A hard reset is when you delete commits and you undo the changes, making those changes permanent.
To perform a soft reset, use the --soft option and point to a specific commit you want to go back to, deleting all previous commits:
git reset --soft <commit>
To perform a hard reset, use the --hard option instead.
git reset --hard <commit>
CAUTION
Never delete git commit history when working on a repo with others. People need that history.
git revert
git revert is a more collaborative-friendly option for undoing commit history because instead of deleting commits, it only undoes changes much like git reset --hard (hard resets) and adds a revert commit saying that the codebase reverted to a previous commit.
git revert <commit>
Summary
git checkout <commit>: goes back in time to view the specified commit. Changes are reflected in the working directory and detaches the head.git switch -: switches back to the previous branch.git checkout HEAD <filename>: reverts changes in unstaged files back to the most recent commit, where HEAD is.git checkout -- <filename>: reverts changes in unstaged files back to the most recent commit, where HEAD is.git restore <filename>: reverts changes in unstaged files back to the most recent commit, where HEAD is.git restore --source <commit> <filename>: reverts changes back to the specified commit.git restore --staged <filename>: unstages the specified file.git reset <commit>: goes back to the specified commit, and all other commits that come afterward are removed from the commit history. Does not affect working directory.git reset --hard <commit>: goes back to the specified commit, and all other commits that come afterward are removed from the commit history. Changes are reflected in the working directory.git revert <commit-hash>: creates a new commit that undoes the changes in the specified commit. Does not affect commit history.
Git Stashing
When we try to switch to another branch without committing changes, there are two things that can happen:
- we switch to the branch with the changes
- we can’t switch to the branch because there are specific conflicts.
In the case where we can’t switch, we must either commit the changes or stash them if we are not ready to commit. git stash is a helpful command that helps you save changes that you are not ready to commit. You can stash all uncommitted changes and return to them later.
The basic stashing workflow is as follows:
git stash: stash away uncommitted changes. This removes the changes and stores them in a stash in the stash stack.git stash pop: This removes the stash at the top of the stash stack and applies it to the current branch.git stash apply: This applies the stash at the top of the stash stack without popping it from the stack.
Since stashing is stored in a stack, you can do stuff like name each stash so you can recognize each stash. You can refer to each stash by index, starting at 0 for the stash at the top of the stack.
git stash save <stash-name>: stashes the current changes and assigns a name to itgit stash apply <stash>: applies the specified stash, which can be accessed from the stash index in the stackgit stash pop <stash>: pops and applies the specified stash, which can be accessed from the stash name or the index in the stack
Here are some other useful commands:
git stash list: lists all your stashesgit stash drop <stash>: deletes the specified stash and removes it from the stash stack without applying it.git stash clear: clears the stash stack.
git clone
git clone <git-url> <foldername>: clones the repo but renames the root folder to what you want.
You also have these options you can pass:
--depth=<n>: when you clone a repo, you also download the entire commit history, which can be expensive to clone. So this makes it possible to clone only the history of thenmost recent commits.
Rebasing
Basic rebasing

Rebasing is a way of merging without using merge commits. It's basically a forced fast-forward merge that rewrites the entire commit history to move the rebasing branch to the tip of the branch that you're rebasing on.
You typically want to be on a feature branch, and then rebase the feature branch onto the master branch. You literally move the bottom node of the feature branch to the tip of the master branch.

TIP
A great trick to try out rebasing and to prevent messing it up is to create a new temporary branch off the master branch without any changes and then try to rebase onto that branch. If everything works out, then you can try it with the master branch for real.
Rebase allows you to move the root commit of a branch to another commit, like moving the entire branch forward.
TIP
A great advantage of rebase is that it prevents merge commits.
solving rebase conflicts
The whole point of rebasing is to avoid merge commits, so when dealing with a rebase conflict, we use first solve the conflicts in the files, and then continue the rebase with git rebase --continue.
- Rebase with
git rebase <branch> - Fix the conflicts in the conflicting files
- Add the files to the staging area with
git add . - Continue the rebase with
git rebase --continue
qutting the rebase
if everything goes horribly wrong, you can just quit the rebase:
git rebase --quit
a rebase example
Let's say our commit graph looks like this, where trunk is the main branch and foo is our feature branch:

To rebase trunk onto foo, the basic idea is that we use the git rebase command to point the first commit on the foo branch (the commit that the branch was created on) to Y, the last commit on the master branch, essentially making it a fast forward merge.
NOTE
It's in the name: we "rebase" trunk onto foo, meaning that foo's new base will be the tip of the trunk branch.
Here are the steps we follow:
git switch foo: make sure you are on the feature branchgit rebase trunk: recreates all commits from thetrunkbranch and rebasesfooonto the tip of thetrunkbranch.
Interactive rebasing
Reflog and Cherry prick
The HEAD pointer in git always points to the current commit of the current branch you're on, but you can do stuff like go into detached head mode to view other commits.
The head pointer lives in the .git/HEAD file, and if you log it out with cat .git/HEAD, it's just a reference to the commit or branch that HEAD is pointing to currently.
Reflog
The git reflog command shows a history of how the HEAD pointer moves across your repo, like when switching branches and going into detached head mode.
git reflog
You can check any commits your HEAD moved to with git reflog. Once you have the sha (7 characters) of your desired commit, there are three things you can do:
- you can use
git checkout <sha>to go into detached head mode and view that lost commit. - You can use
git cat-file -p <sha>to view the shas of the files committed in that commit, and, then usegit cat-file -p <sha-of-file>to output that file's contents. - The
git reset --hard <commit>command goes back to the specified commit in history, deleting all commits that are more recent. It essentially points HEAD to the specified commit. If we accidentally delete a commit, then we can go to the reflog, get back that lost commit, and point head to that commit usinggit reset --hard <lost-commit>
The git reflog show <branch> shows all the movements of the HEAD pointer just localized to that branch.
head references
The HEAD@{n} reference refers to the commit where HEAD was at moves ago. For example, HEAD@{1} refers to the commit that HEAD pointed to 1 move ago. You can use this syntax anywhere where you would want to reference a commit.
You can also include time-based references like so:
git reflog show HEAD@{2.days.ago}
git diff HEAD HEAD@{yesterday}
git diff HEAD HEAD@{55.minute.ago}
Cherry pick
The git cherry-pick <commit-sha> command basically takes the changes from the specified commit and applies it to HEAD at the current branch. A great way of recovering data without dealing with merge conflicts and stuff.
CAUTION
Your working tree must be clean in order to use this command.
Git bisect
grepping and logging
You can search logs for specific keywords with git log --grep=<pattern>. The --grep pattern allows you to supply regex and highlights text that match the pattern.
bisect
Bisect basically uses your knowledge of when code in your codebase stops working at a certain commit, and uses binary search to efficiently find the commit where the bug starts.
- start git bisect
git bisect start - set the known bad commit
git bisect bad, uses the current one - set the known good commit
git bisect good <commit> - test
git bisect <good | bad>depending on how the test runs- goto 4 until git tells you the commit
You can automate the git bisect process with running tests on your code with this:
git bisect run <command>
git bisect run "npm run test"
Git behind the scenes
the .git folder
In the .git folder, you have these folders and files:
refs folder
The refs folder stores references to commits, and has these subfolders, which all have their own files, and in each file, there is just a single commit hash
heads: stores the commit shas that represent HEAD for each branchremotes: stores the remotestags: stores the tags and which commit SHAs they point to
objects folder
Stores the files for every commit in git history. Git stores complete snapshots of files in your codebase for each commit. Each file is encrypted and compressed, so you need the git cat-file -p method to actually view the contents of these files.
Git cat-file
-
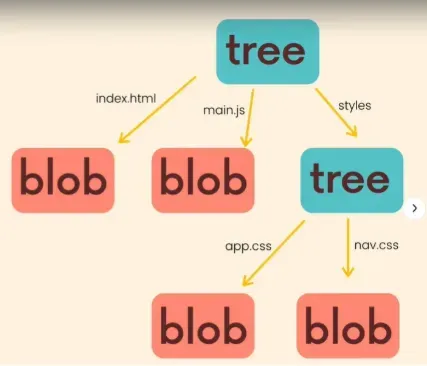
Blobs represent files in git. Trees represent folders in git, and can store blobs and other trees.
-
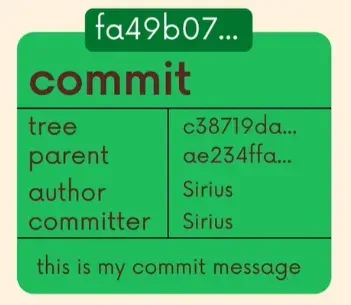
Commits store a tree and a reference to its parent commit.
All the binary compressed versions of your files are stored in the .git folder, which stores an entire compressed version of your codebase under each commit.
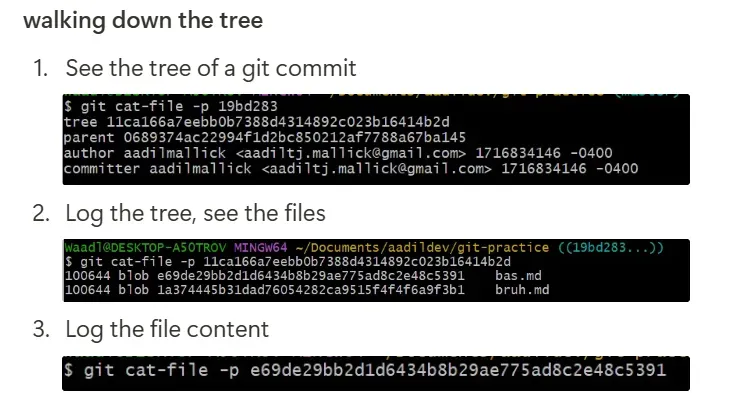
If you want to see the file contents of these binary files in the .git folder, you have to use a special command: git cat-file. The basic use is as follows:
git cat-file -p <commit-sha>
git cat-file -p <hash>: prints out the contents of what the hash referencesgit cat-file -t <hash>: prints out whether what the hash is referencing is a tree, commit, or a blob.
# print tree stored at the specified commit
git cat-file -p "9b$(ls .git/objects/9b)"

# show blobs stored at tree
git cat-file -p 3af8e2207cfe7892e3369ef341699518578e2b12

# print blob of file
git cat-file -p e3b3022aae60d8cdfec78b475452c5362688f7a5
You can use this command to either output the contents of a file stored in git or traverse the tree structure of a folder in git.
Git config
The git config is a key-value store of global git information. You can add your own keys to the config, which will either just be local to the repo you create (optionally add --local option) or global for all git repos if you use the --global option.
- All the global configuration will live in the
~/.gitconfigfile, if you want to edit it manually. - All the local configuration will live in the
.git/configfile in your project folder, if you want to edit it manually
adding your own keys
This is the basic way to add your own key to the git config for a repo, where a key is based on a <section>.<keyname> syntax.
git config --add <section>.<keyname> <value>
listing the git config
Use the git config --list option to list all the key-value pairs in the git config.
You can also find specific keys based on regex matching:
git config --get-regexp <pattern>
getting the value of a key
You are allowed to have duplicate keys in your git config, and whenever you request the value for a key, you will always get the most recent value you set for that key.
Use the git config --get <key> command to get value under the specified key
removing a key
git config --unset <key>: removes the key, and only works if the key is uniquegit config --unset-all <key>: removes the key and only works if the key has duplicates
removing section
You can remove all keys form a section using the git config --remove-section <section> command.
Aliases
All your aliases live in the git config, and you should put your aliases in the global gitconfig so you can reuse them across projects.
All aliases start with the alias section and then have specific keynames:
[user]
	email = bruhdil.bruh@gmail.com
	name = bruhlicious
[alias]
	l = log --oneline
	cm = "!f() { git add . && git commit -m \"$1\"; }; f"
	unstage-all = reset HEAD .
	irebase = "!f() { git rebase -i HEAD~$1; }; f"
	catfile = cat-file -p
	la = "!f() { git config --list | grep alias; }; f"
	list-aliases = la
	findtype = cat-file -t
	irebase-all = git rebase -i --root
	delete-tag = "!f() { git tag -d $1 && git push origin :refs/tags/$1; }; f"
	push-tag = "!f() { git tag $1 && git push && git push --tags; }; f"
Here is an example of how you can globally set an alias from the command line:
git config --global --add alias.l "log --oneline"
Now when we run the git l alias, it will log our git logs in a oneline fashion.
Dealing with git SSH connection
When having multiple SSH hosts at the same time
If you need to maintain git SSH for your work email and one for your personal, then the SSH setup is a little more complicated, but consists of three main points:
- SSH Key: A dedicated key pair (
id_ed25519_personal) handles personal authentication. - SSH Config (
~/.ssh/config): Acts as a router. It intercepts requests sent togithub.com-personaland redirects them togithub.comusing your personal key. - Local Git Config: Overrides your global work name/email inside specific repository folders only.
🛠️ Step 1: Generate & Add Personal SSH Key
- Run this in WSL to create your personal key
ssh-keygen -t ed25519 -C "your-personal-email@email.com"
- ⚠️ Important: Do not overwrite the default path. When prompted, type a custom path:
/home/yourusername/.ssh/id_ed25519_personal
- Print out and copy your public key
cat ~/.ssh/id_ed25519_personal.pub | clip.exe
- Go to GitHub Settings ➡️ SSH and GPG keys ➡️ New SSH Key and paste your key.
⚙️ Step 2: Configure the SSH Router File
- Open your
~/.ssh/configfile to add thegithub.com-personalhost: `
# Personal GitHub Account
Host github.com-personal
    HostName github.com
    User git
    IdentityFile ~/.ssh/id_ed25519_personal
- Test that your routing works:
ssh -T git@github.com-personal
🚀 Step 3: Setup connection to personal git SSH
- In your local git config, override your global settings by setting your personal github username and email:
git config --local user.name "aadilmallick"
git config --local user.email "aadiltj.mallick@gmail.com"
- Add the git remote from the remote repo you created
- Set the git remote URL to use your github-personal SSH:
git remote set-url origin git@github.com-personal:aadilmallick/remote-repo-name.git
Now you can push up your code at will.
Step 3 automation
To automate step 3 and have a less error-prone local git setup, here's a bash script wher eyou preconfigure your personal github username and email ahead of time so that when you run this bash script, it automatically 1) sets your local git config with your local credentials and 2) overrides the remote origin url to point to your personal SSH host.
#!/bin/bash

# Define your personal details here
PERSONAL_EMAIL="aadiltj.mallick@gmail.com"
PERSONAL_NAME="aadilmallick"
PERSONAL_HOST="github.com-personal"

# 1. Get the current remote URL
CURRENT_URL=$(git remote get-url origin 2>/dev/null)

if [ -z "$CURRENT_URL" ]; then
    echo "Error: No remote named 'origin' found in this directory."
    exit 1
fi

# 2. Check if the URL is using standard SSH format
if [[ "$CURRENT_URL" =~ ^git@github\.com: ]]; then
    # Swap github.com with github.com-personal
    NEW_URL="${CURRENT_URL/git@github.com:/git@${PERSONAL_HOST}:}"

    # Update the remote URL
    git remote set-url origin "$NEW_URL"
    echo "Remote URL updated to: $NEW_URL"
else
    # Check if it's already converted to prevent breaking it
    if [[ "$CURRENT_URL" =~ ^git@${PERSONAL_HOST}: ]]; then
        echo "Remote URL is already configured for your personal account."
    else
        echo "Warning: Remote URL doesn't look like a standard GitHub SSH URL ($CURRENT_URL)."
        echo "Could not automatically safely convert it."
    fi
fi

# 3. Override the local repository Git configurations
git config --local user.name "$PERSONAL_NAME"
git config --local user.email "$PERSONAL_EMAIL"

echo "Local Git configuration updated successfully!"
echo "   Name:  $(git config user.name)"
echo "   Email: $(git config user.email)"
Github Codespaces
You can open up a github codespace for any repository by just pressing the period . on the repo page.
Github CLI
Install the github CLI by going to the github cli page. To start with the github CLI, run gh auth login to login.
gh auth
gh auth login: logins to the cligh auth logout: logs out of the cligh auth status: shows current user infogh auth switch: shows quickpicker for user to switch togh auth refresh: allows you to configure your read/write permissions on your account and for certain repos.
# Select what host and account to switch to via a prompt
gh auth switch

# Switch the active account on a specific host to a specific user
gh auth switch --hostname enterprise.internal --user monalisa
# Open a browser to add write:org and read:public_key scopes
$ gh auth refresh --scopes write:org,read:public_key

# Open a browser to ensure your authentication credentials have the correct minimum scopes
$ gh auth refresh

# Open a browser to idempotently remove the delete_repo scope
$ gh auth refresh --remove-scopes delete_repo

# Open a browser to re-authenticate with the default minimum scopes
$ gh auth refresh --reset-scopes
Actions specific commands
These following commands are specific to github actions.
gh secret
In all CLI commands involing secrets, you have these options:
-e <environment-name>or--env <environment-name>: if using environments in your repo, specifies from which environment to fetch variables from.--repoor-R: the specific repo to pull variables from. By default, this is your current repo.
getting secrets
You can get secrets through the gh secret list command, which lists all repo-wide secrets in the current repository. Here are the options you can pass:
setting secrets
The gh secret set command is used to set secrets on your repo or organization-wide for actions. By default, it just sets secrets in your current repo.
The command below sets the specified secret and waits for user input to securely paste in the secret value.
gh secret set <secret-name>
To set secrets programmatically, you can use the --body option to pass in a value:
gh secret set <secret-name> --body <value>
You can also just set them from a .env file using the -f or --file option:
gh secret set -f .env
gh cache
The gh cache command lets you have CRUD funcitonality on your github actions caches.
listing caches
Use the gh cache list to list caches accountwide or for a specific repo:
# List caches for current repository
$ gh cache list

# List caches for specific repository
$ gh cache list --repo cli/cli
deleting caches
# Delete a cache by id
$ gh cache delete 1234

# Delete a cache by key
$ gh cache delete cache-key

# Delete a cache by id in a specific repo
$ gh cache delete 1234 --repo cli/cli

# Delete all caches (exit code 1 on no caches)
$ gh cache delete --all

# Delete all caches (exit code 0 on no caches)
$ gh cache delete --all --succeed-on-no-caches
gh variable
The gh variable command lets you perform CRUD actions on your repo variables that you use in actions.
On all of these CRUD commands, you have access to these important options:
-e <environment-name>or--env <environment-name>: if using environments in your repo, specifies from which environment to fetch variables from.--repoor-R: the specific repo to pull variables from. By default, this is your current repo.
list variables
The gh variable list command lists all variables in your repo.
gh variable list
gh variable ls
set variables
gh variable set <variable-name> <value>
get variables
gh variable get <variable-name>
gh run
gh run download : download artifacts
The gh run download command downloads any artifacts.
gh run download [<run-id>] [flags]
gh api
The gh api command is used as a CLI interface to the github API. Basic usage is as follows:
gh api <url>
Here are important options to set:
--cache <duration>: Cache the response, e.g. "3600s", "60m", "1h"-F,--field <key=value>: Add a typed parameter in key=value format-H,--header <key:value>: Add a HTTP request header in key:value format-f,--raw-field <key=value>-X,--method <METHOD>: changes the REST API method. The default is GET.-f,--raw-field <key=value>: Add a string parameter in key=value format--verbose: Include full HTTP request and response in the output
# List releases in the current repository
$ gh api repos/{owner}/{repo}/releases

# Post an issue comment
$ gh api repos/{owner}/{repo}/issues/123/comments -f body='Hi from CLI'
gh browse
The gh browse command is a really cool command that lets you navigate your repo in the browser through just a few keystrokes. It opens up github on your browser and navigate the current repo.
# Open the home page of the current repository
$ gh browse

# Open the script directory of the current repository
$ gh browse script/

# Open issue or pull request 217
$ gh browse 217

# Open commit page
$ gh browse 77507cd94ccafcf568f8560cfecde965fcfa63

# Open repository settings
$ gh browse --settings

# Open main.go at line 312
$ gh browse main.go:312

# Open main.go with the repository at head of bug-fix branch
$ gh browse main.go --branch bug-fix

# Open main.go with the repository at commit 775007cd
$ gh browse main.go --commit=77507cd94ccafcf568f8560cfecde965fcfa63
gh repo
gh repo view
This command lets you view a repo in the web browser
gh repo view --web # opens the current repo in the web
gh repo rename
This command renames the current repo to the new repo name
gh repo rename <new-name>
gh pr
The gh pr command lets you perform CRUD operations with pull requests.
creating pull requests
tHe gh pr create command creates a pull request of the current branch in the current repo. This will only work if the current branch is already pushed up to remote.
gh pr create