
Command line and Node basics

Command line arguments

You can get all the command line arguments you type in from the process.argv array. However, this stores all the command line arguments.

node index.js is itself two command line arguments:

  • The first argument will always be the path to the node binary
  • The second argument will always be the filepath of the file node is running
  • Any additional arguments are ones you pass in.

So to parse any arguments you pass in, you have to start looking from the 2nd element onward in process.argv.

Process and OS

process.argv; // An array of command-line arguments.
process.arch; // The CPU architecture: "x64", for example.
process.cwd(); // Returns the current working directory.
process.chdir(); // Sets the current working directory.
process.cpuUsage(); // Reports CPU usage.
process.env; // An object of environment variables.
process.execPath; // The absolute filesystem path to the node executable.
process.exit(); // Terminates the program.
process.exitCode; // An integer code to be reported when the program exits.
process.getuid(); // Return the Unix user id of the current user.
process.hrtime.bigint(); // Return a "high-resolution" nanosecond timestamp.
process.kill(); // Send a signal to another process.
process.memoryUsage(); // Return an object with memory usage details.
process.nextTick(); // Like setImmediate(), invoke a function soon.
process.pid; // The process id of the current process.
process.ppid; // The parent process id.
process.platform; // The OS: "linux", "darwin", or "win32", for example.
process.resourceUsage(); // Return an object with resource usage details.
process.setuid(); // Sets the current user, by id or name.
process.title; // The process name that appears in `ps` listings.
process.umask(); // Set or return the default permissions for new files.
process.uptime(); // Return Node's uptime in seconds.
process.version; // Node's version string.
process.versions; // Version strings for the libraries Node depends on.
const os = require("os");
os.arch(); // Returns CPU architecture. "x64" or "arm", for example.
os.constants; // Useful constants such as os.constants.signals.SIGINT.
os.cpus(); // Data about system CPU cores, including usage times.
os.endianness(); // The CPU's native endianness "BE" or "LE".
os.EOL; // The OS native line terminator: "\n" or "\r\n".
os.freemem(); // Returns the amount of free RAM in bytes.
os.getPriority(); // Returns the OS scheduling priority of a process.
os.homedir(); // Returns the current user's home directory.
os.hostname(); // Returns the hostname of the computer.
os.loadavg(); // Returns the 1, 5, and 15-minute load averages.
os.networkInterfaces(); // Returns details about available network. connections.
os.platform(); // Returns OS: "linux", "darwin", or "win32", for example.
os.release(); // Returns the version number of the OS.
os.setPriority(); // Attempts to set the scheduling priority for a process.
os.tmpdir(); // Returns the default temporary directory.
os.totalmem(); // Returns the total amount of RAM in bytes.
os.type(); // Returns OS: "Linux", "Darwin", or "Windows_NT", e.g.
os.uptime(); // Returns the system uptime in seconds.
os.userInfo(); // Returns uid, username, home, and shell of current user.

Streams

Streams are a way of handling data in node in a way that is memory-efficient. It allows you to stream data, never having it all in memory. This is useful for handling large files, or large amounts of data.

import fs from "fs";
const readableStream = fs.createReadStream("file.txt");
const writableStream = fs.createWriteStream("file2.txt");

readableStream
.pipe(writableStream)
.on("finish", () => console.log("Done!"))
.on("error", (error) => console.log(error.message));

The primary benefits of using streams are:

  • Memory Efficiency: Process large files or data sets in chunks, avoiding the need to load the entire content into memory. This prevents out-of-memory errors and keeps your application lightweight.
  • Time Efficiency: Start processing data as soon as the first chunk arrives, rather than waiting for the entire resource to be available. This can lead to faster perceived performance.
  • Composability: Streams are designed to be easily "piped" together, creating a clear and efficient data pipeline. This makes complex data processing workflows more manageable and readable.

There are 4 types of streams;

  • readable streams: read data in chunks, can pipe to other writable streams
  • writable streams: For writing data that is accessed from a readable stream.
  • duplex streams: Streams that are both readable and writable
  • transform streams: duplex streams that modify data in a pipeline
Stream TypeDescriptionExamples
ReadableEmits data (you consume it)fs.createReadStream(), http.IncomingMessage
WritableAccepts data (you write to it)fs.createWriteStream(), http.ServerResponse
DuplexRead + writenet.Socket
TransformDuplex that modifies data on the flyzlib.createGzip()

Readable and writable streams

Basics of readable streams

Readable streams in nodejs have 4 events they can listen to:

  • 'data': Emitted when a chunk of data is available.
  • 'end': Emitted when there is no more data to consume.
  • 'error': Emitted if an error occurs while reading.
  • 'close': Emitted when the underlying resource (e.g., file descriptor) has been closed.

This is the most basic example of using a readable stream:

  • The main use case for using a readable stream is to pipe it to a writable stream, like process.stdout
import fs from "fs";

const readStream = fs.createReadStream("src/streams/roadmaps.json");

// pipe to a writable stream
readStream.pipe(process.stdout);

The basic syntax for creating a read stream using the fs.createReadStream() method is like so:

const readableStream = fs.createReadStream(filepath, options)

Here are the options you have access to in the options object:

  • encoding: the file encoding, like "utf8"
  • highWatermark: the size of each chunk in the stream, in bytes
  • start: Starting byte position to read fro
  • end: Ending byte position to read to

By default, the highWatermark property when creating a readable stream reads 64kb chunks at a time. We can make it more memory-efficient by making each chunk smaller, like 1024 bytes only.

const readable = fs.createReadStream(file, {
encoding: "utf8",
highWaterMark: 1024, // 1 KB chunks
});

readable.on("data", (chunk) => {
console.log("Received chunk:", chunk.length);
});

readable.on("end", () => {
console.log("Done reading file");
});

consuming streams

Readable streams operate in two modes:

  1. Flowing mode: Data is read automatically and provided as quickly as possible
  2. Paused mode: The read() method must be called explicitly to get chunks

There are three ways to consume readable streams in node:

  • async iteration: you can consume streams with the for await syntax, which activates flowing mode.
  • event listeners: By setting event listeners on the stream for the "data" event, you activate flowing mode.
  • using readable.read(): This imperatively reads chunks at a time and activates paused mode.

To manually switch to paused mode, you can use the readableStream.pause() method.

readableStream.pause();

You can now use async iteration to consume readable streams in node:

const fs = require('fs');

async function readFileInChunks() {
const stream = fs.createReadStream('./bigfile.txt', { encoding: 'utf8' });

for await (const chunk of stream) {
console.log('Chunk:', chunk.length);
}
}
readFileInChunks();

Basics of Writable streams

To create a writable stream from a file, you use the fs.createWriteStream() method:

const writable = fs.createWriteStream(filepath, options)

Here are the options you have access to in the options object:

  • encoding: the file encoding, like "utf8"
  • highWatermark: the size of each chunk in the stream, in bytes

ON a writable stream, you have access to the writable.write(chunk) method, which write a chunk manually to the stream. This method returns a boolean that describes the status of the buffer:

  • If writable.write(chunk) returns true, then the buffer is OK and there is no backpressure.
  • If writable.write(chunk) returns false, then the buffer is false and we have to relieve the backpressure.
const writable = fs.createWriteStream("./src/streams/output.txt", {
highWaterMark: 1024,
encoding: "utf8",
});
let isBufferOk = false;

isBufferOk = writable.write("Hello\n");
isBufferOk = writable.write("World\n");
console.log("isBufferOk", isBufferOk);

// setus up event listener for when writable ends.
writable.end(() => {
console.log("All writes are complete!");
});

You then use writable.end() to signal you're done writing and to close the writable stream automatically.

methods

  • writable.write(chunk): writes a chunk to the writable stream and returns a boolean where if true, there is no backpressure, and if false, there is backpressure.
  • writable.end(cb): runs a callback when you're done with all your writes, triggering the 'end' event on the writable stream

events

Here are the 4 events you can listen to on a writable stream:

  • 'drain': Emitted when the internal buffer of the writable stream has been emptied and it's safe to write more data. This is crucial for backpressure handling.
  • 'finish': Emitted when you invoke writable.end() to signal you're done writing and all data has been flushed to the underlying system.
  • 'error': Emitted if an error occurs while writing.
  • 'close': Emitted when the underlying resource has been closed.

built-in writable streams

process.stdout and process.stderr are two built-in writable streams that you can write to.

Combining readable and writable streams

level 1: piping

The main use case for readable and writable streams is to pipe the contents of a readable stream into a writable stream. The basic syntax is to the use readable.pipe() method on a readable stream, and pass a writable stream into that.

readable.pipe(writable)

The rules of piping are as follows:

  • The .pipe() method only exists on readable streams, so readable streams are the only ones that can start a pipeline.
  • You can only pipe transform streams and writable streams

The main problem with piping however, is that if an error occurs, the stream automatically closes and the data flow is broken. The new pipeline() function handles these edge cases:

level 2: pipeline

const fs = require('node:fs');
const { Transform, pipeline } = require('node:stream');

let errorCount = 0;
const upper = new Transform({
transform: function (data, enc, cb) {
if (errorCount === 10) {
return cb(new Error('BOOM!'));
}
errorCount++;
this.push(data.toString().toUpperCase());
cb();
},
});

const readStream = fs.createReadStream(__filename, { highWaterMark: 1 });
const writeStream = process.stdout;

readStream.on('close', () => {
console.log('Readable stream closed');
});

upper.on('close', () => {
console.log('\nTransform stream closed');
});

writeStream.on('close', () => {
console.log('Writable stream closed');
});

pipeline(readStream, upper, writeStream, err => {
if (err) {
return console.error('Pipeline error:', err.message);
}
console.log('Pipeline succeeded');
});

level 3: async pipeline

The asynchronous pipeline() function also accepts async generators as transform streams:

const fs = require('node:fs');
const { pipeline } = require('node:stream/promises');

async function main() {
await pipeline(
fs.createReadStream(__filename), // 1. create read stream
async function* (source) { // 2. async generator as transform stream
for await (let chunk of source) {
yield chunk.toString().toUpperCase();
}
},
process.stdout. // 3. last in pipeline is writable stream
);
}

main().catch(console.error);

Handling backpressure

Backpressure is a crucial concept in stream handling. It refers to the mechanism by which a slow consumer (writable stream) tells a fast producer (readable stream) to slow down, preventing the consumer's internal buffer from overflowing.

Think of streams as a faucet (source) and drain (sink):

  • If the sink is slow, and you keep pouring, you’ll overflow.
  • Backpressure is a signal: "Stop sending data until I’m ready again."

If you use the readable.pipe(writable), the method of piping automatically handles backpressure for you. If instead you use the event listeners, you have to manually pause and resume streams like so:

readable.on('data', chunk => {
if (!writable.write(chunk)) {
readable.pause(); // backpressure signal
}
});

writable.on('drain', () => {
readable.resume(); // sink is ready again
});

To handle backpressure on the producer side, the readable stream has access to these methods:

  • readable.pause(): Pauses the 'data' event.
  • readable.resume(): Resumes the 'data' event.

Extending readable streams

You can create your own implementations of readable streams by extending from the Readable class or creating an instance of it.

  • The subclass must implement the _read() method, which gets called when consuming the stream either in flowing or paused mode.
  • You add chunks to the readable stream through the this.push(chunk) method.
  • You signify that the stream has ended through the this.push(null) method.
const { Readable } = require('stream');

class Counter extends Readable {
constructor(options) {
super(options);
this.count = 0;
this.maxCount = 10;
}

_read() {
if (this.count < this.maxCount) {
const chunk = `Number: ${this.count++}\n`;
// Push the data to the internal buffer
this.push(chunk);
} else {
// Signal that there's no more data
this.push(null);
}
}
}

const counterStream = new Counter();

// consume data in flowing mode through event listeners,
// calls _read() implicitly._
counterStream.on('data', (chunk) => {
console.log(chunk.toString());
});

counterStream.on('end', () => {
console.log('Counting finished.');
});

counterStream.on('error', (err) => {
console.error('Counter stream error:', err);
});

On any readable stream, you can manually read chunks of data through the readable.read() method.

Here is an example of how we can create our own custom readable streams and consume them:

IMPORTANT

Since readable streams are observables, they won't start emitting until you explicitly decide to read them with stream.read() or setting up the event listeners.

import fs from "fs";
import { Writable, Transform, Duplex, Readable, ReadableOptions } from "stream";
import { pipeline } from "node:stream/promises";

class StreamUtils {
static createTransformStream(transformFunction: (chunk: Buffer) => Buffer) {
return new Transform({
transform(chunk, encoding, callback) {
const transformed = transformFunction(chunk);
this.push(transformed);
callback();
},
});
}

static createDelayStream(delay: number) {
return new Transform({
transform(chunk, encoding, callback) {
this.push(chunk);
setTimeout(() => {
callback();
}, delay);
},
});
}
}

class CustomReadable extends Readable {
constructor(options: ReadableOptions) {
super(options);
}

addBinaryChunk(chunk: Buffer) {
this.push(chunk);
}

addTextChunk(chunk: string) {
this.push(chunk, "utf-8");
}

end() {
this.push(null);
}
}

class FileReader extends CustomReadable {
private stream: fs.ReadStream;

constructor(file: string, options: ReadableOptions) {
super(options);
this.stream = fs.createReadStream(file, options);

this.stream.on("data", (chunk) => {
this.addTextChunk(chunk.toString());
});

this.stream.on("end", () => {
this.end();
});

this.stream.on("error", (err) => {
this.emit("error", err);
});
}

_read(size?: number): void {
// event listeners will handle the reading
}
}

// 1. create readable of file
const readable = new FileReader(file, {
highWaterMark: 256,
encoding: "utf-8",
});

// 2. set transform streams
const upperCaseTransform = StreamUtils.createTransformStream((chunk) => {
return Buffer.from(chunk.toString().toUpperCase());
});
const streamDelayTransform = StreamUtils.createDelayStream(150);

// 3. run pipeline
await pipeline(
readable,
upperCaseTransform,
streamDelayTransform,
process.stdout
);

Creating custom readable streams

You can create custom readable streams which might be easier than inheriting it. These are the options and methods you provide when creating a Readable instance:

  • objectMode: if true, then you can deal with streaming objects instead of buffers or strings.
  • read(): this implements _read() under the hood, where you have access to this.push(chunk) to add data to the stream or this.push(null) to end data.
const createReadableStream = new Readable({
objectMode: true,
async read() {
try {
const rows = await fetchData(offset, CHUNK_SIZE);
if (rows.length) {
rows.forEach((row) => this.push(row));
offset += CHUNK_SIZE;
} else {
this.push(null); // End of stream
}
} catch (err) {
this.destroy(err);
}
},
});

// Log the output from the stream
createReadableStream
.on("data", console.log)
.on("end", () => console.log("Stream ended"))
.on("error", (err) => console.error("Stream error:", err));

Extending writable streams

You can create your own implementations of writable streams by extending from the Writable class or from instantiating it

  • The subclass must implement the _write(), _construct(), and _destroy() methods
  • You add chunks to the readable stream through the this.push(chunk) method.
  • You signify that the stream has ended through the this.push(null) method.
const { Writable } = require('stream');

class UppercaseWriter extends Writable {
constructor(options) {
// Calls the stream.Writable() constructor
super(options);
}

_write(chunk, encoding, callback) {
// Convert the chunk to uppercase
const uppercase = chunk.toString().toUpperCase();

// Print to the console
process.stdout.write(uppercase);

// Call callback to indicate we're ready for the next chunk
callback();
}
}

// Create an instance of our custom stream
const uppercaseWriter = new UppercaseWriter();

// Write data to it
uppercaseWriter.write('Hello, ');
uppercaseWriter.write('world!\n');
uppercaseWriter.write('This text will be uppercase.\n');
uppercaseWriter.end();

uppercaseWriter.on('finish', () => {
console.log('All data has been processed');
});

Creating custom writable streams

Instantiating the Writable class with these options creates a custom writable stream:

  • objectMode: a boolean, whether or not to enable object mode.
  • write(chunk, encoding, callback): calls and overrides the _write() method under the hood, which is needed to create a writable. Here are the arguments:
    • chunk: the current chunk to consume
    • encoding: the encoding of the chunk
    • callback(): invoking this method signals that you're ready to process the next chunk.
import { Writable } from "node:stream";

// Create a writable stream function
const createWritableStream = () => {
return new Writable({
objectMode: true,
write(chunk, encoding, callback) {
console.log(chunk);
callback();
},
});
};

object mode


object mode is when you want to deal with streaming javascript objects, which can be useful for having efficient application logic. You can read and write objects by creating readable and writable streams with the objectMode property set to true:

const { Readable } = require('node:stream');

// creates stream of object
const readable = new Readable({
objectMode: true,
read() {
this.push({ hello: 'world' });
this.push(null);
},
});

// consumes streams of objects
const writable = new Writable({
objectMode: true,
write(chunk, encoding, callback) {
console.log(chunk);
callback();
},
});

readable.pipe(writable)

Here's a wrapper around creating obejct streams:

class ObjectStreamManager<T extends Record<string, any>> {
private writable: Writable;
private readable: Readable;
constructor({
addChunks,
onWriteChunk,
shouldEndStream,
}: {
addChunks: () => T[];
shouldEndStream: () => boolean;
onWriteChunk: (chunk: T) => void;
}) {
this.readable = new Readable({
objectMode: true,
read(size) {
const chunks = addChunks();
chunks.forEach((chunk) => this.push(chunk));
if (shouldEndStream()) {
this.push(null);
}
},
});

this.writable = new Writable({
objectMode: true,
write(chunk, encoding, callback) {
onWriteChunk(chunk);
callback();
},
});
}

consume() {
this.readable.pipe(this.writable);
}
}

function* createDogs(num: number) {
for (let i = 0; i < num; i++) {
yield {
name: `dog ${i}`,
breed: "golden lab",
};
}
}

const objectStream = new ObjectStreamManager({
addChunks: () => {
return [...createDogs(20)];
},
shouldEndStream: () => true,
onWriteChunk: (chunk) => {
console.log(chunk);
},
});

objectStream.consume();

Transform Streams

Creating transform streams

Transform streams let you hook into readable streams and modify data in the pipeline. If a readable streams pipes to a transform stream, you can perform modifications to each chunk in a memory-efficient way.

To create a transform stream, you create a Transform stream instance like so:

  1. Override the transform() callback on a chunk
  2. Use the this.push(chunk) method to stream the new transformed chunks
  3. Invoke callback() to ensure that the modifications on the chunk are finished.
const transformStream = new Transform({
transform(chunk, encoding, callback) {
// perform modifications on chunk
this.push(transformedChunk)
callback()
}
})

Then as shown in the example below, all we do is pipe the readable stream to the transform stream (which returns a readable stream), and then pipe that to a writable stream.

import { Writable, Transform, Duplex } from "stream";

const readable = fs.createReadStream(file, {
encoding: "utf8",
highWaterMark: 1024, // 1 KB chunks
autoClose: true,
});

const upperCase = new Transform({
transform(chunk, encoding, callback) {
const transformed = chunk.toString().toUpperCase();
this.push(transformed);
callback();
},
});

readable.pipe(upperCase).pipe(process.stdout);

You can also create an artificial delay with streams by delaying and invoking the callback() in a setTimeout:

const streamDelayTransform = new Transform({
transform(chunk, encoding, callback) {
this.push(chunk);
setTimeout(() => {
callback();
}, 150);
},
});

Here's a utility class for creating transform streams:

import fs from "fs";
import { Writable, Transform, Duplex, Readable, ReadableOptions } from "stream";
import { pipeline } from "node:stream/promises";

class StreamUtils {
static createTransformStream(transformFunction: (chunk: Buffer) => Buffer) {
return new Transform({
transform(chunk, encoding, callback) {
const transformed = transformFunction(chunk);
this.push(transformed);
callback();
},
});
}

static createDelayStream(delay: number) {
return new Transform({
transform(chunk, encoding, callback) {
this.push(chunk);
setTimeout(() => {
callback();
}, delay);
},
});
}
}

Stream compression with GZIP

You can use the zlib library which has utility methods for transform streams that compress and decompress streams using the GZIP algorithm.


import zlib from "zlib";

const readable = fs.createReadStream(file, {
encoding: "utf8",
highWaterMark: 256,
});

const compressed = readable.pipe(zlib.createGzip());
const decompressed = compressed.pipe(zlib.createGunzip());
decompressed.pipe(process.stdout);
  • zlib.createGzip(): a transform stream that compresses chunks using the GZIP algorithm.
  • zlib.createGunzip(): a transform stream that decompresses chunks using the GZIP algorithm.

Event Emitter

The event emitter api in node allows you to partake in event-based programming and is extremely simple, just based on a single messaging event.

The basic premise is that an new EventEmitter() instance has only two important methods: emitter.emit() to trigger events and send a payload, and emitter.on() to listen for events and access the payload.

const EventEmitter = require("events");

const emitter = new EventEmitter();

// 1. setup listener
emitter.on("redevent", () => console.log("RED EVENT FIRED"));

// 2. emit/trigger event
emitter.emit("redevent");

You can extend the event emitter class to create event-based programming easy:

const EventEmitter = require('events');

class MyCustomEmitter extends EventEmitter {
constructor() {
super(); // Call the parent constructor
this.data = [];
}

addItem(item) {
this.data.push(item);
this.emit('itemAdded', item); // Emit an event when an item is added
}

processData() {
// Simulate some processing
console.log('Processing data...');
this.emit('processingComplete', this.data.length); // Emit event on completion
}
}

const myObject = new MyCustomEmitter();

myObject.on('itemAdded', (item) => {
console.log(`New item added: ${item}`);
});

myObject.once('processingComplete', (count) => {
console.log(`Finished processing ${count} items.`);
});

myObject.addItem('A');
myObject.addItem('B');
myObject.processData();

We can take this a step further and make a generic, type safe class wrapper around this:

import { EventEmitter, on } from "node:events";

type EventsType = Record<string, any>;

export class EventEmitterNode<T extends EventsType> {
private emitter: EventEmitter;

constructor() {
this.emitter = new EventEmitter();
}

sendEvent<K extends keyof T>(event: K, data: T[K]) {
this.emitter.emit(event as string, data);
}

on<K extends keyof T>(event: K, callback: (data: T[K]) => void) {
this.emitter.on(event as string, callback);
return {
removeListener: () => this.off(event, callback),
};
}

once<K extends keyof T>(event: K, callback: (data: T[K]) => void) {
this.emitter.once(event as string, callback);
}

async *consumeEventStream<K extends keyof T>(event: K, signal?: AbortSignal) {
for await (const data of on(this.emitter, event as string, { signal })) {
yield data as T[K];
}
}

off<K extends keyof T>(event: K, callback: (data: T[K]) => void) {
this.emitter.off(event as string, callback);
}
}

And here is how you would use this:

const partyEmitter = new EventEmitterNode<{
"party-started": { name: string; time: string };
"party-ended": { bummer: boolean };
}>();

partyEmitter.onEvent("party-started", (data) => {
console.log(`Party started: ${data.name} at ${data.time}`);
});

partyEmitter.sendEvent("party-started", { name: "Party", time: "2025-05-24" });

NOTE

Event emitters are synchronous by nature, meaning that an eventEmitter.emit() call is blocking until the listener for that event finishes executing.

File System

Filepath manipulation

// Some important paths
process.cwd(); // Absolute path of the current working directory.
__filename; // Absolute path of the file that holds the current code.
__dirname; // Absolute path of the directory that holds __filename.
os.homedir(); // The user's home directory.

const path = require("path");

path.sep; // Either "/" or "\" depending on your OS

// The path module has simple parsing functions
let p = "src/pkg/test.js"; // An example path
path.basename(p); // => "test.js"
path.extname(p); // => ".js"
path.dirname(p); // => "src/pkg"
path.basename(path.dirname(p)); // => "pkg"
path.dirname(path.dirname(p)); // => "src"

// normalize() cleans up paths:
path.normalize("a/b/c/../d/"); // => "a/b/d/": handles ../ segments
path.normalize("a/./b"); // => "a/b": strips "./" segments
path.normalize("//a//b//"); // => "/a/b/": removes duplicate /

// join() combines path segments, adding separators, then normalizes
path.join("src", "pkg", "t.js"); // => "src/pkg/t.js"

// resolve() takes one or more path segments and returns an absolute
// path. It starts with the last argument and works backward, stopping
// when it has built an absolute path or resolving against process.cwd().
path.resolve(); // => process.cwd()
path.resolve("t.js"); // => path.join(process.cwd(), "t.js")
path.resolve("/tmp", "t.js"); // => "/tmp/t.js"
path.resolve("/a", "/b", "t.js"); // => "/b/t.js"

Important paths

  • process.cwd(): Absolute path of the current working directory.
  • __filename: Absolute path of the file that holds the current code. Right now this is the absolut path of 07-command-line.md
  • __dirname: Absolute path of the directory that the current file lives in
  • os.homedir(): The user's home directory.
  • path.sep: Either "/" or "" depending on your OS, used for path separators.

Path methods

  • path.basename(filepath): Returns the basename (filename) of the path, like json.txt
  • path.extname(filepath): Returns the extension of the path, like .txt
  • path.dirname(filepath): Returns the directory name of the path, like ./src/pkg
  • path.resolve(filepath): Returns the absolute path of the given filepath

Get file info

The fs.statSync() method takes in a filepath and returns information about that file or folder, returning a stats object. The stats object has the following properties and methods:

  • stats.isFile(): Returns true if the path is a file
  • stats.isDirectory(): Returns true if the path is a directory
  • stats.size: Returns the size of the file in bytes
const fs = require("fs");
let stats = fs.statSync("book/ch15.md");
stats.isFile(); // => true: this is an ordinary file
stats.isDirectory(); // => false: it is not a directory
stats.size; // file size in bytes

__dirname in es6 modules

When using es6 modules in node by change the "type" key in the package json to "module", you no longer have access to the __dirname variable. To get the current directory, instead you have to do code like this:

import { fileURLToPath } from "url";
import { dirname, join } from "path";

// import.meta.url is the URL version of the filepath of the current file
const currentFileURL = import.meta.url;
// 1. convert import.meta.url to a static filepath
// 2. get the directory path of the directory that houses that filepath
const currentDir = dirname(fileURLToPath(currentFileURL));
// you now have access to the current directory as you please
const DB_FILE = join(currentDir, "db.json");

Filesystem manager

Creating executable files

By using the fs.writeFile() function, you can pass in an object of options, specifically the mode option and pass in an octal permission number.

The example below creates a functioning bash script (yes, it is necessary to add code besides the shebang).

export async function createBashFile(filepath: string) {
await fs.writeFile(filepath, "#!/bin/bash\necho 'hello'", {
mode: 0o777,
});
}

Adding to path

import fs from "node:fs/promises";
import os from "node:os";
import path from "node:path";
import process from "node:process";

async function getShellProfileContents() {
// Detect the user's shell and profile file
const shell = process.env.SHELL || "";
let profileFile = "";
if (shell.includes("zsh")) {
profileFile = path.join(os.homedir(), ".zshrc");
} else if (shell.includes("bash")) {
profileFile = path.join(os.homedir(), ".bashrc");
} else {
// fallback
profileFile = path.join(os.homedir(), ".profile");
}

// Check if already present
let content = "";
try {
content = await fs.readFile(profileFile, { encoding: "utf-8" });
} catch (e) {
console.error(e);
// File may not exist, will be created
}
return { profileFile, content };
}

export async function addToPath(folderPath: string) {
const { profileFile, content } = await getShellProfileContents();
const exportLine = `export PATH="$PATH:${folderPath}"\n`;

if (content.includes(exportLine.trim())) {
console.log(`${folderPath} already in your PATH.`);
return;
}

// Append to profile
await fs.appendFile(profileFile, exportLine);
console.log(`Added ${folderPath} to your PATH in ${profileFile}.`);
console.log(`Please run: source ${profileFile} or restart your terminal.`);
}

export async function removeFromPath(folderPath: string) {
const { profileFile, content } = await getShellProfileContents();

const exportLine = `export PATH="$PATH:${folderPath}"\n`;

if (content.includes(exportLine.trim())) {
const newContent = content.replace(exportLine, "");
await fs.writeFile(profileFile, newContent);
console.log(`Removed ${folderPath} from your PATH in ${profileFile}.`);
console.log(`Please run: source ${profileFile} or restart your terminal.`);
} else {
console.log(`${folderPath} not found in your PATH.`);
}
}

Running CLI commands in Node

The child_process module in node allows you to run command line tools from within your nodeJS program, like cd, ls, and much more.

You can import it like so:

import * as child_process from "child_process";

ExecSync

The child_process.execSync(command, options) method takes in a string command as its first argument, an an object of options as its second.

This method invokes a unix shell and runs the command in that shell, returning the standard output of the command as a string. If the command fails, it throws an error.

import * as child_process from "child_process";

async function runLinuxCommandLevel1() {
try {
// run the ls -l . command and store stdout in the output variable
let output = child_process.execSync("ls -l .", {
encoding: "utf8",
});
console.log(output);
} catch (err) {
// if the command fails, catch the error and log it
console.log(err);
}
}

ExecFileSync

For a more performant way of running linux commands, we can use the child_process.execFileSync(command, args, options) method. This method takes in a command as its first argument, an array of arguments and options as its second, and an object of options as its third.

You can also execute scripts you wrote yourself with this.

  • First argument: the file/script or command to run
  • Second argument: a list of command line options to pass in
  • Third argument: options like encoding

It's more perfomant because it doesn't spawn a shell, but instead runs the command directly.

async function runLinuxCommandLevel2() {
try {
let output = child_process.execFileSync("ls", ["-l", "."], {
encoding: "utf8",
});
console.log(output);
} catch (err) {
console.log(err);
}
}

Spawn

With the child_process.spawn() method, we can have a more asynchronous approach where we listen to the stdout and stderr streams from executing a command.

const commandListener = spawn(command, [option1, option2, ...], options)

Like the other methods, here are the arguments in order:

  • First argument: the file/script or command to run
  • Second argument: a list of command line options to pass in
  • Third argument: options like encoding
const { spawn } = require("child_process");
// runs this command: identify -verbose bidengoeshard.png
const identify = spawn("identify", ["-verbose", "bidengoeshard.png"]);

// handles the stdout stream
identify.stdout.on("data", (data: string) => {
// prints out the output in the command line from running the identify command
console.log(`stdout:\n ${data}`);
});

// handles the stderr stream
identify.stderr.on("data", (data: string) => {
// prints out the error in the command line, if any, when running the identify command
console.log(`stderr:\n ${data}`);
});

identify.on("exit", (code: number) => {
console.log(`child process exited with code ${code}`);
});

Wrapper CLI class

Here's a wrapper CLI class around all of that

import { spawnSync, spawn, execFile } from "node:child_process";
import path from "node:path";
import os from "node:os";

interface ProcessOptions {
cwd?: string;
quiet?: boolean;
detached?: boolean;
}

class LinuxError extends Error {
constructor(command: string, extraData?: string) {
super(`Running the '${command}' command caused this error`);
console.error(extraData);
}
}

export default class CLI {
static isLinux() {
const platform = os.platform();
return platform === "linux";
}

static isWindows() {
const platform = os.platform();
return platform === "win32";
}

static getAbsolutePath(filePath: string) {
return path.join(__dirname, path.normalize(filePath));
}

/**
*
* Synchronous linux command execution. Returns the stdout
*/
static linux_sync(command: string, args: string[] = []) {
try {
const { status, stdout, stderr } = spawnSync(command, args, {
encoding: "utf8",
});
if (stderr) {
throw new LinuxError(command, stderr);
}
return stdout;
} catch (e) {
console.error(e);
throw new LinuxError(command);
}
}

/**
* Asynchronous command execution for executable files
*
* @param filepath the path to the executable
* @param command any commands to pass to the executable
* @param options cli options
* @returns stdout or stderr
*/
static cmd(
filepath: string,
command: string,
options?: ProcessOptions
): Promise<string> {
const args = command
.match(/(?:[^\s"]+|"[^"]*")+/g)
?.map((arg) => arg.replace(/"/g, ""));
if (!args) {
throw new Error("Invalid command");
}
return new Promise((resolve, reject) => {
execFile(
filepath,
args,
{
maxBuffer: 500 * 1_000_000,
...options,
},
(error, stdout, stderr) => {
if (error) {
console.log(`Error executing ${path.basename(filepath)}:`, error);
reject(stderr);
} else {
resolve(stdout);
}
}
);
});
}

/**
* Asynchronous command execution for bash shell
*
* @param command the command to run
* @param options cli options
* @returns stdout or stderr
*/
static linux(command: string, options?: ProcessOptions): Promise<string> {
try {
// send back stderr and stdout
return new Promise((resolve, reject) => {
const child = spawn(command, {
shell: true,
...options,
});
let stdout = "";
let stderr = "";

child.stdout?.on("data", (data) => {
options?.quiet === false && console.log(data.toString());
stdout += data.toString();
});

child.stderr?.on("data", (data) => {
options?.quiet === false && console.log(data.toString());
stderr += data.toString();
});

child.on("close", (code) => {
if (code !== 0) {
reject(new LinuxError(command, stderr));
} else {
resolve(stdout);
}
});
});
} catch (e) {
throw new LinuxError(command);
}
}
}

Using 3rd party libraries: zx

Install like so:

npm i zx
npm i -D @types/fs-extra @types/node

Just like how you can do bun shell scripting with $, you can do the exact same thing with google's zx library, which uses tagged template literal functions and escapes and sanitizes all input.

import { $ } from 'zx';

await $`ls -la`;
const branch = await $`git branch --show-current`;
await $`mkdir -p ${branch}/src`;
  • $: tagged template literal function that runs shell commands asynchronously and returns a ProcessOptions object
  • $.sync: tagged template literal function that runs shell commands synchronously and returns a ProcessOptions object

Here is what the ProcessOptions object that is returned looks like, and you can just print it out with the toString() implementation.

class ProcessOutput {
readonly stdout: string
readonly stderr: string
readonly signal: string
readonly exitCode: number

toString(): string // Combined stdout & stderr.
}

Not awaiting the promise

The $ async function doesn't return a normal promise. Rather it returns a wrapper aorund that promise called a ProcessPromise, which has extra utilities like seeing the duration of the promise, what stage it is in, and even getting data from the promise without outputting to the command line.

When you don't await the promise, you can do stuff with it:

const p = $`echo 'foo\nbar'`

await p.text() // foo\n\bar\n
await p.text('hex') // 666f6f0a0861720a
await p.buffer() // Buffer.from('foo\n\bar\n')
await p.lines() // ['foo', 'bar']
await $`echo '{"foo": "bar"}'`.json() // {foo: 'bar'}

You can even consume it in an async generator fashion with a for ... await loop:

const p = $`echo "Line1\nLine2\nLine3"`
for await (const line of p) {
console.log()
}

You can use them in a stream-like fashion:

await $`echo "Hello, stdout!"`
.pipe('/tmp/output.txt') // pipes stream output to a file

You can also pipe shell commands together:

const greeting = await $`printf "hello"`
.pipe($`awk '{printf $1", world!"}'`)
.pipe($`tr '[a-z]' '[A-Z]'`)

echo(greeting)

Advantages and niche features

The zx library offers a couple of niche yet appreciated features that improves DX greatly:

  • No need to put anything like double quotes or single quotes, because anything interpolated with the tagged template literals
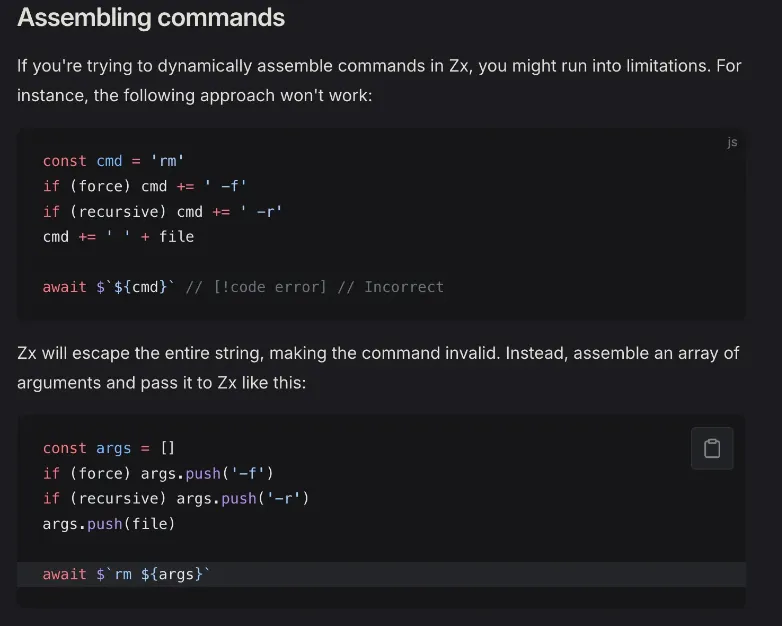
 ${...} is automatically parsed and put in single quotes.
  • You can pass in an array of flags instead of joining them with spaces.
const flags = [
'--oneline',
'--decorate',
'--color',
]
await $`git log ${flags}`

Since zx escapes everything by default, you can't use glob syntax. Instead, you have to use this glob() function:

const files = await glob('./**/*.md')
await $`ls ${files}`

Since zx escapes everything by default, you can't refer to the home directory with ~. Rather, you must get it programmatically through something like os.homedir()

await $`ls ${os.homedir()}/Downloads` // Correct

assembling commands

PM2

The pm2 command line tool which you can install with npm i -g pm2 allows you to run node programs as daemon threads, meaning that the will continue to run in the background perpetually until you yourself tell them to stop executing.

pm2 start my-node-program.js

PM2 commands

  • pm2 start <file>: starts the node program as a daemon thread
  • pm2 stop <file>: stops the node program
  • pm2 restart <file>: restarts the node program
  • pm2 delete <file>: deletes the node program from the list of programs that pm2 is managing
  • pm2 list: lists all the running pm2 programs

PM2 options

  • -l <logfile> : outputs logs to the specified log file
  • -o <logfile>: Log stdout from the script to the specified output file
  • -e <logfile>: Log stderr from the script to the specified error file
  • --watch: Watch for changes and restart the application
  • -n <name>: Set the name of the application in pm2

Here is an example with all these options put together:

pm2 start  -l forever.log -o out.log -e err.log -n app_name index.js --watch