Learning web performance
Intro
Web performance is a frontend problem, not backend. The only thing the server handles is serving the HTML, which accounts for 5% on average for total page load time.
Optimizing the backend is not a fruitful task. Our efforts are better spent optimizing the frontend.
Adopt a "mobile-first" mindset
Latency is the time delay between sending packets over an HTTP connection. The time it takes in milliseconds between a packet being sent and it being received.
- max latency for 4g network is 160ms
- max latency for 5g network is 50ms
The key to making our website performant is to make the website performant on mobile.
- 28% of the world is still on a 3G network, which has high latency, so we have to accommodate for them.
- Mobile phones have a CPU that is 8x weaker than those of computers, so page load will be 8x slower on mobile.
Types of rendering patterns
Client side rendering
Client-side rendering is where JavaScript is loaded and used to dynamically insert all the HTML for a website.
- pros: benefits from caching
- cons: Bad for SEO, performance, and has large JS bundle size.
Server side rendering
HTML is generated on the server and sent to the client.
- pros: super fast
- cons: not as dynamic as client-side rendering, and no soft navigations.
Static rendering
Static rendering is when the HTML for a page gets generated at build time and gets cached by the browser. This means the HTML lives right there in the browser cache, without any JavaScript to run and load it.
This pattern is ideal for pages that don't change, like landing pages or About pages.
Incremental static regeneration
Uses caching and cache invalidation to update static pages if any changes occur.
Core Web Vitals
The three core web vitals are LCP, DIF, and CLS, and we have to make sure we are in these ranges for these three performance benchmarks.
- Largest contentful paint: time it takes to render the largest element in the viewport
- First input delay (FID): Time it takes until the website is able to be interacted with
- Cumulative layout shift: How much elements shift layout around.
For these metrics, we have goal benchmarks we want to achieve:
- LCP: 2.5 - 4.0s
- FID: 100 - 300ms
- CLS: 0.1 - 0.25
LCP
LCP measures the time it takes for the largest element on the viewport (part of the screen that’s visible) to be rendered.
NOTE
This is the most useful user-centric metric because it perfectly captures how fast a website feels to a user if the biggest thing is rendered quickly. If the biggest element is rendered quickly, users feel like the website loads fast.
A good measure for LCP is anything below 2.5 seconds.
Approaches to reduce LCP
- Use a server-side framework to avoid render blocking javascript so the LCP image can immediately be rendered instead of having to load the javascript first to render it.
- Set
fetchpriority="high"on the LCP image to pre-download it and preload it by creating a preload link.
FID
FID is the time it takes until the website is able to be interacted with. The main issue behind a large FID is render-blocking JS.
Approaches to reduce FID
- Reduce render blocking JS by using workers or dynamic imports or code splitting.
CLS
To avoid CLS, you need to prevent elements from shifting across the page all the time. You can achieve this by setting aspect-ratio appropriate width= and height= attributes on all <img> elements.
Other Metrics
Time to first byte
TTFB is the time it takes to get the first byte of the web page (like index.html ).
First interactive
First interactive is the time it takes to finish executing the main thread. It is a user centric metric that when improved, also improves user experience.
Speed index
Speed index is a metric concerned with how fast a website’s loading feels. It measures the percentage of the page rendered every few milliseconds until the page completely loads. It is a user centric metric that when improved, also improves user experience.
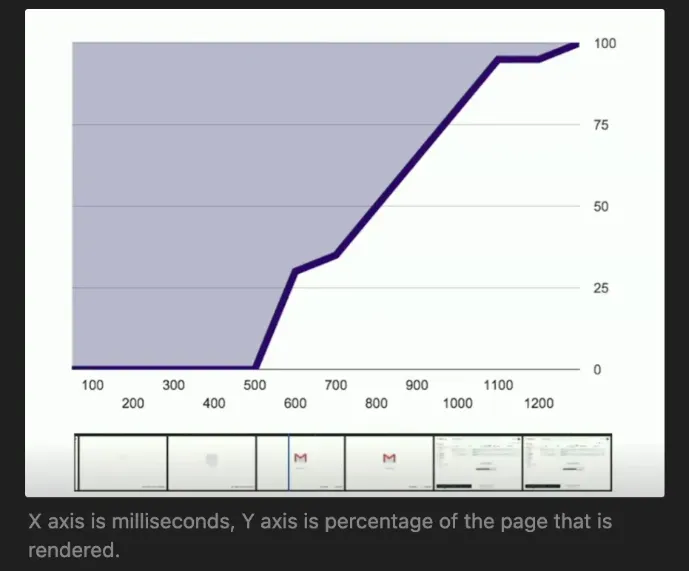
Speed index is measured by the area above the curve in the graph. The less of the area above the curve (the purple area), the better and faster the website feels.
WARNING
The lower the speed index, the better. A good speed index is less than 2.5
Basically, if a high percentage of the website is rendered early on rather than later, the website feels like it loaded faster.
- A website with 5 second page load but loads 90% of its content within the first second has a better speed index that a website with 5 second page load but loads only 20% of its content within the first second.
Images
CLS with images
Always, always, always specify a width= and height= for the image, supplying the original dimensions of the image so the browser knows how to display the image based on its aspect ratio.
Lazy Loading
We can add loading="lazy" attribute to images to lazy load them, only loading them when they are about to be scrolled into the viewport.
WARNING
Do not use lazy loading on your LCP image. It changes the fetch priority to low.
fetchpriority
The fetchpriority attribute determines the priority of a resource in the browser download queue.
We can set images in LCP with a fetchpriority="high" to immediately download them, and set things below the fold with a fetchpriority="low" .
<link rel="preload" href="lcp.png" as="image" fetchpriority="high" />
Resizing and optimizing images
HTML way
Use the <picture> element to choose different image sources depending on what the user's browser can handle.
<picture>
  <source srcset="image.avif" type="image/avif">
  <source srcset="image.webp" type="image/webp">
  <img src="image.jpg" alt="Description">
</picture>
You can also use the srcset and sizes attributes on the image tag to conditionally show different images depending on the width of the viewport.
<img srcset="elva-small.jpg 480w,
             elva-medium.jpg 800w,
             elva-large.jpg 1200w"
     sizes="(max-width: 600px) 480px,
            (max-width: 900px) 800px,
            1200px"
     src="elva-medium.jpg"
     alt="Elva dressed as a developer">
Resizing way
The first step is to create multiple copies of our images, all resized for different viewport sizes.
/**
 * PNG Resizer
 * Fundamentals of Web Performance
 *
 * Build tool to generate responsive sizes for all the images on the size and
 * put in the `r` directory.
 * @see https://jimp-dev.github.io/jimp/
 */

import { parse } from "node:path";
import { mkdir } from "node:fs/promises";
import { Jimp } from "jimp";
import { glob } from "glob";

const imageFolderPath = `public/assets/img`;

const filePaths = await glob(`${imageFolderPath}/*.png`);
const widths = [360, 720, 1024, 1400, 2800];

console.log("Generating Responsive Images");

await mkdir(`${imageFolderPath}/r`, { recursive: true });

filePaths.forEach(async (path) => {
  widths.forEach(async (width) => {
    const sourcePath = parse(path);
    const file = await Jimp.read(path);
    const resizedFile = await file.resize({ w: width });
    await resizedFile.write(
      `${imageFolderPath}/r/${sourcePath.name}-${width}${sourcePath.ext}`
    );
  });
});
Then the next step is to optimize them
/**
 * PNG Optimizer
 * Fundamentals of Web Performance
 *
 * Build tool to optimize the PNG images and place them in the `min` directory.
 *
 * If images have already been resized, the responsive images will be optimized
 * as well.
 *
 * @see https://www.npmjs.com/package/imagemin
 */

import imagemin from "imagemin";
import imageminPngquant from "imagemin-pngquant";

console.log("Optimizing PNG Images");

const imageFolderPath = `public/assets/img`;

await imagemin([`public/assets/img/**/*.png`], {
  destination: "public/assets/img/min",
  plugins: [
    imageminPngquant({
      quality: [0.6, 0.8],
    }),
  ],
});
Then the next step is to convert them into webP.
/**
 * WebP Converter
 * Fundamentals of Web Performance
 *
 * Build tool to optimize convert the optimized PNGs in the `min` directory
 * into WebP files, placed in the `webp` directory.
 *
 * @see https://www.npmjs.com/package/imagemin
 */

import imagemin from "imagemin";
import imageminWebp from "imagemin-webp";

console.log("Converting to WebP Images");

await imagemin(["public/assets/img/min/**/*.png", "public/assets/img/*.png"], {
  destination: "public/assets/img/webp",
  plugins: [imageminWebp({ quality: 50 })],
});
Using sharp
You can use the sharp npm package as a way to programmatically resize images and transform them really quick.
import sharp from "sharp";
import fs from "fs";
const sizes = [72, 96, 128, 144, 152, 192, 384, 512];
sizes.forEach((size) => {
  sharp("public/favicon.svg")
    .resize(size, size)
    .png()
    .toFile(`public/icon-${size}x${size}.png`, (err) => {
      if (err) console.error(err);
    });
});
Get better at performance
Performance tools
Do an audit of your site at https://pagespeed.web.dev/. Also go here: https://speedvitals.com/
Lighthouse
There are three modes in lighthouse for making a report:
- navigation: The default. Reloads the page and records page load and other metrics
- timespan: Records how a user interacts with the website over time. Records user interaction over a period of time and reports back
- snapshot: Takes a performance snapshot of the current page without reloading. Useful for SPAs where you don’t want to lose state
Improve time to first byte
You can improve time to first byte via these three methods:
- Use HTTP 3 over HTTP 2
- Enable GZIP and Brotli compression on your server.
- Use a CDN
HTTP3 vs HTTP2
HTTP 2 uses TCP connections, which is a redundant way of communicating ensuring lossless transfer of data.
HTTP3 uses UDP connections, which is just the server rapid-firing sending data to the user in a lossy manner, resending packets where they were lost.
NOTE
Try to use HTTP3 over HTTP2 whenever possible
Compression Strategies
You can use either GZIP or Brotli file compression to reduce file size and transfer over the wire when sending website assets to the browser because all browsers have built-in mechanisms for decompressing brotli and gzip files.
why would you want to use compression? Because it makes your TTFB metric faster. However, there are some tradeoffs between GZIP and Brotli:
GZIP
GZIP has been a web standard for compression for over two decades now, and offers decent levels of compression while being extremely fast to decompress. GZIP compression uses two techniques in their compression strategy:
- LZ77: This part of the algorithm finds repetitive sequences of bytes in the data and replaces them with pointers to previous occurrences. For example, if the word "the" appears multiple times, subsequent instances can be replaced with a reference to the first occurrence.
- Huffman Coding: This is a form of entropy encoding. It assigns variable-length codes to the data, with more frequent symbols receiving shorter codes and less frequent symbols receiving longer codes. This further reduces the overall size of the data.
NOTE
Since GZIP works at the binary level and not at the text level, it achieves standard performance on all assets, not just text-based files.
Brotli
Brotli is a newer compression algorithm developed by Google, and achieves higher compression than GZIP but suffers larger decompression times. They use 4 techniques that help them achieve stellar compression on text-based files:
- Dictionary-Based Compression: Brotli uses a pre-defined, static dictionary of common words, phrases, and code snippets found in web resources. This dictionary contains over 120,000 entries. When it encounters a sequence in the data that matches an entry in the dictionary, it can replace that sequence with a short reference to the dictionary entry. This is particularly effective for text-based web content like HTML, CSS, and JavaScript, which often contain repetitive patterns.
- Context Modeling: Brotli uses context modeling to predict the probability of the next symbol based on the surrounding symbols. This helps in more efficient entropy coding.
- Second-Order Context Modeling: This is an advanced technique where the prediction of the next symbol is based on the two preceding symbols, leading to even better compression.
- Improved Huffman Coding: Brotli utilizes a more sophisticated form of Huffman coding compared to Gzip.
NOTE
This approach on focusing on text-based compression makes Brotli the optimal choice for achieving high compression for text files, but the slow decompression time means you'll want to use Brotli for static assets that won't change too often.
GZIP vs Brotli
Here is the main tradeoff between GZIP and Brotli summarized:
- GZIP has low compression but fast at decompressing
- Brotli has high compression but slow at decompressing, (excels at text-based)
Therefore GZIP is the best bet for serving assets that change often (dynamic HTML routes) while Brotli is the best bet for serving assets that are mostly static (CSS , JS for PWA) and when you implement aggressive caching to not deal with the long decompression time.
implementing file compression
It's important to realize that you should only use GZIP and Brotli on text-based website assets, as you'll often want other compression methods to use for images, videos, and the like.
Here is a well-used strategy to implement file compression on your server:
- Content Negotiation: Modern web servers can use HTTP's
Accept-Encoding headerto determine which compression algorithms the user's browser supports. - Prioritize Brotli: Configure your server to prefer Brotli if the browser supports it (
brin the Accept-Encoding header). - Fallback to Gzip: If the browser does not support Brotli (or
bris not present in the header), fall back to Gzip (gzipin theAccept-Encodingheader). - No Compression: As a final fallback, serve the uncompressed resource if neither is supported.
Use aggressive caching when dealing with Brotli so you don't have to deal with serving the asset and making the browser decompress it again.
Speculative loading (reduce DNS connection time)
Speculative loading comes in two flavors:
- prefetching or prerendering: prefetch or prerender pages in your app using the speculation rules api
- preconnect: preconnect to websites that you will fetch from in your app
Here is how you can you make a preconnect link:
<link rel="preconnect" href="https://example.com" />
However, preconnecting is pretty expensive and should only be used for absolutely critical connections. For less critical connections, you should use the rel="dns-prefetch" to perform an inexpensive DNS lookup:
<link rel="dns-prefetch" href="https://example.com" />
GZIP and Brotli
Enabling GZIP and Brotli compression for your assets is as simple as your server sending down a header to use gzip or brolti for that asset.
Here is an express middleware that does it all:
const compression = require("http-compression");
const express = require("express");

express()
  .use(
    compression({
      // sensible defaults are already provided
    })
  )
  .use((req, res) => {
    // this will get compressed:
    res.end("hello world!".repeat(1000));
  })
  .listen(3000);
CDN
A CDN is a cache devilery network that basically stores a copy of your website in a region of your choice. For example, your server might be living in LA, but if you want to serve users in Australia without delay, you need a CDN set up somewhere in Australia.
The first time the user requests the CDN, it will be a cache miss and the CDN will have to take the long way around to request from the original server, but then it will have stored the copy of the website inside it and all succeeding requests will be cache hits.
Improve FCP
The browser can only download up to 5 resources in parallel, so at some point we have to start deciding which assets are the most essential to download first and make the site load faster.
To improve FCP, we need to do these three things:
- Remove sequence chains
- Preload resources
- Lazy load render-blocking JS
Remove sequence chains
You need to eliminate any dependencies in render-blocking resources like CSS and fonts, because if we do so, then we can parallelize downloading them.
For example, if your CSS requests a Google Font via URL and then requests another local CSS file via @import(), then you will create a dependency chain that is impossible to parallelize.
The solution is to create a single bundle for your CSS that includes all its dependencies inside it, so instead you just make 1 request to one massive thing instead of 5 requests to 5 semi-massive things that can't be parallelized.
Remove unused CSS or JS
On the chrome devtools, you can go to the coverage tab, which will show you the current assets being used ont he website and how much of the CSS or JS is unused. This lets you do cool things like only loading the CSS or JS when necessary.
Preload vs Prefetch
Two concepts that are vital to downloading essential resources ahead of time are preloading and prefetching:
- preloading: Downloads resources ahead of time and prioritizes them. Putting a
<link rel="preload" />tag in your HTML preloads that resource ahead of time and puts it in the beginning of the network waterfall. - prefetching: Downloads an entire URL ahead of time, which would be something like a website URL. This is useful for pre-downloading the next page in your site you think the user is going to click on.
NOTE
The key difference here: preloading is used for resources (CSS, images, JS) while prefetching is used for pages (HTML, URLs)
preloading
Preload is a declarative fetch request that tells the browser to request a resource that is otherwise not discoverable by the browser's preload scanner, such as an image referenced by the background-image property.
It's important to preload resources on the internet, like google fonts, CDNs, and external stylesheets, all these external or internal resources that are needed for the functionality and appearance of your web app.
Here are the attributes you should put on a <link> tag to make it preload a resource:
rel="preload": declares the link tag as a preload link, which the browser will then download and store it in the cache.href=: the resource to preloadas=: tells the browser what type of resource you are preloading, like"image","css", or"font"crossorigin: needed if you are requesting a resource over the internet. Otherwise it should be omitted.
<link rel="preload" href="lcp.png" as="image" />
The as= can have these values:
fetch: Resource to be accessed by a fetch or XHR request, such as an ArrayBuffer, WebAssembly binary, or JSON file.font: Font file.image: Image file.script: JavaScript file.style: CSS stylesheet.
If you are trying to preload a javascript file, it's better to use think link below, which handles loading javascript modules well:
<link rel="modulepreload" href="main.js" />
Preload rules:
- When everything is important, nothing is important. Only use preload to improve LCP, like preloading the hero image or preloading
- Do not preload anything that is visible in your HTML file like an inline
<img>tag. The browser already knows about it.
TIP
If you have fetchpriority="high" on an image, then you don't need to preload that image.
By telling the browser that you’d like to preload a certain resource, you’re telling the browser that you would like to fetch it sooner than the browser would otherwise discover it! Preloading is a great way to optimize the time it takes to load resources that are critical for the current route.
Although preloading resources are a great way to reduce the amount of roundtrips and optimize loading time, pushing too many files can be harmful. The browser’s cache is limited, and you may be unnecessarily using bandwidth by requesting resources that weren’t actually needed by the client.
Lazy loading JS
To lazy load JS and prevent it from being render blocking, put on it the type="module" or defer attribute.
Improve LCP
There are three things we need to do to improve LCP:
- Lazy load all non-LCP images and content
- Eager load all above-the-fold content and LCP images.
- Optimize images (compress them and serve them as webp)
Lazy loading non-LCP images
Just add the loading="lazy" attribute to load any non-LCP image, even if it's above-the-fold.
Eager load LCP images
Just use fetchpriority="high" on the LCP image
Optimize images
We need to serve different size images depending on the viewport size:
The <picture> element is a way of swapping out higher and lower resolution images to gain higher performance on mobile devices.
<picture>
  <source media="(min-width: 650px)" srcset="img_food.jpg" />
  <source media="(min-width: 465px)" srcset="img_car.jpg" />
  <img src="img_girl.jpg" />
</picture>
You nest <source> and <img> elements in a picture element.
<source>: a conditional image that will render an image based on the media query provided inmediaand the filepath provided insrcset.<img>: the default fallback for when none of the media queries match the source tags.
use speculation rules
Intro
Speculation rules can prerender or prefetch pages in a MPA like so:
<script type="speculationrules">
  {
    "prerender": [
      {
        "where": {
          "and": [
            { "href_matches": "/*" },
            { "not": { "href_matches": "/logout" } },
            { "not": { "href_matches": "/*\\?*(^|&)add-to-cart=*" } },
            { "not": { "selector_matches": ".no-prerender" } },
            { "not": { "selector_matches": "[rel~=nofollow]" } }
          ]
        }
      }
    ],
    "prefetch": [
      {
        "urls": ["next.html", "next2.html"],
        "requires": ["anonymous-client-ip-when-cross-origin"],
        "referrer_policy": "no-referrer"
      }
    ]
  }
</script>
- prefetching: downloads the html of the page, but none of the subresources in that page
- prerendering: loads an invisible tab and basically invisibly renders that entire page, putting it in the cache. Navigation to that page and page load will be instant.
In depth
The speculation rules API tries to prerender an entire page before a user navigates to it leading to instant navigation times.
It only works with multipage apps since you can only prerender multipage apps, and it only works with prefetching links from the same origin.
<script type="speculationrules">
  {
    "prerender": [
      {
        "urls": ["fish.html", "vegetatian-pho.html"]
      }
    ]
  }
</script>
You can also specify matches to URLs based on regex patterns or css selectors with the "where" key
<script type="speculationrules">
  {
    "prerender": [
      {
        "where": {
          "href_matches": "/*"
        }
      }
    ]
  }
</script>
<script type="speculationrules">
  {
    "prerender": [
      {
        "where": {
          "selector_matches": ".prerender"
        }
      }
    ]
  }
</script>
You can also combine multiple conditions into one with the where.and key
<script type="speculationrules">
  {
    "prerender": [
      {
        "where": {
          "and": [
            { "href_matches": "/*" },
            { "not": { "href_matches": "/wp-admin" } },
            { "not": { "href_matches": "/*\\?*(^|&)add-to-cart=*" } },
            { "not": { "selector_matches": ".do-not-prerender" } },
            { "not": { "selector_matches": "[rel~=nofollow]" } }
          ]
        }
      }
    ]
  }
</script>
Eagerness settings
You can dial in how fast speculation rules apply to your website. There are 4 settings, which you can set with the "eagnerness" key:
- immediate: Speculation rules immediately apply
- eager: a little less than immediate
- moderate: Speculation rules apply only after a user hovers over a link for 200 ms.
- convservative: Speculation rules apply only after the user clicks on a link
WARNING
There is an obvious tradeoff between a higher level of eagerness and page performance. Only do immediate eagerness on lightweight static sites where there is little to no overhead, and go for lower levels of eagerness on bigger, complex sites.
There is a limit on the number of rules you can have: 10 for prerender, 50 for prefetch.
Dynamically adding speculation rules with javascript
if (
  HTMLScriptElement.supports &&
  HTMLScriptElement.supports("speculationrules")
) {
  const specScript = document.createElement("script");
  specScript.type = "speculationrules";
  specRules = {
    prerender: [
      {
        urls: ["/next.html"],
      },
    ],
  };
  specScript.textContent = JSON.stringify(specRules);
  console.log("added speculation rules to: next.html");
  document.body.append(specScript);
}
Performance Patterns
PRPL pattern
PRPL is an acronym that describes a pattern used to make web pages load and become interactive, faster:
- Preload the late-discovered resources.
- Render the initial route as soon as possible.
- Pre-cache remaining assets.
- Lazy load other routes and non-critical assets.
The PRPL pattern focuses on four main performance considerations:
- Pushing critical resources efficiently, which minimizes the amount of roundtrips to the server and reducing the loading time.
- Rendering the initial route soon as possible to improve the user experience
- Pre-caching assets in the background for frequently visited routes to minimize the amount of requests to the server and enable a better offline experience
- Lazily loading routes or assets that aren’t requested as frequently
IMPORTANT
The main goal of the PRPL pattern is having critical speed to support slow internet connections. To reach this end, the goal is to minimize the amount of round-trips to the server, which is the main bottleneck for bad connections and low-end devices.
Here are the main tactics used in the PRPL pattern:
- use HTTP 2: uses the streaming capabilities of HTTP 2 to let the server continuously push data to the client without having to make multiple requests to the server.
- use service workers: Uses service workers to cache assets for speed.
- preloads critical resources: Uses the
preload=HTML attribute to preload critical resources like CSS and LCP images. - uses code splitting: Splits up javascript into many small bundles and preloads the critical first-page bundles. Caches the bundles as well.
RAIL pattern
RAIL is a user-centric performance model that structures an app’s life cycle into four actionable areas: Response, Animation, Idle, and Load.
Each area has a main goal that centers focus around a quantifiable metric to improve.
| Stage | User Expectation | Technical Budget | Strategy |
|---|---|---|---|
| Response | Instant feedback | 100 ms (handler <50 ms) | Lightweight handlers, defer heavy tasks |
| Animation | Smooth 60fps | 16 ms frame (script <10 ms) | CSS transitions, rAF, minimize layout shifts |
| Idle | Efficient background work | 50 ms chunks | requestIdleCallback, task chunking |
| Load | Page usable quickly | 5 s initial, 2 s repeat | Preload critical assets, defer others |
Response
The RAIL model says that each response should take no longer than 100ms. This means that the thread should never be frozen doing some synchronous work for more than 100ms.
Goal: to keep blocks of synchronous work time on a single thread under 100ms, and yield back to UI afterwards. Complete a transition initiated by user input within 100 ms, so users feel like the interactions are instantaneous.
Keeping a small response time and constantly yielding back to the main thread helps the uI feel fast and snappy for the user and improves UX.
Here are the two main strategies:
- Keep event handlers light
- Defer heavy work using setTimeout, requestIdleCallback
button.addEventListener("click", (e) => {
  // Quick response
  showSpinner();

  // Heavy lifting deferred
  requestIdleCallback(() => performComplexTask());
});
Guidelines:
- To ensure a visible response within 100 ms, process user input events within 50 ms. This applies to most inputs, such as clicking buttons, toggling form controls, or starting animations. This does not apply to touch drags or scrolls.
- Though it may sound counterintuitive, it's not always the right call to respond to user input immediately. You can use this 100 ms window to do other expensive work, but be careful not to block the user. If possible, do work in the background.
- For actions that take longer than 50 ms to complete, always provide feedback
Animation
To make animations feel buttery smooth, they should maintain 60 fps, meaning each frame must complete in 16 ms, with ~10 ms for script and ~6 ms for rendering
Goal: maintain animations in 60fps
The main strategy we have to achieve this is to use performant animation techniques like CSS transforms and make sure to do animation work in the requestAnimationFrame() function.
Idle
To make a page responsive to user input as quickly as possible, we need to defer all non-critical CSS and JS to load during idle time, and for all application logic work to also run during idle time.
Goal: Maximize idle time and use idle time to pre-load non-critical tasks in chunks ≤50 ms
let queue = heavyTasks.slice();

function processQueue(deadline) {
  while (deadline.timeRemaining() > 0 && queue.length) {
    doSmallPiece(queue.shift());
  }
  if (queue.length) {
    requestIdleCallback(processQueue);
  }
}
requestIdleCallback(processQueue);
Load
Goal: Interactive content ready
<5 son mid-range 3G, subsequent views in<2 s.
Improving JavaScript Performance
Memory Leaks in Js
There are 4 common culprits in JS for memory leaks:
- Creating global variables and not dereferencing them
- Creating variables in closures
- Creating too many event listeners and not cleaning them up
- Creating an interval with
setInterval()and not clearing it
You can discover memory leaks in the devtools in the memory pane. It will look something like this:
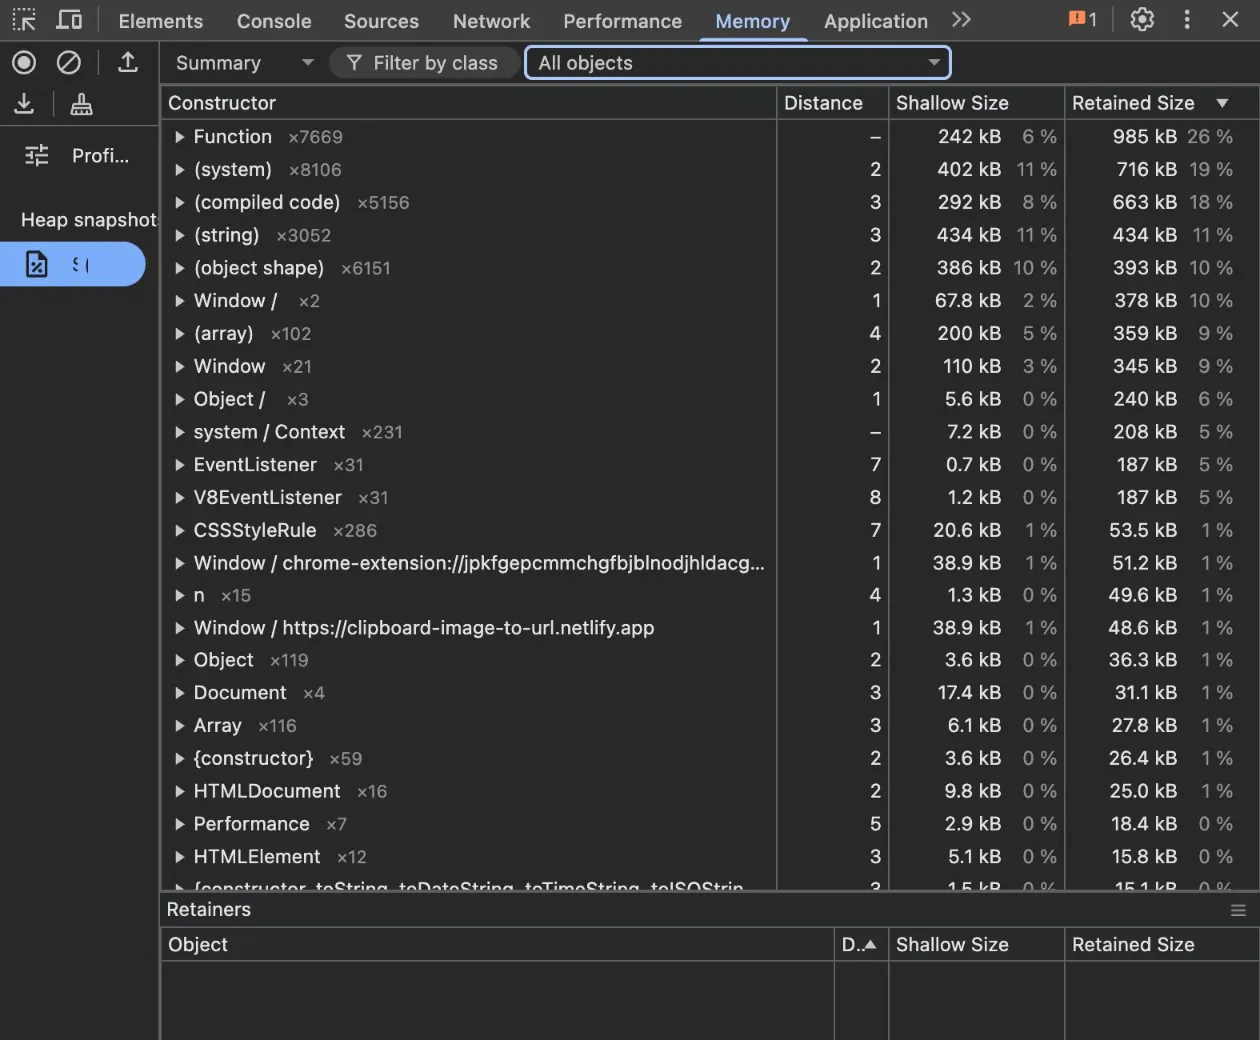
- shallow size: how much memory the object itself is taking up
- retained size: how much memory you would get back if you dereferenced that object, which includes calculations of how many references you have pointing to that same object.
Main thread work optimizations
Here are some articles:
Both the scheduler.yield() and requestIdleCallback() APIs are used as ways to break up long chunks of synchronous work happening on the main thread so that the thread can be yielded back to the user to make the UI feel responsive and snappy.
These two methods are a huge component in making great, responsive UIs.
The approaches below are not exhaustive, but I think they do a good job at representing the various trade-offs you should consider when breaking up long tasks. Still, depending on the need, I'd probably only reach for a subset of these myself.
-
If I can do the work off from the main thread, I'd choose a web worker, hands-down. They're very well supported across browsers, and their entire purpose is to offload work from the main thread. The only downside is their clunky API, but that's eased by tools like Workerize and Vite's built-in worker imports.
-
If I need a dead-simple way to break up tasks, I'd go for
scheduler.yield(). I don't love how I'd also need to polyfill it for non-Chromium users, but the majority of people would benefit from it, so I'm up for that extra bit of baggage. -
If I need very fine-grained control over how chunked work is prioritized,
scheduler.postTask()would be my choice. It's impressive how deep you can go in tailoring that thing to your needs. Priority control, delays, cancelling tasks, and more are all included in this API, even if, like.yield(), it needs to be polyfilled for now. -
If browser support and reliability are of the utmost importance, I'd just choose
setTimeout(). It's a legend that's not going anywhere, even as flashy alternatives hit the scene.
yield back to main thread (using scheduler)
Use await scheduler.yield() to break up long tasks, even if async, and yield back to the main thread. This helps keep the website responsive even as a long-running task is going on.
Imagine you're cooking dinner (your code). You pause briefly to stir a pot (UI tasks), then resume cooking.
scheduler.yield()lets the kitchen staff handle faster, urgent tasks before you continue, but puts you back to the front of the line when you're ready.
async function this_func_takes_10_secs() {
  // do some work
  await scheduler.yield();
  // do some work
  await scheduler.yield();
  // do some more work
}
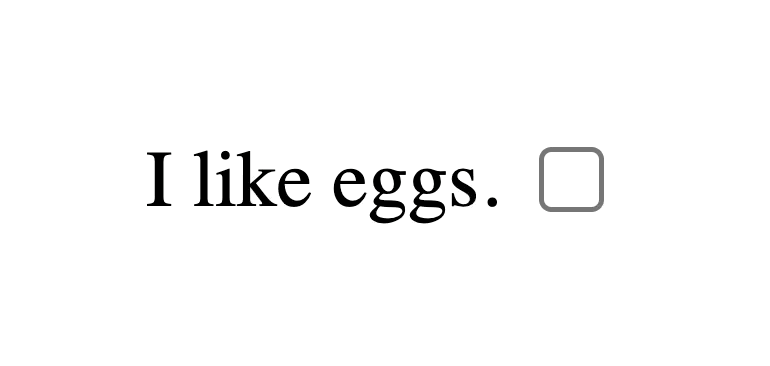
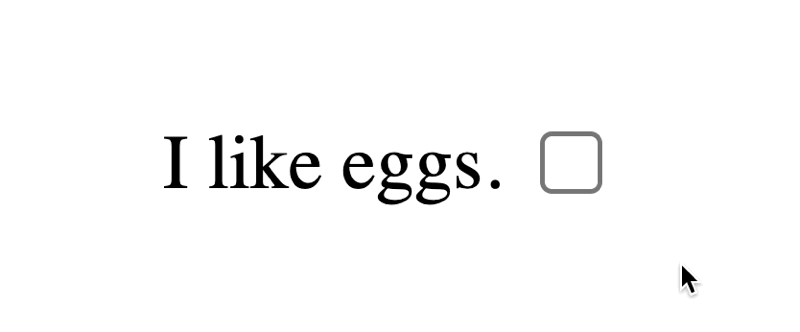
Here is an example of where when clicking a check box, some expensive work is immediately done, freezing the UI. This is because UI updates only occur AFTER the event listener finishes executing:
But now, let's immediately yield control to the browser, giving it a chance to update that UI after the click.
document
  .querySelector('input[type="checkbox"]')
  .addEventListener("change", async function (e) {
+    await scheduler.yield();

    waitSync(1000);
});
Look at that. Nice & snappy.
Here is a way to batch jobs and run them one at a time, yielding every 50ms:
async function runJobs(jobQueue: Function[], deadline = 50) {
  let lastYield = performance.now();

  for (const job of jobQueue) {
    // Run the job:
    job();

    // If it's been longer than the deadline, yield to the main thread:
    if (performance.now() - lastYield > deadline) {
      await scheduler.yield();
      lastYield = performance.now();
    }
  }
}
Run during idle time: requestIdleCallback()
requestIdleCallback() is a browser API that allows you to schedule non-urgent work to be executed during the browser’s idle time on the main thread.
Imagine you're at a coffee shop (the browser). The barista (main thread) is busy making drinks (rendering, layout, user interactions). You want to ask the barista a low-priority question (e.g., "Do you have WiFi?"). Instead of interrupting, you say: "Answer me when you’re not busy."
That’srequestIdleCallback().
NOTE
The main difference between using requestIdleCallback() vs scheduler.postTask() is that for requestIdleCallback(), it's not guaranteed that the deferred task will run. On top of that, MDN encourages a timeout over requestIdleCallback() for required work, so keep that in mind, to only use requestIdleCallback() for noncritical work.
The method below is the syntax for how it works, where the method accepts a callback to be run during idle time, and an object of options with these properties:
timeout: the maximum amount of time in milliseconds the callback can wait before execution. If the timeout is exceeded, then an error is thrown.
The requestIdleCallback() invocation returns a callbackId which you can use to cancel the idle callback execution with the cancelIdleCallback(callbackId) method.
const callbackId = requestIdleCallback(cb, options);
Here is a basic example of how to use something like this:
const callbackId = requestIdleCallback(
  () => {
    console.log("idle");
  },
  {
    timeout: 3000,
  }
);
Here are the main use cases for work that we would want to run in idle time:
- Analytics tracking
- Logging
- Background cache warming
- Preloading assets or routes
- Scheduling large DOM queries (like
getBoundingClientRect) - Syncing non-urgent data with localStorage or IndexedDB
Here are tasks that we should NOT run in idle time:
- Rendering UI: Too slow/unpredictable.
- Responsive feedback: Use
requestAnimationFrameorsetTimeout(...). - Critical I/O or fetches: Use standard promises or worker threads.
deadline
In the callback we pass to requestIdleCallback() function, that callback automatically passes one argument it is populated with: deadline. This argument represents the current state of the idle task and has these properties:
deadline.timeRemaining()→ approx. milliseconds of idle time leftdeadline.didTimeout→ was the callback forced to run due to timeout?
const thing = requestIdleCallback(
  (deadline) => {
    console.log(deadline.didTimeout);
    console.log(deadline.timeRemaining);
    console.log("idle");
  },
  {
    timeout: 3000,
  }
);
Here is a small, reusable code example:
function doIdleWork(
  cb: (options?: { timedOut: boolean }) => void,
  timeout?: number
) {
  const callbackId = requestIdleCallback(
    (deadline) => {
      cb({
        timedOut: deadline.didTimeout,
      });
    },
    {
      timeout,
    }
  );

  return {
    cancel: () => cancelIdleCallback(callbackId),
  };
}
And here is a full example:
function updateDomElementsInChunks(elements, chunkSize = 10) {
  let index = 0;

  function processChunk(deadline) {
    // While we have idle time and work to do
    while (index < elements.length && deadline.timeRemaining() > 0) {
      const end = Math.min(index + chunkSize, elements.length);
      for (let i = index; i < end; i++) {
        const el = elements[i];

        // ⚠️ This forces a layout reflow, be careful with batching!
        const rect = el.getBoundingClientRect();

        // Apply some non-blocking style changes
        el.style.opacity = rect.top < window.innerHeight ? "1" : "0.5";
      }

      index += chunkSize;
    }

    // If there's still work left, schedule next idle callback
    if (index < elements.length) {
      requestIdleCallback(processChunk);
    }
  }

  requestIdleCallback(processChunk);
}
class
IN this idle callback class, we expose methods to create a standard idle callback, and to do work in chunks recursively with the idle callback.
export class IdleCallback {
  doIdleWork(cb: (options?: { timedOut: boolean }) => void, timeout?: number) {
    const callbackId = requestIdleCallback(
      (deadline) => {
        cb({
          timedOut: deadline.didTimeout,
        });
      },
      {
        timeout,
      }
    );

    return {
      cancel: () => cancelIdleCallback(callbackId),
    };
  }

  createIdleChunkProcessor<T>(
    elements: T[],
    cb: (element: T) => void,
    options: {
      chunkSize?: number;
      timeout?: number;
    } = {}
  ) {
    const { chunkSize = 10, timeout } = options;
    let index = 0;
    let currentCallbackId: number | null = null;
    let cancelled = false;

    function cancel() {
      cancelled = true;
      if (currentCallbackId !== null) {
        cancelIdleCallback(currentCallbackId);
      }
    }

    function start() {
      cancelled = false;
      index = 0;

      function processChunk(deadline: IdleDeadline) {
        while (!cancelled && index < elements.length && !deadline.didTimeout) {
          const end = Math.min(index + chunkSize, elements.length);
          for (let i = index; i < end; i++) {
            cb(elements[i]);
          }
          index += chunkSize;
        }

        if (!cancelled && index < elements.length) {
          currentCallbackId = requestIdleCallback(processChunk, { timeout });
        }
      }

      currentCallbackId = requestIdleCallback(processChunk, { timeout });
    }

    return { start, cancel };
  }
}
Run during idle time (scheduler)
You can use the scheduler.postTask(cb) method to invoke a callback during idle time, which moves scheduled tasks into a queue for later completion.
const items = new Array(100).fill(null);

for (const i of items) {
  loopCount.innerText = Number(loopCount.innerText) + 1;

  await new Promise((resolve) => scheduler.postTask(resolve));

  waitSync(50);
}
You can even set priorities for scheduled tasks like so:
// high priority
scheduler.postTask(() => {
  console.log("postTask");
}, { priority: "user-blocking" });

// low priority
scheduler.postTask(() => {
  console.log("postTask - background");
}, { priority: "background" });
Here are what the different priority levels mean:
"user-blocking": intended for tasks critical to the user's experience on the page (such as responding to user input), not for big workloads."background": runs tasks in the background, intended for noncritical tasks