AI-slop-mastery
AI-assisted coding
The workflow
1) Context is king
- Problem: The more context you feed to your agent, the worse it performs. Keep context small.
- Solution: Use
/compactto compact and summarize your conversation history in claude code, or just prompt the AI to summarize the entire conversation history and put that into a markdown file, which you can then feed as context into a new chat.
2) Write E2E tests
End to end tests will give you the biggest bang for your buck.
3) Review every line of code
No excuses. If you didn't write it, then review it.
4) Abstract first
LLMs perform better when there is some sort of structure in your coding, for example, using TS or building abstractions in simple interfaces on top of third-party libraries will help the AI to understand your coding style, and it will build off of that.
5) Actually doing it
- Create a
features.mdto track features, describe them, and cross them off incrementally. - Always ask the agent to plan through solving a feature before implementing it.
- Always use a living document for features, saving progress you made on a feature and describing it so you can feed it as context even when starting a brand new convo.
Summary
-
Plan First: Never let the AI code without a
plan.md. Read the plan. If the plan is wrong, the code will be wrong. -
Give it Eyes (Harnesses): The AI cannot see the UI. Give it a
dry-runscript or anpm testso it can "see" if it broke something. -
Review is Mandatory: AI is not a replacement for knowing how to code. It is a replacement for typing. You must review every line (or use tools like Graphite/CodeRabbit for a second opinion).
Github Copilot
You can also use copilot on the web here:
Main use cases
- fix with copilot: You can highlight line(s), right click, and then use either modify with copilot or review with copilot to review the code, suggest any improvements, etc.
- regex: you can ask copilot to do regex for you
- generate commit messages for you: using the github GUI in vscode, you can commit AI-generated messages
Attaching context
You can attach context in the inline chat or in the chat sidebar by either manually adding files and images, or you can use these symbol prefixes to reference stuff in your codebase:
#: used to reference individual files, folders, symbols in your code (objects and types), content from the terminal, or an entire codebase@: used to reference different VSCode contexts, like@codebasefor your code,@terminalfor the terminal, or@workspacefor the current VSCode workspace. These are only available in the sidebar chat.
You can attach context in the inline chat by clicking CTRL + I twice to get a list of slash commands and available contexts.
Running terminal commands
With the chat sidebar, you can first type @terminal to give github copilot access to your terminal context, and then it will write a command to run based on the prompt.
You can also do CTRL + I in the terminal to popup an inline chat in the terminal to run commands there.
Slash commands
Copilot has a variety of slash commands that make doing monotonous tasks like documentation, fixing code, and creating unit tests much much easier. You can view a list of slash commands by clicking CTRL + I twice or by typing them manually in the chat sidebar.
Here are the most useful ones:
/explain: explains the selected code/fix: fixes the selected code/doc: creates documentation for the selected code, like JSdoc/tests: creates unit tests for the selected code
Github copilot CLI
The gh copilot CLI can be installed like so:
gh extension install github/gh-copilot
You can then use it to generate terminal commands:
gh copilot suggest "create a basic nextjs app"
Copilot Extensions
Copilot Extensions are 3rd party extensions that add additional context options with the @symbol to github copilot in your VSCode.
Go here for a list of all extensions
Here are the useful ones:
Agentic search
Go to the agentic search extensionin order to use agentic search capabilities, using cookies, etc.
prisma
Provides additional context for asking questions abotu prisma
neon db
Provides an additional context for asking questions about neon db.
Copilot instruction files
You can add copilot instruction files in the chat options, which apply to certain files or to all files. Think of these as a style guide and a way to let copilot know what your porject is about.
Enabling mcp
- Create a
.vscode/mcp.json - Specify mcp servers like so:

Cursor
Inline chat
The inline chat in cursor has several options for what you can do with it by first typing CTRL + K to bring up the inline chat, and then typing @ for context options.
You can also instead of asking it to generate or edit code, ask a quick question about it in the inline chat:
Adding context
You can add context with the @ symbol as a prefix.
@docs: adds documentation@web: tells cursor to do a web search@<filename>: adds the specific file as context
Adding docs
You can add certain websites' documentation to cursor, and cursor will index it and be able to reference it via the @docs context command. There are two ways to add documentation to certain websites you want:
- Add when prompted to add a new documentation when typing the
@docscommand - Add in the cursor features settings.
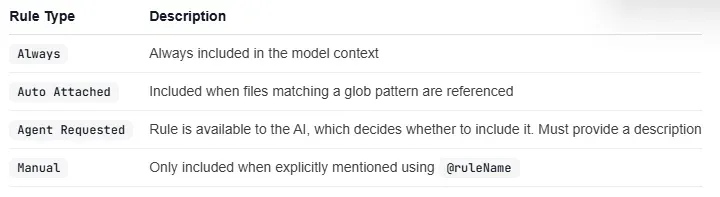
Cursor rules
Cursor rules are a new way to enforce coding style and give cursor additional context when you're chatting with it. There are 4 ways to create rules:
- Rules live in the
.cursor/rulesfolder in your workspace, and are single text.mdcfile. - You can also create a rule in the command palette in cursor
- You can ask cursor chat to create a rule for your project with the
/Generate cursor rulesslash command. - Go to cursor settings -> project settings -> and create rules.
Here are the 4 types of rules you can have:
 Here is an example of a cursor mdc rule, where yu can add in additional file context as well with @ symbols.
---
description: RPC Service boilerplate
globs:
alwaysApply: false
---

- Use our internal RPC pattern when defining services
- Always use snake_case for service names.

@service-template.ts
You can get a list of reusable rules for each language that makes working on your codebase even better:
Antigravity
Intro
Open up the current folder in antigravity using the agy command
- implementation plans: WHen you're in planning mode you'll be able to create implementation plans and then you can even comment on those plans to have the AI implement your suggestions.
- inbox: when you click on the home screen icon, you're taking to a place where you can start a bunch of AI threads in parallel and they can even work on the same project.
COpilot CLI
The copilot command lets you pull up github copilot and use it like claude code. Everything there still applies.
Here are also some one-off prompts you can do:
copilot "create a bash script to check for uncommitted changes and push if clean"
CLI options
-p <prompt>: lets you do a one-off promp--allow-all-tools: gives copilot access to all tools. Maybe you want to run this in a dev container.
Here's a useful alias that lets you run a one-off prompt with all tools allowed
cpcli='copilot --allow-all-tools -p "$@"'
Then you can use like so:
cpcli "Explain each of these scripts and offer improvements"
Use cases and example prompts:
- Review the project README to make it easier for newcomers to understand
- What is taking up the most space on my own laptop?
Gemini CLI
CLI options
You can get just the text content of prompting an AI using the -p option, which can be useful for some quick prompting or even just running an AI without the SDK:
gemini -p "What is fine tuning?"
going YOLO mode
TO go yolo mode and accept all tool calls automatically, the first thing you'll want to do is to go into a sandbox and make sure nothing gets broken. You'll use these two commands:
--sandbox: runs in sandbox mode via a docker image--sandbox-image: optionally set the dockerhub iamge URL if you want the sandbox image to start from a different image.--yolo: sets yolo mode
However, yolo mode by default enters a sandbox, so you don't need that.
Thus the command to enter YOLO mode would look like so:
gemini --yolo
reference
--model <model_name>(-m <model_name>):- Specifies the Gemini model to use for this session.
- Example:
npm start -- --model gemini-1.5-pro-latest
--prompt <your_prompt>(-p <your_prompt>):- Used to pass a prompt directly to the command. This invokes Gemini CLI in a non-interactive mode.
--sandbox(-s):- Enables sandbox mode for this session.
--sandbox-image:- Sets the sandbox image URI.
--debug(-d):- Enables debug mode for this session, providing more verbose output.
--all-files(-a):- If set, recursively includes all files within the current directory as context for the prompt.
--help(or-h):- Displays help information about command-line arguments.
--show-memory-usage:- Displays the current memory usage.
--yolo:- Enables YOLO mode, which automatically approves all tool calls.
--telemetry:- Enables telemetry.
--telemetry-target:- Sets the telemetry target. See telemetry for more information.
--telemetry-otlp-endpoint:- Sets the OTLP endpoint for telemetry. See telemetry for more information.
--telemetry-log-prompts:- Enables logging of prompts for telemetry. See telemetry for more information.
--checkpointing:- Enables checkpointing.
--extensions <extension_name ...>(-e <extension_name ...>):- Specifies a list of extensions to use for the session. If not provided, all available extensions are used.
- Use the special term
gemini -e noneto disable all extensions. - Example:
gemini -e my-extension -e my-other-extension
--list-extensions(-l):- Lists all available extensions and exits.
--version:- Displays the version of the CLI.
Slash commands
-
/docs: brings up the Docs. -
/chat- Description: Save and resume conversation history for branching conversation state interactively, or resuming a previous state from a later session.
- Sub-commands:
save- Description: Saves the current conversation history. You must add a
<tag>for identifying the conversation state. - Usage:
/chat save <tag>
- Description: Saves the current conversation history. You must add a
resume- Description: Resumes a conversation from a previous save.
- Usage:
/chat resume <tag>
list- Description: Lists available tags for chat state resumption.
-
/clear- Description: Clear the terminal screen, including the visible session history and scrollback within the CLI. The underlying session data (for history recall) might be preserved depending on the exact implementation, but the visual display is cleared.
- Keyboard shortcut: Press Ctrl+L at any time to perform a clear action.
-
/compress- Description: Replace the entire chat context with a summary. This saves on tokens used for future tasks while retaining a high level summary of what has happened.
-
/editor- Description: Open a dialog for selecting supported editors.
-
/help(or/?)- Description: Display help information about the Gemini CLI, including available commands and their usage.
-
/mcp- Description: List configured Model Context Protocol (MCP) servers, their connection status, server details, and available tools.
- Sub-commands:
descordescriptions:- Description: Show detailed descriptions for MCP servers and tools.
nodescornodescriptions:- Description: Hide tool descriptions, showing only the tool names.
schema:- Description: Show the full JSON schema for the tool's configured parameters.
- Keyboard Shortcut: Press Ctrl+T at any time to toggle between showing and hiding tool descriptions.
-
/memory- Description: Manage the AI's instructional context (hierarchical memory loaded from
GEMINI.mdfiles). - Sub-commands:
add:- Description: Adds the following text to the AI's memory. Usage:
/memory add <text to remember>
- Description: Adds the following text to the AI's memory. Usage:
show:- Description: Display the full, concatenated content of the current hierarchical memory that has been loaded from all
GEMINI.mdfiles. This lets you inspect the instructional context being provided to the Gemini model.
- Description: Display the full, concatenated content of the current hierarchical memory that has been loaded from all
refresh:- Description: Reload the hierarchical instructional memory from all
GEMINI.mdfiles found in the configured locations (global, project/ancestors, and sub-directories). This command updates the model with the latestGEMINI.mdcontent.
- Description: Reload the hierarchical instructional memory from all
- Note: For more details on how
GEMINI.mdfiles contribute to hierarchical memory, see the CLI Configuration documentation.
- Description: Manage the AI's instructional context (hierarchical memory loaded from
-
/restore- Description: Restores the project files to the state they were in just before a tool was executed. This is particularly useful for undoing file edits made by a tool. If run without a tool call ID, it will list available checkpoints to restore from.
- Usage:
/restore [tool_call_id] - Note: Only available if the CLI is invoked with the
--checkpointingoption or configured via settings. See Checkpointing documentation for more details.
-
/stats- Description: Display detailed statistics for the current Gemini CLI session, including token usage, cached token savings (when available), and session duration. Note: Cached token information is only displayed when cached tokens are being used, which occurs with API key authentication but not with OAuth authentication at this time.
-
- Description: Open a dialog that lets you change the visual theme of Gemini CLI.
-
/auth- Description: Open a dialog that lets you change the authentication method.
-
/about- Description: Show version info. Please share this information when filing issues.
-
- Description: Display a list of tools that are currently available within Gemini CLI.
- Sub-commands:
descordescriptions:- Description: Show detailed descriptions of each tool, including each tool's name with its full description as provided to the model.
nodescornodescriptions:- Description: Hide tool descriptions, showing only the tool names.
-
/privacy- Description: Display the Privacy Notice and allow users to select whether they consent to the collection of their data for service improvement purposes.
-
/quit(or/exit)- Description: Exit Gemini CLI.
Memory
You should use a GEMINI.md file kind of the same way as a cursor rule - type it to be full of rules that the AI should listen to, like info about the project PRD and the tech stack.
You can use the /memory show slash command to view gemini's current memory in the current workspace. Since gemini has access to the memory tool, you can also tell it to update its memory, remove stuff from its memory, and that will lead to it having better responses.
Whenever you feel like memory is getting stale and the AI has lost the plot of your gemini rules in the GEMINI.md, you can always refeed it again and refresh the memory through this slash command:
/memory refresh
Adding files to context
You can refer to specific files in context using the @ prefix, which explicitly tells gemini to use file reading tools. By default, files and folders in your .gitignore are excluded from reading.
- Git-aware filtering: By default, git-ignored files (like
node_modules/,dist/,.env,.git/) are excluded. This behavior can be changed via thefileFilteringsettings.
Settings
Here is the complete documentation on how to configure your gemini CLI on the user level, system level, and project level.

All project level config lives inside the .gemini folder, and there are special files you can put in their that configure the behavior of the Gemini CLI.
settings.json
The settings.json file configures the CLI settings for the project, like enabling/disabling tools, adding MCP servers, etc.
- user level config: to set global gemini CLI settings, go to this path:
~/.gemini/settings.json - project level config: to set project level gemini CLI settings, create a
.gemini/settings.jsonfile in the cwd.
{
  // -- UI & THEME SETTINGS --
  // These settings control the look and feel of the Gemini CLI.

  "theme": "GitHub",
  // Sets the visual theme. "Default" is the standard theme.
  // Check the documentation for other available themes.

  "hideBanner": false,
  // Set to true if you want to hide the ASCII art logo on startup.

  "hideTips": false,
  // Set to true to disable the helpful tips that appear in the UI.


  // -- CONTEXT & MEMORY --
  // Configure how the CLI understands the context of your project.

  "contextFileName": "GEMINI.md",
  // Specifies the file name for loading instructional context. The CLI
  // searches for this file in the current directory, parent directories,
  // and sub-directories to build a hierarchical context for the model.
  // You can provide a single string or an array of strings (e.g., ["GEMINI.md", "CONTEXT.md"]).


  // -- TOOL & COMMAND SETTINGS --
  // Control how the model interacts with built-in and custom tools.

  "autoAccept": false,
  // If set to true, the CLI automatically executes tool calls that are
  // considered  (e.g., read-only operations) without asking for confirmation.
  // This can speed up your workflow, but use it with caution.

  "coreTools": [
    "read_file",
    "glob",
    "run_shell_command(ls)",
    "run_shell_command(cat)"
  ],
  // Whitelists specific built-in tools for the model to use, enhancing security.
  // If this setting is omitted, all core tools are available.
  // You can also restrict shell commands to specific patterns, as shown above.

  "excludeTools": [
    "run_shell_command(rm -rf)"
  ],
  // Blacklists specific tools or commands. This is less secure than `coreTools`.
  // A tool listed in both `coreTools` and `excludeTools` will be excluded.
  // Note: Command restrictions are based on simple string matching and can be bypassed.


  // -- SANDBOXING FOR SECURITY --
  // Isolate tool execution to protect your system.

  "sandbox": "docker",
  // Controls the sandboxing environment for executing tools.
  // - "false" (default): No sandboxing.
  // - "true" or "docker": Uses a pre-built Docker image for sandboxing.
  // This is highly recommended when allowing the model to execute shell commands.


  // -- FILE DISCOVERY --
  // Define how the CLI finds files for @-mentions and other file operations.

  "fileFiltering": {
    "respectGitIgnore": true,
    "enableRecursiveFileSearch": true
  },
  // "respectGitIgnore": When true, files and directories listed in your .gitignore
  // (like node_modules/, dist/, .env) are automatically excluded.
  // "enableRecursiveFileSearch": When true, allows recursively searching for
  // files in subdirectories when you use the @ prefix in a prompt.


  // -- CUSTOM TOOLS (ADVANCED) --
  // For integrating your own project-specific tools.

  "toolDiscoveryCommand": "bin/get_tools",
  // A custom shell command that returns a JSON array of function declarations
  // for your project's tools.

  "toolCallCommand": "bin/call_tool",
  // A custom shell command to execute a tool discovered via `toolDiscoveryCommand`.
  // It receives the tool name as an argument and its parameters as JSON on stdin.


  // -- TELEMETRY & USAGE STATISTICS --
  // Help improve the Gemini CLI by sharing anonymous data.

  "telemetry": {
    "enabled": false,
    "target": "local",
    "otlpEndpoint": "http://localhost:4317",
    "logPrompts": false
  },
  // Configures telemetry for debugging and monitoring.
  // "enabled": Set to true to turn on telemetry.
  // "target": Can be "local" or "gcp".
  // "logPrompts": Set to true to include prompt content in logs (use with care for privacy).

  "usageStatisticsEnabled": true,
  // Set to false to opt-out of sending anonymized usage statistics.
  // We don't collect any PII, prompt content, or file content. Disabling this
  // just means we have less data to guide improvements.


  // -- SESSION MANAGEMENT --

  "maxSessionTurns": -1
  // Sets the maximum number of conversation turns before a session is automatically reset.
  // A "turn" consists of one user prompt and one model response.
  // The default, -1, means the session is unlimited.
}
TIP
Note on environment variables in settings: String values within your settings.json files can reference environment variables using either $VAR_NAME or ${VAR_NAME} syntax. These variables will be automatically resolved when the settings are loaded. For example, if you have an environment variable MY_API_TOKEN, you could use it in settings.json like this: "apiKey": "$MY_API_TOKEN".
contextFileName(string or array of strings): a list of files to use as context or equivalent of cursor rules for the current gemini session.
By far the most important properties are the ones enabling and disabling tools, allowing you to get as granular as allowlisting certain commands or blacklisting them:
-
coreTools(array of strings):- Description: Allows you to specify a list of core tool names that should be made available to the model. This can be used to restrict the set of built-in tools. See Built-in Tools for a list of core tools. You can also specify command-specific restrictions for tools that support it, like the
ShellTool. For example,"coreTools": ["ShellTool(ls -l)"]will only allow thels -lcommand to be executed. - Default: All tools available for use by the Gemini model.
- Example:
"coreTools": ["ReadFileTool", "GlobTool", "ShellTool(ls)"].
- Description: Allows you to specify a list of core tool names that should be made available to the model. This can be used to restrict the set of built-in tools. See Built-in Tools for a list of core tools. You can also specify command-specific restrictions for tools that support it, like the
-
excludeTools(array of strings):- Description: Allows you to specify a list of core tool names that should be excluded from the model. A tool listed in both
excludeToolsandcoreToolsis excluded. You can also specify command-specific restrictions for tools that support it, like theShellTool. For example,"excludeTools": ["ShellTool(rm -rf)"]will block therm -rfcommand. - Default: No tools excluded.
- Example:
"excludeTools": ["run_shell_command", "findFiles"]. - Security Note: Command-specific restrictions in
excludeToolsforrun_shell_commandare based on simple string matching and can be easily bypassed. This feature is not a security mechanism and should not be relied upon to safely execute untrusted code. It is recommended to usecoreToolsto explicitly select commands that can be executed.
- Description: Allows you to specify a list of core tool names that should be excluded from the model. A tool listed in both
-
autoAccept(boolean):- Description: Controls whether the CLI automatically accepts and executes tool calls that are considered safe (e.g., read-only operations) without explicit user confirmation. If set to
true, the CLI will bypass the confirmation prompt for tools deemed safe. - Default:
false - Example:
"autoAccept": truesandbox(boolean or string):
- Description: Controls whether the CLI automatically accepts and executes tool calls that are considered safe (e.g., read-only operations) without explicit user confirmation. If set to
-
Description: Controls whether and how to use sandboxing for tool execution. If set to
true, Gemini CLI uses a pre-builtgemini-cli-sandboxDocker image. For more information, see Sandboxing. -
Default:
false -
Example:
"sandbox": "docker
Enabling MCP servers
To enable MCP servers per project, you can add them through the mcpServers key like so:
"mcpServers": {
  "myPythonServer": {
    "command": "python",
    "args": ["mcp_server.py", "--port", "8080"],
    "cwd": "./mcp_tools/python",
    "timeout": 5000
  },
  "myNodeServer": {
    "command": "node",
    "args": ["mcp_server.js"],
    "cwd": "./mcp_tools/node"
  },
  "myDockerServer": {
    "command": "docker",
    "args": ["run", "-i", "--rm", "-e", "API_KEY", "ghcr.io/foo/bar"],
    "env": {
      "API_KEY": "$MY_API_TOKEN"
    }
  }
}
Blocking tool use
You can restrict the shell commands that can be executed by the run_shell_command tool by using the tools.core and tools.exclude settings in your config file:
tools.core: Specifies an allowlist of commands.tools.exclude: Specifies a blocklist of commands. The blocklist takes precedence over the allowlist.
Here is an example config that allows git commands but blocks git push commands:
{
// ...
 "tools": {
	  "core": [ "run_shell_command(git)" ],
	  "exclude": [ "run_shell_command(git push)" ]
 }
 // ...
}
Using tools
You can use tools automatically with gemini through just its automatic tool selection capability, but you can also manually invoke them, which may be useful, by just invoking these bash methods:
web fetch
web_fetch(
	prompt="Can you summarize the main points of https://example.com/news/latest"
)
google search
google_web_search(query="Your query goes here.")
Sandboxing
There are three different ways to sandbox a one-off gemini CLI run or a TUI session into an isolated docker container:
- Run with the
--sandboxoption - Export the
GEMINI_SANDBOX=trueenv var into the current shell session - Set the
tools.sandboxkey in thesettings.jsonto"docker".
# Enable sandboxing with a command-line flag
gemini --sandbox --prompt "run the test suite"

# Use environment variable
export GEMINI_SANDBOX=true
gemini --prompt-interactive "explain this code"

# Configure in settings.json
{
  "tools": {
    "sandbox": "docker"
  }
}
Agent skills
You can add custom agent skills to gemini, which gemini will recognize in a .agents/skills folder or the .gemini/skills folder.
To enable globally available skills and have them be automatically recognized, put them in the ~/.agents/skills folder.
CLI
gemini skills list: lists all active skills
Here's the complete way to use the cli:
# List all discovered skills
gemini skills list

# Link agent skills from a local directory via symlink
# Discovers skills (SKILL.md or */SKILL.md) and creates symlinks in ~/.gemini/skills
# (or ~/.agents/skills)
gemini skills link /path/to/my-skills-repo

# Link to the workspace scope (.gemini/skills or .agents/skills)
gemini skills link /path/to/my-skills-repo --scope workspace

# Install a skill from a Git repository, local directory, or zipped skill file (.skill)
# Uses the user scope by default (~/.gemini/skills or ~/.agents/skills)
gemini skills install https://github.com/user/repo.git
gemini skills install /path/to/local/skill
gemini skills install /path/to/local/my-expertise.skill

# Install a specific skill from a monorepo or subdirectory using --path
gemini skills install https://github.com/my-org/my-skills.git --path skills/frontend-design

# Install to the workspace scope (.gemini/skills or .agents/skills)
gemini skills install /path/to/skill --scope workspace

# Uninstall a skill by name
gemini skills uninstall my-expertise --scope workspace

# Enable a skill (globally)
gemini skills enable my-expertise

# Disable a skill. Can use --scope to specify workspace or user (defaults to workspace)
gemini skills disable my-expertise --scope workspace
Plan mode
You can have gemini follow a plan by just telling it to plan out a feature:

You can also use the /plan command to manually trigger plan mode, and then send messages mid-conversation to steer the agent in the right direction.
MCP
You can enable mcp servers in the gemini settings JSON:
- Open
~/.gemini/settings.json(or the project-specific.gemini/settings.json). - Add the
mcpServersblock. This tells Gemini: “Run this docker container and talk to it.”
{
  "mcpServers": {
    "github": {
      "command": "docker",
      "args": [
        "run",
        "-i",
        "--rm",
        "-e",
        "GITHUB_PERSONAL_ACCESS_TOKEN",
        "ghcr.io/github/github-mcp-server:latest"
      ],
      "env": {
        "GITHUB_PERSONAL_ACCESS_TOKEN": "${GITHUB_PERSONAL_ACCESS_TOKEN}"
      }
    }
  }
}
TIP
TO avoid hardcoding secrets into the settings JSON, you can first export any secrets as an environment variable into the current session and then you can interpolate via ${} syntax in the JSON file.
To verify connections, you can use the /mcp command:
/mcp list: lists all currently active MCP servers/mcp reload: reloads the MCP server
Claude code
CLAUDE.md
The CLAUDE.md file is based on three facts about LLM agents:
- Coding agents know absolutely nothing about your codebase at the beginning of each session.
- The agent must be told anything that's important to know about your codebase each time you start a session.
CLAUDE.mdis the preferred way of doing this.
This file should clarify three questions:
- WHAT: tell Claude about the tech, your stack, the project structure. Give Claude a map of the codebase. This is especially important in monorepos! Tell Claude what the apps are, what the shared packages are, and what everything is for so that it knows where to look for things
- WHY: tell Claude the purpose of the project and what everything is doing in the repository. What are the purpose and function of the different parts of the project?
- HOW: tell Claude how it should work on the project. For example, do you use
buninstead ofnode? You want to include all the information it needs to actually do meaningful work on the project. How can Claude verify Claude's changes? How can it run tests, typechecks, and compilation steps?
To write a good CLAUDE.md file, we should follow these core principles:
CLAUDE.mdis for onboarding Claude into your codebase. It should define your project's WHY, WHAT, and HOW.- Less (instructions) is more. While you shouldn't omit necessary instructions, you should include as few instructions as reasonably possible in the file.
- Keep the contents of your
CLAUDE.mdconcise and universally applicable. - Use Progressive Disclosure - don't tell Claude all the information you could possibly want it to know. Rather, tell it how to find important information so that it can find and use it, but only when it needs to to avoid bloating your context window or instruction count. Also, don't embed files directly with
@, as that bloats the context. Just reference the file. - Claude is not a linter. Use linters and code formatters, and use other features like Hooks and Slash Commands as necessary.
CLAUDE.mdis the highest leverage point of the harness, so avoid auto-generating it. You should carefully craft its contents for best results.
ANother 4 principles:
-
Start with Guardrails, Not a Manual. Your
CLAUDE.mdshould start small, documenting based on what Claude is getting wrong. -
Don’t
@-File Docs. If you have extensive documentation elsewhere, it’s tempting to@-mention those files in yourCLAUDE.md. This bloats the context window by embedding the entire file on every run. But if you just mention the path, Claude will often ignore it. You have to pitch the agent on why and when to read the file. “For complex … usage or if you encounter aFooBarError, seepath/to/docs.mdfor advanced troubleshooting steps.” -
Don’t Just Say “Never.” Avoid negative-only constraints like “Never use the
--foo-barflag.” The agent will get stuck when it thinks it must use that flag. Always provide an alternative. -
Use
CLAUDE.mdas a Forcing Function. If your CLI commands are complex and verbose, don’t write paragraphs of documentation to explain them. That’s patching a human problem. Instead, write a simple bash wrapper with a clear, intuitive API and document that. Keeping yourCLAUDE.mdas short as possible is a fantastic forcing function for simplifying your codebase and internal tooling.
principle 1 - Keep your claude md small
As instruction count increases, instruction-following quality decreases uniformly. This means that as you give the LLM more instructions, it doesn't simply ignore the newer ("further down in the file") instructions - it begins to ignore all of them uniformly
This implies that your CLAUDE.md file should contain as few instructions as possible - ideally only ones which are universally applicable to your task.
TIP
Aim for a CLAUDE.md less than 60 lines long
principle 2 - use progressive disclosure
The term Progressive disclosure is just a fancy way of saying to reference different markdown files inside your CLAUDE.md file and then give brief descriptions of those files so that Claude can decide whether or not to read those markdown files.
However, referencing files directly with the @ prefix is NOT progressive disclosure, as that just completely embeds the file content into the context.
Rather, in the CLAUDE.md, to implement progressive disclosure, just reference the filepath and describe what that file does, and claude will decide whether or not to look at that md file.
CLI options
claude -p <prompt>: runs a one-off promptclaude --model=<model>: runs claude with a specific model. Here are the different values you can pass for the--modelparameter:sonnetopushaiku
claude --continue: continue off from the last sessionclaude --resume: resume a specific session.
Keyboard shortcuts
- auto accept mode: TO enter auto accept mode for edits, press
shift + tabkeyboard shortcut - plan mode: TO enter plan mode, press
shift + tabtwice
Slash options
When inside a conversation with claude code, you have access to these special slash commands:
/model <model>: change the model mid convo to one ofhaiku,sonnet, oropus/compact: compacts previous conversation history into a summary. Useful when you've now moved on to a different task./clear: clears the conversation history/init: reads the current codebase and based off that, creates aCLAUDE.mdfile/context: visualize the current context and how much of it is taken up./status: shows current token and session info/review: performs a code review/security-review: performs a code review that searches for security flaws./install-github-app: allows you to add claude as a collaborator to a github repoi so you can assign it issues and to pull requests
Managing context
Hit the esc key twice to stop a response while Claude is generating. Then you can start a user query by prefixing with a # to start a memory which claude code will remember during the conversation.
Also use these slash commands to manage memory:
/clear: clears the conversation history/compact: compacts previous conversation history into a summary. Useful when you've now moved on to a different task.
Commands
Commands are special markdown files that must live within the .claude/commands folder, and can be used as custom slash commands.
- For example, a
.claude/commands/goal.mdcan be invoked via the/goalslash command, and it acts like a really big prompt to claude, giving it all the markdown content.
NOTE
The main use case of commands is to prompt for repetitive tasks like linting, testing, or adding documentation. You can also do neat stuff like dynamically add arguments and interpolate bash commands in these markdown files.
Skills / Plugins
You can install MCP servers and skills as "plugins" in claude code.
- List all skills claude has access to with
/skillscommand. - Manage plugins (install and delete) by using the
/pluginscommand
To add custom skills to claude code, they should be SKILL.md files within the .claude/skills folder

Hooks
Claude hooks are bash commands that run at different lifecycle moments such as session start, pre compact, and on stop. Key moments include startup, resume, clear, and various tool use stages like pre tool use and post tool use.
NOTE
You can check all registered hooks with the /hooks command.
If you want to create a claude command that can easily create hooks for you, use this command:
Here is a typescript SDK for creating claude commands:
You can specify the events to listen to and a file to run on those events, and you do all this from a json file. These are the lifecycle hooks you can listen for:
- PreToolUse: This hook runs before a tool (like
edit_fileorBash) is executed. It is the most powerful point of control for preventative measures and is the only event that can proactively block a tool’s execution. - PostToolUse: This hook runs after a tool has successfully completed. It’s ideal for reactive tasks like automatic formatting, running tests, or logging. It cannot block execution but can provide feedback to Claude.
- Notification: This hook triggers whenever Claude Code sends a notification to the user, for example, when it’s waiting for input or has completed a long task. It is purely informational and cannot block execution.
- Stop: This hook runs when the main Claude Code agent finishes responding. It can be configured to prevent the agent from terminating, forcing it to continue working until a specific condition is met.
- SubagentStop: This hook runs when a sub-agent task completes its work. Like the
Stophook, it can block the sub-agent from stopping.
You specify hooks in JSON in the .claude/settings.local.json under the "hooks" key:
"matcher": the tools to match on"hooks": the files to run when matched
{
  "hooks": {
    "PreToolUse": [
      {
        "matcher": "Bash",
        "hooks": [
          {
            "type": "command",
            "command": "jq -r '\\(.tool_input.command) - \\(.tool_input.description // \"No description\")' >> ~/.claude/bash-command-log.txt"
          }
        ]
      }
    ]
  }
}
Hooks receive JSON data via standard input (stdin) that provides session information and event-specific data, such as session_id, transcript_path, and tool_name.
They communicate status back to Claude Code primarily through shell exit codes and, for more advanced control, structured JSON output to stdout.
- Exit Code 0: Indicates success. Any output to stdout is shown to the user in the transcript, but not to the model.
- Exit Code 2: Signals a blocking error. This tells Claude Code to halt the current action (for
PreToolUsehooks) and processes the feedback fromstderras new input for Claude to understand the error and adjust its plan. It is crucial that error messages for blocking errors are sent tostderr. - Other Non-Zero Exit Codes: Indicate a non-blocking error. The hook failed, but execution continues. The error message from
stderris shown to the user, but not to Claude.
NOTE
This means since hooks provide parameters in a deterministic format, we can programatically do stuff with those inputs in another program, like a python or bash script.
For more examples on how to use hooks, look here:
custom hook: deny dangerous commands
This hook is used to deny dangerous commands like rm -rf or curling to a non HTTPS string.
"hooks": {
    "PreToolUse": [
      {
        "matcher": "Bash",
        "hooks": [
          {
            "type": "command",
            "command": ".claude/hooks/pre-bash-firewall.sh"
          }
        ]
      }
    ]
  }
#!/usr/bin/env bash
set -euo pipefail

# stdin: JSON with .tool_input.command
cmd=$(jq -r '.tool_input.command // ""')

# Block list (add as needed)
deny_patterns=(
  'rm\s+-rf\s+/'
  'git\s+reset\s+--hard'
  'curl\s+http'
)

for pat in "${deny_patterns[@]}"; do
  if echo "$cmd" | grep -Eiq "$pat"; then
    echo "Blocked command: matches denied pattern '$pat'. Use a safer alternative or explain why it's necessary." 1>&2
    exit 2
  fi
done

exit 0
custom hook: write bash commands to a log
#!/usr/bin/env bash
set -euo pipefail
cmd=$(jq -r '.tool_input.command // ""')
printf '%s %s\n' "$(date -Is)" "$cmd" >> .claude/bash-commands.log
exit 0
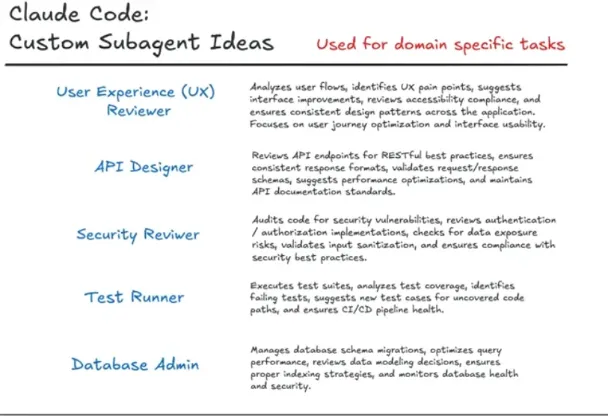
Subagents
Subagents in claude are just several different agents each with their own system prompt and context window.
You can create subagents with the /agents command, and the agent specification is like so:
- storage: agents are stored as markdown files in the
.claude/agentsfolder in your project - tools: You can specify which tools the agent has access to.
You can also set agents on the global level:
| Type | Location | Scope | Priority |
|---|---|---|---|
| Project | .claude/agents/ | Available only in the current project | Highest |
| User | ~/.claude/agents/ | Available across all your projects | Lower |
Here is an example of the different types of subagent personalities you can create.

subagents in claude code skills
You can specify skills that a subagent can access, as they don't inherit skills from the parent.
# .claude/agents/code-reviewer/AGENT.md
---
name: code-reviewer
description: Review code for quality and best practices
skills: pr-review, security-check
---
Here's another example:
---
name: your-sub-agent-name
description: A clear description of when this sub agent should be used.
tools: tool1, tool2 # Optional - inherits all tools from the main agent if omitted.
---

Your sub agent's system prompt goes here.

This section should clearly define the sub agent's role, capabilities, personality, and approach to solving problems. Include specific instructions, best practices, and any constraints the sub agent should follow.
| Field | Required | Description |
|---|---|---|
name | Yes | A unique identifier for the agent, using lowercase letters and hyphens. |
description | Yes | A natural language description of the agent’s purpose, used by Claude for automatic delegation. |
tools | No | A comma-separated list of specific tools the agent can use. If omitted, it inherits all tools from the main agent, including any connected via MCP servers. |
skills | No | A command-separated list of skill names the agent can have access to. |
Git worktrees
Git worktrees are especially useful when running several agents in parallel.
Techniques and strategies
forcing thinking
To force thinking, you can use these keywords in your prompt:
- "think": reasoning up to 4000 tokens
- "think harder": reasoning up to 10000 tokens
switch models smartly
Use opus for planning, sonnet for execution.
Use plan mode
You can tell claude to "make the plan multi-phase" which makes the plan, well, multi-phase.
Process - Claude code planning workflow
-
Start each task with a plan file
-
Create or designate a
plans/folder in your repo (e.g.plans/feature-query-builder.md). -
Ask the AI to write a plan into that file, not to write code yet.
-
-
Prompt the AI to draft the plan
Use a prompt along the lines of- “Here is the feature I want. Create a detailed implementation plan and write it into
plans/feature-X.md. Include: restated requirements, architecture, file-level changes, pseudo-code, and test/lint/type-check commands.”
- “Here is the feature I want. Create a detailed implementation plan and write it into
-
Review and edit the plan with the AI
-
Read the plan and comment like you would on a junior engineer’s design doc (e.g. “route naming is off”, “missing auth checks”, “doesn’t match existing patterns”).
-
Ask the AI to revise the plan until it matches how you actually want to build the feature.
-
-
Implement strictly from the plan
-
Once happy, say: “Now follow the plan in
plans/feature-X.mdand implement the changes step by step.” -
When things change, first update the plan file, then implement according to the updated plan.
-
-
Keep the plan as a living document
-
Whenever tests fail or requirements shift, tell the AI: “Update
plans/feature-X.mdto reflect what we’ve learned, then adjust the implementation.” -
For new related features, point the AI at existing plan files so it keeps architecture consistent.
-
Living document feature: save to github issue.
Ask Claude to save the current plan state to a GitHub Issue before clearing the context.
Step A: Save State
"Make a GitHub issue containing the current plan, checking off the items we have already completed."
Claude runs gh issue create automatically.
Step B: Reset & Resume
/clear "Get GitHub issue #24 and enact Phase 4 of that plan."
Claude reads the issue from GitHub, sees where it left off, and resumes work with a fresh context window.
Claude on your PRs
Run the /install-github-app to install a claude code github action.
- By default, the Claude Code GitHub Action listens for comments or issues mentioning
@claude.
This actions makes claude become a collaborator on your PRs for the current repo. You can now tag claude on issues, make it an assignee, etc.
Claude config
The claude config file lives here:
- global:
~/.claude/settings.json - local:
.claude/settings.local.json
allowed tools
At the project or global level, you can set which tools claude does and doesn't need permission for:
{
  "permissions": {
    "allow": [
      "WebSearch",
      "WebFetch"
      "Bash(git add:*)"
    ],
    "deny": [],
    "ask": []
  }
}
MCP
You can add MCP config in a .mcp.json in the current directory, which claude can access and load the MCP servers from.
It should be in this format:
{
  "mcpServers": {
    "github": {
      "type": "http",
      "url": "https://api.githubcopilot.com/mcp/",
      "headers": {
        "Authorization": "Bearer <ACCESS_TOKEN_HERE>"
      }
    }
  }
}
Here are some important things to keep in mind:
- The
typeproperty is required in MCP configuration with claude, and should be one of these three types:"http": HTTP transport server"stdio": locally running STDIO transport server"sse": SSE transport server
The access token must be valid and scoped correctly, having at least the repo permissions.
Here's an example of my favoriute MCP setuo:
"mcpServers": {
"playwright": {
  "type": "stdio",
  "command": "npx",
  "args": [
	"@playwright/mcp@latest"
  ],
  "env": {}
},
"context7": {
  "type": "http",
  "url": "https://mcp.context7.com/mcp",
  "headers": {
	"CONTEXT7_API_KEY": "apikeyhere"
  }
}
},
Claude Cowork
Scheduled tasks
Run scheduled tasks by using the /schedule command.
CodeRabbit CLI
coderabbit: runs a normal code review sessioncoderabbit --plain: runs a normal code review session
Codex
# Interactive: start a session with a prompt
codex "Refactor utils/logger to remove dead code"

# Non-interactive: run once and print the result
codex exec "Generate a README outline for a Flask API"

# Choose a model
codex -m o3 "Summarize the contribution guidelines"

# Use local OSS provider (expects a local Ollama server)
codex --oss "Suggest performance improvements for this script"

# Attach one or more images to the initial prompt
codex -i screenshots/login.png -i screenshots/dashboard.png \
  "Describe accessibility issues in these screens and fix React code"
Core Concepts
- Prompt: Optional initial message you provide on invocation. If omitted, Codex opens the interactive CLI waiting for your input.
- Models (
-m): Select the model to use.- Works with configured providers;
--ossis a convenience flag to target a local open-source provider (verifies a local Ollama server).
- Images (
-i): Attach one or more files to give visual context (e.g., UI screenshots) to the first turn. - Config override (
-c key=value): Override any config key at runtime. Values parse as JSON when possible; otherwise treated as strings. Examples:-c model="o3"-c 'sandbox_permissions=["disk-full-read-access"]'-c shell_environment_policy.inherit=all
- Sandbox (
-s): Controls what Codex-generated commands can do when executed.read-only: Only safe read operations (e.g.,ls,cat,sed).workspace-write: Can modify files inside the workspace.danger-full-access: No filesystem sandboxing. Use with extreme care.
- Approval policy (
-a): When Codex asks before executing commands.untrusted: Run only trusted read commands automatically; ask for others.on-failure: Run all commands; ask only if one fails and needs escalation.on-request: Codex decides when to ask (balanced default for many cases).never: Never ask; failures are returned immediately.
codex -a untrusted -s workspace-write
Interactive session (default)
# With an initial prompt
codex "Add pagination to /api/posts, include tests"

# No prompt: open the interactive TUI and chat
codex
Use the session to iterate on code, ask Codex to propose patches, run tests, and refine outputs. Combine with sandbox + approvals to keep changes safe.
exec — one-shot non-interactive
codex exec "Write a bash script that cleans old build artifacts safely"

# Pipe output directly to a file
codex exec "Create a .gitignore for a Rust workspace" > .gitignore

# With images
codex exec -i docs/wireframe.png "Generate a responsive HTML/CSS layout"
apply — apply the latest diff from Codex
When Codex proposes edits, it often produces a patch. Apply it directly to your working tree:
# After Codex proposes a patch in the session
codex apply
Under the hood this runs a git apply of the last diff the agent produced. Ensu
re you’re in a clean repo or understand what will change before applying.
Practical Workflows & Use Cases
- Code edits in a repo: Ask Codex to modify specific files/functions; review the
proposed patch; run
codex applyto commit changes locally. - Bug triage and fixes: Provide failing test output; Codex pinpoints the issue, proposes a change, and helps validate the fix.
- Documentation & READMEs: Generate outlines or complete docs via
codex execa nd refine interactively. - Refactors: Guide multi-file refactors in steps; use sandboxed execution and ap provals to run formatters and tests.
- UI reviews: Attach screenshots with
-iso Codex can suggest accessibility im provements and produce code updates. - OSS/local models: Use
--ossto target a local provider when network-limited or to keep data local.
Here are some examples
- Fix a bug interactively and apply
codex -s workspace-write -a on-request \
  "Investigate failing test in tests/test_parser.py and fix the parser"

# In the session, ask Codex to run tests, identify the failure, propose a patch.
# Then apply the patch locally:
codex apply
- Generate a README non-interactively
codex exec -m o3 \
  "Write a comprehensive README for a RESTful Flask service; include setup, run,
 env, testing"
- Attach images for context
codex -i screenshots/mobile-home.png -i screenshots/mobile-detail.png \
  "Spot a11y issues and provide React Native fixes"
- Override configuration at runtime
# Switch model and expand permissions for the current run only
codex -c model="o3" -c 'sandbox_permissions=["disk-full-read-access"]' \
  "Profile code hotspots and propose optimizations"

# Inherit full shell environment (example nested key override)
codex -c shell_environment_policy.inherit=all \
  "Use my local toolchain to compile and test"
- Tune sandbox and approvals
# Conservative: read-only + untrusted (ask for anything risky)
codex -s read-only -a untrusted "List flaky tests and analyze logs"

# Productive middle ground: workspace writes allowed; ask when needed
codex -s workspace-write -a on-request \
  "Refactor utils/date and update usage sites"

# Power mode: bypass everything (only in safe, sandboxed environments)
codex --dangerously-bypass-approvals-and-sandbox \
  "Bulk-apply code style fixes across the repo"
Tips & Best Practices
- Be explicit: Include filenames, functions, and constraints in prompts.
- Iterate: Start broad, then refine with follow-ups or
execreruns. - Review diffs: Read proposed patches before
codex apply. - Keep changes scoped: Smaller prompts produce clearer, safer edits.
- Use profiles: Store your defaults in
~/.codex/config.tomland reference them with-p. - Treat
danger-full-accessand--dangerously-bypass-approvals-and-sandboxwi th care; preferworkspace-write+on-requestfor day-to-day work.
Vibe coding mastery
tech stack
The "gooner tech stack" as I like to call it helps with vibe coding and consists of NextJS, tailwind, typescript, supabase, shadcn.
Workflow
- Tell chat about your idea and ask it to make a PRD (project requirements document) so that you can input it into cursor.
- Ask chat to convert the PRD into a prompt for building with cursor or replit
- Copy a standard cursor rules for nextjs, tyepscript, react, enable it for project.
- Paste in your PRD into cursor and ask it to create a landing page for you. You can also paste in wireframes or mockups of what you want the UI to look like.
- Once the code is built, ask cursor to explain the file structure and what each file in the codebase does so you can understand it better.
must have workflow techniques
- have good git hygeine: commit consistently once the AI changes something so you can easily roll back.
Creating a PRD
A PRD should have the structure of having a high-level overview for the product, what it's about, and the tech stack that will be used in it.
Then you break up the PRD into milestones, where each milestone defines a technical objective to complete and the technology that will be used to complete it.
Here is a prompt that makes any AI a PRD master:
You are a software engineering designer that excels at creating PRDs for web apps that will then be generated with AI. Your task is to create a PRD for <insert app idea>
After creating the PRD, ask the AI to give a prompt that implements the PRD:
create a ready-to-generate prompt for building this app with AI tools like GPT or a working code scaffold.
Ui first creation
You can start off creating the UI simply with HTML and tailwindcss, which cursor excels at. Then based off that UI, you can tell cursor to make a plan (essential step) and then implement it peacemeal:
step 1: UI creation
Use this prompt as a cursor rule to build gorgeous UIs, and paste in mockups for inspiration.
## Role
You are a senior front-end developer.

## Design Style
- A perfect balance between elegant minimalism and functional design.
- Soft, refreshing gradient colors that seamlessly integrate with the brand palette.
- Well-proportioned white space for a clean layout.
- Light and immersive user experience.
- Clear information hierarchy using subtle shadows and modular card layouts.
- Natural focus on core functionalities.
- Refined rounded corners.
- Delicate micro-interactions.
- Comfortable visual proportions.

## Mobile UI isntructions

- **Page Size and Outlines**: Each page should be 375x812 pixels, with outlines to simulate a mobile device frame.

- **Icons**: Use an online vector icon library, ensuring that icons do not have background blocks, baseplates, or outer frames.

- **Images**: Images must be sourced from open-source image websites and linked directly.

- **Styles**: Utilize Tailwind CSS via CDN for styling purposes.

- **Status Bar**: Do not display the status bar, including time, signal, and other system indicators.

- **Non-Mobile Elements**: Avoid displaying non-mobile elements such as scrollbars.

- **Text Color**: All text should be either black or white.

## Task

This is an **AI Calorie calculator app** where users can take pic of food and auto extract nutrition**.

- Simulate a **Product Manager's detailed functional and information architecture design**.

- Follow the **design style** and **technical specifications** to generate a complete **UI design plan**.

- Create a **UI.html** file that contains all pages displayed in a **horizontal layout**.

- Generate the **first two pages** now
step 2: ascii layouts
Tp figure out how to go about for the rest of the pages, you can ask cursor to brainstorm ascii layouts for you of what the page should look like, which consumes less tokens and is easier for the AI model to iterate on.
step 3: creating a theme
Go to the Beautiful themes for shadcn/ui — tweakcn | Theme Editor & Generator site to create your custom shadcn theme, paste it in your code, and then ask cursor if it understands your theme and ask it to display it for you (adds it to context)
step 4: adding animations
Tell the model which types of animations you would like to do. You can just copy this prompt:
Add smooth animations and micro interactions like:
- smooth hover effects
- gentle tilt effects
- scroll-based animations
- animated glitch-style
- inertia-based scroll
Vibe coding prompts
Here are some good vibe coding prompts to inject during your workflow:
- responsive: Tell the AI to "make the app responsive and mobile-friendly"
- good UX: Tell the AI to improve UX to make the app simpler and more visual, while keeping all current functionality.
Workflow for projects
The main bulk of a vibe-coding based workflow hinges on 4 cursor rules files you should define:
1. Coding Preferences – "Write Code Like This"
Purpose: Ensures clean, maintainable, and efficient code.
Rules:
- Simplicity: "Always prioritize the simplest solution over complexity."
- No Duplication: "Avoid repeating code; reuse existing functionality when possible."
- Organization: "Keep files concise, under 200-300 lines; refactor as needed."
- Documentation: "After major components, write a brief summary in
/docs/[component].md(e.g.,login.md)."
Why It Works: Simple code reduces bugs; documentation provides a readable audit trail.
2. Technical Stack – "Use These Tools"
Purpose: Locks the AI to your preferred technologies.
- stack: NEXTjs, TS, tailwind, shadcn
- database: Use PostgreSQL with drizzle, using local docker connection string in development and production URL in production.
- testing: write unit tests using vitest to test isolated classes and functions.
Why It Works: Consistency prevents AI from switching tools mid-project.
3. Workflow Preferences – "Work This Way"
Purpose: Controls the AI’s execution process for predictability.
- Steps: "Break large tasks into stages; pause after each for my approval."
- Planning: "Before big changes, write a
plan.mdand await my confirmation." - Tracking: "Log completed work in
progress.mdand next steps inTODO.txt."
Why It Works: Incremental steps and logs keep the process transparent and manageable.
4. Communication Preferences – "Talk to Me Like This"
Purpose: Ensures clear, actionable feedback from the AI.
- Summaries: "After each component, summarize what’s done."
- Clarification: "If my request is unclear, ask me before proceeding."
Why It Works: You stay informed without needing to decipher AI intent.
LLM websites
ChatGPT
Canvas mode
Canvas mode is a way to edit some text, like an essay or code, by "pair coding" with chatGPT.
- You can highlight text in canvas mdoe and ask chatgpt to do something abotu that highlighted text, which is faster than simply retyping it.
Code execution
You can ask ChatGPT to execute code in a python repl to give you back exact mathematical answers or to create charts with matplotlib. Here are the things you can do:
- math: get back perfect math answers by asking in a repl
- graphs: ask for perfect graphs using matplotlib
- qr codes: ask to make qr codes from a link using the
qrcodepython package
Tasks
In the chatgpt pro plan, you can ask o3-mini model to create recurring tasks for you that get executed everyday and notify you via email.
For example, you could ask gpt to send you the latest ai news every morning
Microsoft copilot
Microsoft copilot is cool because it has AI sidebar integration in the edge browser to analyze the contents of a website.
NotebookLM
NotebookLM is really cool and has a great use case for generating minutes of audio on the fly.
- language use case: Use it to generate lessons and roadmaps of language learning content, and then create podcasts or voice lessons in your target language.
Perplexity/Comet
Shortcuts
In comet, you can register special slash commands that basically just copy and paste a predefined prompt, which is useful for saving keystrokes. Here are some good shortcuts
Context
- Use
@tabor@productpageto reference any open tabs.
Local LLMs
You can use local LLMs in a chat interface either with LMStudio desktop app or the Ollama CLI.
You can download quantized models off of hugging face or in LM Studio itself.
Theory
Quantization
quantization is the idea of precision in model parameters, either letting each parameter have a floating point precision (more precise) or an integer precision (less precise).
Although it sounds like being more precise would lead to better results - which it does - it also adds up more space to download local models and requires more RAM. To use a model for inference, it has to get loaded into memory, and even the smallest LLM has over 1 billion parameters. Higher precision leads to higher RAM requirements:
- A model with float32 quantization for parameters means each parameter is 32 bits, or 4 bytes, meaning a model with 2 billion parameters would need 8GB of RAM.
Thus quantization allows us to mathematically round the floating point precision parameters to integers, either int4 (4 bit) or int8 (8 bit) to cut down the RAM usage of a model:
- A model quantized with int4 quantization for parameters means each parameter is 4 bits, or 0.5 bytes, meaning a model with 2 billion parameters would only need 1GB of RAM.
TIP
quantization allows us to achieve up to 1/2 or 1/4 cutting of RAM usage, while still having only a negligible difference in performance from the more precise unquantized models.
Offloading
offloading is the technique of loading a model's parameters between CPU, GPU, and RAM, in order to efficiently load a model in memory.
A main drawback of offloading is that model performance becomes worse, even if memoyr use is more efficient.
Lm studio
CLI
lms ls: lists all downloaded modelslms ps: lists all currently loaded models in memorylms load <model-id>: loads a specific modellms unload <model-id>: unloads a specific model
listing models
Show all downloaded models using the lms ls command. You have 4 options to consider:
--llm: lists only llm models--json: lists info in JSON--detailed: lists details info--embeddings: prints only embedding models
lms ls
Example output:
You have 47 models, taking up 160.78 GB of disk space.

LLMs (Large Language Models)                       PARAMS      ARCHITECTURE           SIZE
lmstudio-community/meta-llama-3.1-8b-instruct          8B         Llama            4.92 GB
hugging-quants/llama-3.2-1b-instruct                   1B         Llama            1.32 GB
mistral-7b-instruct-v0.3                                         Mistral           4.08 GB
zeta                                                   7B         Qwen2            4.09 GB

... (abbreviated in this example) ...

Embedding Models                                   PARAMS      ARCHITECTURE           SIZE
text-embedding-nomic-embed-text-v1.5@q4_k_m                     Nomic BERT        84.11 MB
text-embedding-bge-small-en-v1.5                     33M           BERT           24.81 MB
List only LLM models:
lms ls --llm
List only embedding models:
lms ls --embedding
Get detailed information about models:
lms ls --detailed
Output in JSON format:
lms ls --json
You can show all currently loaded models with lms ps.
Get the list in machine-readable format:
lms ps --json
loading into memory
Load a model into memory by running the following command:
lms load <model_key>
You can find the model_key by first running lms ls to list your locally downloaded models. You also have access to these options:

unloading from memory
Unload a single model from memory by running:
lms unload <model_key>
If no model key is provided, you will be prompted to select from currently loaded models.
To unload all currently loaded models at once:
lms unload --all
Server CLI
You use the lms server start command to start the LM studio server
lms server start: starts server with default settings on port 1234lms server start --port <port>: starts server on specific portlms server start --cors: opens CORS for all web apps to access
You can use the lms server stop command to stop the LM studio server.
You use the lms server status command to see the status of the LM studio server
lms server start # start server
lms server status # get status
lms server stop # stop server
You also have these options:

Get the status in machine-readable JSON format:
lms server status --json --quiet
Example output:
{"running":true,"port":1234}
seeing logs
lms log stream allows you to inspect the exact input string that goes to the model.
lms log stream
Here would be the example output:

Programming
You can hit API endpoints for models that your load onto the LM studio server, which runs on localhost:1234.
There are three different ways to run the LMS studio server and hit up the endpoints:
- Basic rest API
- Open AI SDK (compatibility version)
- LM studio Python SDK
- LM studio TS SDK
Open AI Compatibility
Using models with LM studio is completely compatible with the openAI sdk. All you have to do is to pass the base_url parameter and point that to the LM studio server endpoint, like so:
from openai import OpenAI

client = OpenAI(
  base_url="http://localhost:1234/v1", # LM Studio endpoint on port 1234
  api_key="something-doesnt-matter", # doesn't matter, but should pass value
)
And here is an example showing just how simple and compatible the OpenAI SDK is to use with LM studio models
from openai import OpenAI

client = OpenAI(
  base_url="http://localhost:1234/v1",
  api_key="something-doesnt-matter",
)

response = client.chat.completions.create(
  model="gemma-3-12b-it-qat",
  messages=[
    {
      "role": "system",
      "content": "You are a helpful and friendly assistant."
    },
    {
      "role": "user",
      "content": "What is the meaning of life?"
    }
  ],
  temperature=0.7,
)

print(response.choices[0].message.content)
LM studio TS sdk
fIrst install with this:
npm install @lmstudio/sdk --save
And here's a quickstart:
import { LMStudioClient } from "@lmstudio/sdk";
const client = new LMStudioClient();

const model = await client.llm.model("llama-3.2-1b-instruct");
const result = await model.respond("What is the meaning of life?");

console.info(result.content);
OLlama
OLLama is a CLI tool for installing and running local models. Here is an example that automatically installs and runs llama 3.2
ollama run llama3.2
In fact, here's a list of all CLI commands you can run:

rUnning models
When chatting with ollama models, you have access to these slash commands:
Available Commands:
  /set            Set session variables
  /show           Show model information
  /load <model>   Load a session or model
  /save <model>   Save your current session
  /clear          Clear session context
  /bye            Exit
  /?, /help       Help for a command
  /? shortcuts    Help for keyboard shortcuts
Since you have to chat using the CLI in a purely text based ways, there are a few caveats to keep iin mind when trying to chat with OLLama:
- multiline text: ANy multiline text needs to be encased in triple double quotes
- images: To refer to images or files, you just write out the relative path to that file in your prompt. Any filepaths you refer to MUST MUST MUST be at the end of your prompt, after any text.
- system message: run the
/set system <message>command to change the model's system message for the chat duration
saving chats
To save chats, you can use the /save <chat-name> and /load <chat-name> to load a chat. These commands save and load the chat respectively with the hyperparameters, chat history, and system message all set and saved.
/show command
Available Commands:
  /show info         Show details for this model
  /show license      Show model license
  /show modelfile    Show Modelfile for this model
  /show parameters   Show parameters for this model
  /show system       Show system message
  /show template     Show prompt template
If you run the /show system command, you can see the system message for the model.
/set command
>>> /set
Available Commands:
  /set parameter ...     Set a parameter
  /set system <string>   Set system message
  /set history           Enable history
  /set nohistory         Disable history
  /set wordwrap          Enable wordwrap
  /set nowordwrap        Disable wordwrap
  /set format json       Enable JSON mode
  /set noformat          Disable formatting
  /set verbose           Show LLM stats
  /set quiet             Disable LLM stats
  /set think             Enable thinking
  /set nothink           Disable thinking
/set system <message>: changes the model's system message for the chat duration/set parameter: shows the parameters of the model you can change
managing models
ollama list: lists all models you have installed.ollama ps: lists all currently running models.ollama rm <model-name>: deletes a model by its name.ollama show <model-name>: shows more info on the specified model.
TIP
You can find the parameters for a model on the ollama page for a model or through ollama show command.
Model env vars
These are the env vars you should set on a model in order to make OLLAMA more efficient:

Modelfiles
Modelfiles are essentially the Dockerfile version of creating LLMs, blueprinting them with system prompts, hyperparameter values, and message history.
Here are the directives you can use:
| Instruction | Description |
|---|---|
FROM (required) | Defines the base model to use. |
PARAMETER | Sets the parameters for how Ollama will run the model. |
TEMPLATE | The full prompt template to be sent to the model. |
SYSTEM | Specifies the system message that will be set in the template. |
ADAPTER | Defines the (Q)LoRA adapters to apply to the model. |
LICENSE | Specifies the legal license. |
MESSAGE | Specify message history. |
| Here is an example modelfile: |
FROM llama3.2
# sets the temperature to 1 [higher is more creative, lower is more coherent]
PARAMETER temperature 1
# sets the context window size to 4096, this controls how many tokens the LLM can use as context to generate the next token
PARAMETER num_ctx 4096

# sets a custom system message to specify the behavior of the chat assistant
SYSTEM You are Mario from super mario bros, acting as an assistant.

# adds message history
MESSAGE user "Hi mario, what's up?"
MESSAGE assistant "whats a up mamma mia you piece of shit!"
To use this:
- Save it as a file (e.g.
Modelfile) ollama create choose-a-model-name -f <location of the file e.g. ./Modelfile>ollama run choose-a-model-name- Start using the model!
# 1. create the modelfile and use it
ollama create <new-model-name> -f ./Modelfile
ollama run <new-model-name>
To view the Modelfile of a given model, use the ollama show --modelfile command.
Ollama server
Run ollama serve to start the server, but ollama runs on localhost:11434 automatically when you start it.
Ollama API
API fetching
open ai compatible
You can use the openAI compatibility API through setting the baseUrl property to localhost:11434/v1 endpoint.
vercel ai
Through the openAI compatibility endpoint, you can use ollama models on vercel AI.
import { createOpenAICompatible } from "npm:@ai-sdk/openai-compatible";

 function get_ollama(modelName: string) {
    const model = createOpenAICompatible({
      name: "ollama",
      baseURL: `http://localhost:11434/v1`,
      apiKey: "1234567890",
    });
    return {
      model: model(modelName),
      modelOptions: {
        maxRetries: 0,
      },
    };
  },
python sdk
js sdk
The JS sdk is super easy to use through the ollama package:
import ollama from 'ollama'

const response = await ollama.chat({
  model: 'llama3.1',
  messages: [{ role: 'user', content: 'Why is the sky blue?' }],
})
console.log(response.message.content)
You can also stream messages:
import ollama from 'ollama'

const message = { role: 'user', content: 'Why is the sky blue?' }
const response = await ollama.chat({
  model: 'llama3.1',
  messages: [message],
  stream: true,
})
for await (const part of response) {
  process.stdout.write(part.message.content)
}
custom sdk
Made with the power of gemini
import { z } from "npm:zod";

// Base URL for the Ollama API
const OLLAMA_API_BASE_URL = "http://localhost:11434/api";

// Zod Schemas for API validation

const ModelDetailsSchema = z.object({
  parent_model: z.string(),
  format: z.string(),
  family: z.string(),
  families: z.array(z.string()).nullable(),
  parameter_size: z.string(),
  quantization_level: z.string(),
});

const ModelSchema = z.object({
  name: z.string(),
  model: z.string(),
  modified_at: z.string(),
  size: z.number(),
  digest: z.string(),
  details: ModelDetailsSchema,
});

const ListModelsResponseSchema = z.object({
  models: z.array(ModelSchema),
});

const GenerateCompletionOptionsSchema = z
  .object({
    temperature: z.number().optional(),
    seed: z.number().optional(),
    top_k: z.number().optional(),
    top_p: z.number().optional(),
    min_p: z.number().optional(),
    repeat_last_n: z.number().optional(),
    repeat_penalty: z.number().optional(),
    presence_penalty: z.number().optional(),
    frequency_penalty: z.number().optional(),
    stop: z.array(z.string()).optional(),
  })
  .partial();

const GenerateCompletionRequestSchema = z.object({
  model: z.string(),
  prompt: z.string(),
  suffix: z.string().optional(),
  images: z.array(z.string()).optional(),
  think: z.boolean().optional(),
  format: z.union([z.literal("json"), z.any()]).optional(),
  options: GenerateCompletionOptionsSchema.optional(),
  stream: z.boolean().optional(),
  raw: z.boolean().optional(),
  keep_alive: z.string().optional(),
});

const GenerateCompletionResponseSchema = z.object({
  model: z.string(),
  created_at: z.string(),
  response: z.string(),
  done: z.boolean(),
  context: z.array(z.number()).optional(),
  total_duration: z.number().optional(),
  load_duration: z.number().optional(),
  prompt_eval_count: z.number().optional(),
  prompt_eval_duration: z.number().optional(),
  eval_count: z.number().optional(),
  eval_duration: z.number().optional(),
});

const MessageSchema = z.object({
  role: z.enum(["system", "user", "assistant", "tool"]),
  content: z.string(),
  images: z.array(z.string()).optional(),
});

const GenerateChatRequestSchema = z.object({
  model: z.string(),
  messages: z.array(MessageSchema),
  tools: z.array(z.any()).optional(),
  think: z.boolean().optional(),
  format: z.union([z.literal("json"), z.any()]).optional(),
  options: GenerateCompletionOptionsSchema.optional(),
  stream: z.boolean().optional(),
  keep_alive: z.string().optional(),
});

const GenerateChatResponseSchema = z.object({
  model: z.string(),
  created_at: z.string(),
  message: MessageSchema,
  done: z.boolean(),
  total_duration: z.number().optional(),
  load_duration: z.number().optional(),
  prompt_eval_count: z.number().optional(),
  prompt_eval_duration: z.number().optional(),
  eval_count: z.number().optional(),
  eval_duration: z.number().optional(),
});

const GenerateEmbeddingsRequestSchema = z.object({
  model: z.string(),
  input: z.union([z.string(), z.array(z.string())]),
  truncate: z.boolean().optional(),
  options: GenerateCompletionOptionsSchema.optional(),
  keep_alive: z.string().optional(),
});

const GenerateEmbeddingsResponseSchema = z.object({
  model: z.string(),
  embeddings: z.array(z.array(z.number())),
  total_duration: z.number().optional(),
  load_duration: z.number().optional(),
  prompt_eval_count: z.number().optional(),
});

// Type Definitions from Zod Schemas
type ListModelsResponse = z.infer<typeof ListModelsResponseSchema>;
type GenerateCompletionRequest = z.infer<
  typeof GenerateCompletionRequestSchema
>;
type GenerateCompletionResponse = z.infer<
  typeof GenerateCompletionResponseSchema
>;
type GenerateChatRequest = z.infer<typeof GenerateChatRequestSchema>;
type GenerateChatResponse = z.infer<typeof GenerateChatResponseSchema>;
type GenerateEmbeddingsRequest = z.infer<
  typeof GenerateEmbeddingsRequestSchema
>;
type GenerateEmbeddingsResponse = z.infer<
  typeof GenerateEmbeddingsResponseSchema
>;

/**
 * A TypeScript class to interact with the Ollama API in a typesafe way.
 */
export class OllamaAPI {
  private baseUrl: string;

  constructor(baseUrl: string = OLLAMA_API_BASE_URL) {
    this.baseUrl = baseUrl;
  }

  private async post<T>(endpoint: string, body: unknown): Promise<T> {
    const response = await fetch(`${this.baseUrl}${endpoint}`, {
      method: "POST",
      headers: {
        "Content-Type": "application/json",
      },
      body: JSON.stringify(body),
    });

    if (!response.ok) {
      throw new Error(`API request failed with status ${response.status}`);
    }

    return response.json();
  }

  private async get<T>(endpoint: string): Promise<T> {
    const response = await fetch(`${this.baseUrl}${endpoint}`);
    if (!response.ok) {
      throw new Error(`API request failed with status ${response.status}`);
    }
    return response.json();
  }

  /**
   * Lists all models available locally.
   */
  async listModels(): Promise<ListModelsResponse> {
    const response = await this.get("/tags");
    return ListModelsResponseSchema.parse(response);
  }

  /**
   * Generates a completion for a given prompt.
   * @param request The request object for generating a completion.
   * @returns The generated completion.
   */
  async generateCompletion(
    request: GenerateCompletionRequest
  ): Promise<GenerateCompletionResponse> {
    const validatedRequest = GenerateCompletionRequestSchema.parse(request);
    const response = await this.post("/generate", validatedRequest);
    return GenerateCompletionResponseSchema.parse(response);
  }

  /**
   * Generates the next message in a chat.
   * @param request The request object for generating a chat completion.
   * @returns The generated chat message.
   */
  async generateChat(
    request: GenerateChatRequest
  ): Promise<GenerateChatResponse> {
    const validatedRequest = GenerateChatRequestSchema.parse(request);
    const response = await this.post("/chat", validatedRequest);
    return GenerateChatResponseSchema.parse(response);
  }

  /**
   * Generates embeddings for a given input.
   * @param request The request object for generating embeddings.
   * @returns The generated embeddings.
   */
  async generateEmbeddings(
    request: GenerateEmbeddingsRequest
  ): Promise<GenerateEmbeddingsResponse> {
    const validatedRequest = GenerateEmbeddingsRequestSchema.parse(request);
    const response = await this.post("/embed", validatedRequest);
    return GenerateEmbeddingsResponseSchema.parse(response);
  }
}
Prompt engineering
Prompt Engineering in a nutshell
A good prompt consists of these 4 ingredients:
- Initial context
- Telling chatgpt what role to play, and providing any initial context about the situation the model needs to know.
- Use the act as or imagine syntax for defining the gpt role
- Instructions
- Start by saying, your task is ____. The task is best paired with good context or a good role.
- Input data
- Make sure chatgpt can find your input data by clearly separating it from the rest of your prompt.
- Put your input data as the last thing in your prompt, to prevent confusion
- You could do something like, “here is the text below:”
- Constraints and format
- Explain to gpt what format you want the output to be in
- using fewer than 200 characters
- your response should be formatted as markdown, you should bold any key sentences or phrases
- Explain to gpt what format you want the output to be in
All together, you should get something like this:
Act as an article summarizing assistant. I will provide you with the text of a news article, and I’d like you to generate a summary. (step 1, initial context) The summary should include a 2 sentence overall summary and then also include 4-6 bullet points summarizing the key points of the article. (step 2, instructions) Your total output should not exceed 120 words. (step 4, constraints) Here is the text: (then you do step 3, the input)
This is formally known as the RGC prompt:
- RGC prompting: A type of prompting that can be universally used to generate detailed output. It has these following attributes:
- role: Tell chatgpt who to act as
- result: Tell chatgpt what kind of output you want back
- goal: What is the purpose that the output is supposed to serve? What are you trying to accomplish here?
- context: Provide what or who the output is for
- constraint: Guidelines for the response.
- You are an expert
[role]. Create[result]. The goal is[end goal]. The content is for[context]. Your guidelines for writing are[constraints].
Basic techniques
Shot prompting
The concept of a shot is providing the model context that is an example of a response you want to get back or of what you want the model to do.
NOTE
The main use case of shot prompting is to inject a bit of determinism into the AI so we can get a predictable response back. This is useful if you need the response to be in a certain style, format, etc.
There are three types of "shot" prompting:
- zero-shot: you don't give the AI any examples of the response you want back.
- one-shot: you give the AI one example of the response you want back.
- few-shot: you give the AI many examples of the response you want back.
The structure of a shot prompting prompt should be as follows to ensure the AI follows it correctly:
- At the beginning, give general background context and instructions and say something like "below you have examples."
- paste the examples delimited by xml tags like
<example-1>to clearly delineate where an example starts and ends. - Put your main instructions at the end
Chain of thought
For complex mathematical calculations, you can ask the ai to walk through a solution step by step:
think step by step, outline your solution process (in detail), and derive the solution step by step.
Ask before answer
ask before answer prompting is where before telling chatgpt what to do, you tell it to ask any questions for clarification it needs before answering the prompt in the best way possible.
This lets chatgpt ask its own questions so you can give it context and form the best possible prompt.
Rephrase the question
By asking the AI to rephrase and expand the question before responding, it gives you a glimpse into what the AI thinks you're asking and fleshes it out, thus increasing the probability of producing a better response.

The basic prompt formula is like so:
{Your question}
Rephrase and expand the question, and respond.
There are some limitations:
- While rephrasing can help clarify ambiguous questions, it can also make straightforward queries unnecessarily complex.
- Rephrasing can sometimes inadvertently alter the original question's intent or focus, leading to a response that doesn’t fully address the user's needs.
reverse prompt engineering
Telling chatgpt to pretend it is a prompt engineer, and you give it a piece of content and tell it to reverse-engineer it and give you back a prompt that would produce that type of content.
The order of prompts
Here is a basic guideline of the order to follow when prompting the AI:
- Examples (if needed)
- Additional Information
- Role
- Directive
- Output Formatting
Image prompting
Basics
with any llm chat that supports creating images like ChatGPT, you have the ability to use the chat interface to improve image generation. Here are the specific things you can do:
- provide aspect ratio: You can tell gpt to set the image's aspect ratio to something like 16:10 or 4:3.
- refine the image: Since images are saved as part of the chat history, you can ask gpt to refine the image and change certain parts of the image.
- base off of a previous image: If you find an image you like, you can ask chat to create an image in that exact same style.
prompt resources
AI Engineering
LLM hyperparameters
These are the important LLM hyperparameters you can tweak:
- temperature: the "randomness" of the model, a value between 0-2. The higher this vallue, the more random the model will be, and the lower the value, the less random.
- If temperature is set to 0, you will get back the same output every single time.
- top k: Used to configure that the LLM will only choose from the top
kcandidates with the highest probability of being the next token.- The lower this value, like 1 (the lowest it can be), the more deterministic the LLM is, selecting only the most likely token every single time.
- top p: a value between 0-1 representing the percentage of cumulative probability you need in the candidate pool. The higher this value, the more tokens will be considered. The lower this value, the less tokens will be considered as candidates.
- For example, if you set top p to 90%, then the LLM will consider as many tokens as it takes until their cumulative likeliness probability for being the next token reaches the threshold of 90%.
History management techniques
How do you stop an AI chat from running out of context in a long-term chat? Well there are three main techniques:
- window sliding: Only include the most recent
nmessages.- This technique prioritizes new context over old context, completely discarding the old.
- summarization: Summarize all past messages and put it in a system prompt.
- context-specific summarization: Summarize all past messages but partition them into summaries of new content, old content, and primordial content.
The best kind of technique is a combination of window sliding and summarization, where you summarize all past messages except the n most recent, and then use window sliding for the rest.
Here are a few important things to keep in mind when implementing these techniques:
- Don't include tool calls in message history.
Tool calling and agent capabilities
The basic idea of tool calling is where you describe functions you create in terms of their intended purpose, the arguments (types, description) that the function takes in, and what it returns, and that is a tool.
You then pass these tools to the AI, and based on your prompt, it will decide if it's suitable for using tools. If so, then it will follow these three steps:
- Choose a tool whose description would most closely match the prompt
- Extract the parameters from the prompt, using structured output to get back the parameters in a format that's easy to call the tool with.
- Returns the tool name, and the args to pass in
The onus is now on you to parse those arguments, call your tool programmatically, and then add to the chat history a tool result message, where you s
The basic steps of exposing tools to any openai compatible API is as follows:
- Generate a list of tools via tools schema, and provide that to the model when generating a response from a prompt.
- Access the specific tool called by checking the
tool_callsproperty on the response, parse the arguments, and run the function that was called with the arguments provided from the LLM. - Pass in the results of you calling your function as a special tool message in this format:
{
	role: "assistant"
	content: `Tool call: ${toolCallName}, Tool result: ${toolCallResult}`
}
An agentic loop is based on constantly calling tools in a loop until the ai decides on a final response.
Here is a pseudocode example:
while (!taskComplete) {
  // 1. Get LLM response
  const response = await llm.chat(messages)

  // 2. If LLM wants to call a function
  if (response.tool_calls) {
    const result = await executeFunction(response.tool_calls)
    messages.push(toolResponse(result))
    continue
  }

  // 3. If LLM gives final answer
  if (isTaskComplete(response)) {
    taskComplete = true
  }
}
OpenAI API
You can use the open ai sdk like so, where it needs the OPENAI_API_KEY environment variable set.
import OpenAI from "npm:openai";

const openai = new OpenAI();
Basic text prompting
Text prompting with the CLI is based on messages which represent memory, which is an array of objects that represents messages of 4 types:
"user": message by a user"assistant": message by the chatbot"system": system message for the AI to get preliminary instructions on its task and purpose."tool": for tool calls
export class OpenAiChat<
  T extends {
    createdAt: Date;
  } = {
    createdAt: Date;
  }
> {
  private openai: OpenAI;
  private messages: OpenAI.Chat.ChatCompletionMessageParam[] = [];

  constructor(messages: OpenAI.Chat.ChatCompletionMessageParam[]) {
    this.openai = new OpenAI();
    this.messages = messages || this.messages
  }


  addSystemMessage(message: string) {
    this.messages.push({ role: "system", content: message });
  }

  async prompt(prompt: string) {
    this.messages.push({ role: "user", content: prompt });

    const response = await this.openai.chat.completions.create({
      model: "gpt-4o-mini",
      temperature: 0.1,
      messages: this.messages,
    });

    const text = response.choices[0].message.content;

    this.messages.push({
      role: "assistant",
      content: text,
    });

    return text;
  }
}
Tool calling
manual way
You would define your tools in a structured output sort of format so you can deterministically get valid parameter inputs, which then let you programmatically execute the function binded to a tool call.
A tool definition would look like this:
- We define two tools here, one called
get_weatherand the other calledget_stock_price.
const functions = [
  {
    name: 'get_weather',
    description: 'Get current weather for a city',
    parameters: {
      type: 'object',
      properties: {
        location: {
          type: 'string',
          description: 'City name'
        }
      },
      required: ['location']
    }
  },
  {
    name: 'get_stock_price',
    description: 'Get current stock price',
    parameters: {
      type: 'object',
      properties: {
        symbol: {
          type: 'string',
          description: 'Stock ticker symbol'
        }
      },
      required: ['symbol']
    }
  }
];
The basic flow of tool calling via the OpenAI API is as follows:
- Send a chat completion prompt, passing the tools available.
- Get back the llm response and parse the extracted tool name the LLM decides to use, and any args it passes through the
response.tool_callsarray. - Use the args and tool name to execute a function programmatically with those arguments. Return the result of the function execution as a
'tool'role message, passing in the the tool call id and the return value. - The LLM then returns a response based on the tool result.
IMPORTANT
Whatever tool result you pass to the tool message must be a string.
// 1. User Message
{
  role: 'user',
  content: 'What's the weather like in London?'
}

// 2. LLM Response with Function Call
{
  role: 'assistant',
  content: null,
  tool_calls: [{
    id: 'call_abc123',
    type: 'function',
    function: {
      name: 'get_weather',
      arguments: '{"location":"London"}'
    }
  }]
}

// 3. Function Execution Result
{
  role: 'tool',
  content: '{"temperature": 18, "condition": "cloudy"}',
  tool_call_id: 'call_abc123'
}

// 4. Final LLM Response
{
  role: 'assistant',
  content: 'The weather in London is currently cloudy with a temperature of 18°C.'
}
The most important thing to understand is that a role: "tool" message must ALWAYS be provided after a tool_calls is provided by the assistant, even if you don't decide to call the tool.
tool approval
In your app logic, you can make an agent have to manually approve a tool trhough a human in the loop sort of structure, skipping executing the tool if permission is not given. The basic flow is like so:
- Agent wants to call tool, push message with
tool_callsto history. - If tool that is being called is in list of sensitive permission tools, have some sort of permission validation logic requiring human input that returns a boolean whether to approve or not.
- If approved, invoke the tool function with the args and add the tool result content to a new
role: "tool"message, add that to history - If not approved, add a
role: "tool"message to history with content being something like "executing tool was not approved"
new way
The new of using tools is to create tools from zod schemas using the zodFunction helper.
First, you have to create the tool:
export class Tool<T extends z.ZodObject<any>> {
  constructor(
    public name: string,
    public description: string,
    public parameters: T,
    public cb: (args: z.infer<T>) => Record<string, any>
  ) {}

  execute(args: z.infer<T>) {
    return JSON.stringify(this.cb(args));
  }
}
And this is how you can create tools from zod schema definitions and pass them to openai.
import { zodFunction } from "npm:openai/helpers/zod";

  async promptWithTools<R extends z.ZodObject<any>>(
    messages: OpenAI.Chat.ChatCompletionMessageParam[],
    tools: readonly Tool<R>[]
  ) {
    const newMessages = [...messages];
    let response = await this.openai.chat.completions.create({
      model: "gpt-4o-mini",
      temperature: 0.1,
      messages: newMessages,
      tools: tools.map(zodFunction),
      tool_choice: "auto",
      parallel_tool_calls: false,
    });

    let result = {
      tool_calls: response.choices[0].message.tool_calls,
      content: response.choices[0].message.content,
      toolWasRun: (response.choices[0].message.tool_calls?.length ?? 0) > 0,
    };
    newMessages.push(response.choices[0].message);

    const maxDepth = 10;
    let depth = 0;

    while (result.toolWasRun && depth < maxDepth) {
      depth++;
      const toolCall = result.tool_calls![0];
      const toolName = toolCall.function.name;
      const toolArgs = JSON.parse(toolCall.function.arguments);
      const tool = tools.find((t) => t.name === toolName);
      if (tool) {
        console.log("Executing tool:", toolName);
        const functionResultContent = tool.execute(toolArgs);
        // 1. push tool execution
        newMessages.push({
          role: "tool",
          content: functionResultContent,
          tool_call_id: toolCall.id,
        });
        // 2. get back response
        response = await this.openai.chat.completions.create({
          model: "gpt-4o-mini",
          temperature: 0.1,
          messages: newMessages,
        });
        result = {
          tool_calls: response.choices[0].message.tool_calls,
          content: response.choices[0].message.content,
          toolWasRun: (response.choices[0].message.tool_calls?.length ?? 0) > 0,
        };
        // if rsponse is asking for more tools, repeat
        newMessages.push(response.choices[0].message);
      }
    }

    return {
      content: result.content,
      messages: newMessages,
    };
  }
Then this is how you would use the tool:
const openAi = OpenAiModel.createBasicOpenAI(Deno.env.get("OPENAI_API_KEY")!);
// const response = await ollamaModel.prompt("how are you?", []);
// console.log(response);

const weatherTool = new OpenAITool(
  "weather_tool",
  "gets the current weather in a specific city",
  z.object({
    city: z.string().describe("the city to get the weather for"),
  }),
  async (args) => {
    return {
      weatherResult: `the weather in ${args.city} is super sunny!`,
    };
  }
);

const response = await openAi.promptWithTools(
  [
    {
      role: "system",
      content:
        "you are a friendly assisant who has access to these tools: weather_tool. Based on the chat history, which may include tool calls & results, answer the prompts appropriately.",
    },
    {
      role: "user",
      content: "what is the current weather in Chicago?",
    },
  ],
  [weatherTool]
);

console.log(response);
Creating images
export class OpenAiModel {
  private openai: OpenAI;

  constructor() {
    this.openai = new OpenAI();
  }

  async createImage(
    prompt: string,
    size: "1024x1024" | "512x512" | "256x256" = "1024x1024"
  ) {
    const response = await this.openai.images.generate({
      n: 1,
      size: size,
      prompt: prompt,
      model: "dall-e-3",
    });
    return response.data?.[0]?.url; // returns url
  }
Complete abstraction
import OpenAI from "npm:openai";
import { z } from "npm:zod";
import { zodFunction } from "npm:openai/helpers/zod";

export class OpenAiModel {
  constructor(public openai: OpenAI, public readonly modelName: string) {}

  static createBasicOpenAI(apiKey: string, modelName = "gpt-4o-mini") {
    return new OpenAiModel(
      new OpenAI({
        apiKey,
      }),
      modelName
    );
  }

  static createOllamaAI(modelName: string) {
    return new OpenAiModel(
      new OpenAI({
        baseURL: "http://localhost:11434/v1",
        apiKey: "ollama",
      }),
      modelName
    );
  }

  async createImage(
    prompt: string,
    size: "1024x1024" | "512x512" | "256x256" = "1024x1024"
  ) {
    const response = await this.openai.images.generate({
      n: 1,
      size: size,
      prompt: prompt,
      model: "dall-e-3",
    });
    return response.data?.[0]?.url;
  }

  async prompt(
    prompt: string,
    history: OpenAI.Chat.Completions.ChatCompletionMessageParam[] = []
  ) {
    const response = await this.openai.chat.completions.create({
      model: this.modelName,
      temperature: 0.1,
      messages: [...history, { role: "user", content: prompt }],
    });

    return response.choices[0].message.content;
  }

  async promptWithMessages(
    history: OpenAI.Chat.Completions.ChatCompletionMessageParam[]
  ) {
    const response = await this.openai.chat.completions.create({
      model: this.modelName,
      temperature: 0.1,
      messages: history,
    });

    return {
      history: [
        ...history,
        {
          role: "assistant",
          content: response.choices[0].message.content,
        },
      ] as OpenAI.Chat.Completions.ChatCompletionMessageParam[],
      content: response.choices[0].message.content,
    };
  }

  async promptWithTools<R extends z.ZodObject<any>>(
    messages: OpenAI.Chat.ChatCompletionMessageParam[],
    tools: readonly OpenAITool<R>[]
  ) {
    const newMessages = [...messages];
    let response = await this.openai.chat.completions.create({
      model: this.modelName,
      temperature: 0.1,
      messages: newMessages,
      tools: tools.map(zodFunction),
      tool_choice: "auto",
      parallel_tool_calls: false,
    });

    let result = {
      tool_calls: response.choices[0].message.tool_calls,
      content: response.choices[0].message.content,
      toolWasRun: (response.choices[0].message.tool_calls?.length ?? 0) > 0,
    };
    newMessages.push(response.choices[0].message);

    const maxDepth = 5;
    let depth = 0;

    while (result.toolWasRun && depth < maxDepth) {
      depth++;
      const toolCall = result.tool_calls![0];
      const toolName = toolCall.function.name;
      const toolArgs = JSON.parse(toolCall.function.arguments);
      const tool = tools.find((t) => t.name === toolName);
      if (tool) {
        console.log("Executing tool:", toolName);
        const functionResultContent = await tool.execute(toolArgs);
        // 1. push tool execution
        newMessages.push({
          role: "tool",
          content: functionResultContent,
          tool_call_id: toolCall.id,
        });
        // 2. get back response
        response = await this.openai.chat.completions.create({
          model: this.modelName,
          temperature: 0.1,
          messages: newMessages,
        });
        result = {
          tool_calls: response.choices[0].message.tool_calls,
          content: response.choices[0].message.content,
          toolWasRun: (response.choices[0].message.tool_calls?.length ?? 0) > 0,
        };
        // if rsponse is asking for more tools, repeat
        newMessages.push(response.choices[0].message);
      }
    }

    return {
      content: result.content,
      messages: newMessages,
    };
  }
}

interface MemoryStrategy {
  modifyMessages: (
    messages: OpenAI.Chat.ChatCompletionMessageParam[]
  ) =>
    | OpenAI.Chat.ChatCompletionMessageParam[]
    | Promise<OpenAI.Chat.ChatCompletionMessageParam[]>;
}

export class WindowSlidingStrategy implements MemoryStrategy {
  constructor(public readonly n: number, private systemMessage?: string) {}
  modifyMessages(messages: OpenAI.Chat.ChatCompletionMessageParam[]) {
    return [
      {
        role: "system",
        content: this.systemMessage,
      },
      ...messages.slice(-this.n),
    ] as OpenAI.Chat.ChatCompletionMessageParam[];
  }
}

export class SummarizationStrategy implements MemoryStrategy {
  constructor(
    public openaiModel: OpenAiModel,
    private systemMessage?: string
  ) {}
  async modifyMessages(messages: OpenAI.Chat.ChatCompletionMessageParam[]) {
    const summary = await this.openaiModel.prompt(
      "Your task is to summarize the entire chat history. Just return the summary, and nothing else.",
      messages
    );
    return [
      {
        role: "system",
        content: `${
          this.systemMessage || "you are a helpful assistant"
        }. This is the summary of the entire conversation history up till now:\n\n${summary}`,
      },
    ] as OpenAI.Chat.ChatCompletionMessageParam[];
  }
}

export class SummarizationAndSlidingStrategy implements MemoryStrategy {
  constructor(
    public openaiModel: OpenAiModel,
    public readonly n: number,
    private systemMessage?: string
  ) {}
  async modifyMessages(messages: OpenAI.Chat.ChatCompletionMessageParam[]) {
    const summary = await this.openaiModel.prompt(
      "Your task is to summarize the entire chat history. Just return the summary, and nothing else.",
      messages
    );
    return [
      {
        role: "system",
        content: `${
          this.systemMessage || "you are a helpful assistant"
        }. This is the summary of older messages in the conversation history:\n\n${summary}`,
      },
      ...messages.slice(-this.n),
    ] as OpenAI.Chat.ChatCompletionMessageParam[];
  }
}

export class OpenAiChat<T extends Record<string, any>> {
  private messages: OpenAI.Chat.ChatCompletionMessageParam[] = [];
  private storedMessages: (OpenAI.Chat.ChatCompletionMessageParam & T)[] = [];
  private metadataSetter?: () => T;
  private strategy?: MemoryStrategy;
  private systemMessage?: string;
  private openAiModel: OpenAiModel;
  constructor(public openai: OpenAI, public readonly modelName: string) {
    this.openAiModel = new OpenAiModel(openai, modelName);
  }

  isChatEmpty() {
    return this.messages.length === 0;
  }

  setMetadata(cb: () => T) {
    this.metadataSetter = cb;
  }

  getSystemMessage() {
    return this.systemMessage;
  }

  setStrategy(strategy: MemoryStrategy) {
    this.strategy = strategy;
  }

  private async implementStrategy() {
    if (this.strategy) {
      this.messages = await this.strategy.modifyMessages(this.messages);
    }
  }

  private get metadata() {
    return {
      ...this.metadataSetter?.(),
    };
  }

  async saveToFile(filePath: string) {
    if (filePath.endsWith(".json")) {
      await Deno.writeTextFile(
        filePath,
        JSON.stringify(this.storedMessages, null, 2)
      );
    } else if (filePath.endsWith(".md")) {
      await Deno.writeTextFile(
        filePath,
        this.storedMessages
          .map((message) => `**${message.role}**\n${message.content}`)
          .join("\n\n")
      );
    }
  }

  async loadFromFile(filePath: string) {
    const content = await Deno.readTextFile(filePath);
    this.storedMessages = JSON.parse(content);
    // @ts-ignore
    this.messages = this.storedMessages.map((message) => {
      const base = {
        role: message.role,
        content: message.content,
      };
      if ("name" in message && message.name) {
        // @ts-expect-error: name is only valid for some roles
        base["name"] = message.name;
      }
      return base;
    });
    this.systemMessage = this.messages.find(
      (message) => message.role === "system"
    )?.content as string | undefined;
  }

  addSystemMessage(message: string) {
    if (this.systemMessage) {
      return;
    }
    this.messages.push({ role: "system", content: message });
    this.storedMessages.push({
      role: "system",
      content: message,
      ...this.metadata,
    });
    this.systemMessage = message;
  }

  private addMessageToHistory(role: "user" | "assistant", content: string) {
    this.messages.push({
      role,
      content,
    });
    this.storedMessages.push({
      role,
      content,
      ...this.metadata,
    });
  }

  private async runLLM() {
    const response = await this.openAiModel.promptWithMessages(this.messages);

    const text = response.content;

    this.addMessageToHistory("assistant", text!);
    this.implementStrategy();

    return text!;
  }

  async prompt(prompt: string) {
    this.addMessageToHistory("user", prompt);

    const response = await this.openai.chat.completions.create({
      model: this.modelName,
      temperature: 0.1,
      messages: this.messages,
    });

    const text = response.choices[0].message.content;

    this.addMessageToHistory("assistant", text!);
    this.implementStrategy();

    return text;
  }

  private async handleToolApprovals<R extends z.ZodObject<any>>(
    tools: readonly OpenAITool<R>[],
    toolCalls: OpenAI.Chat.Completions.ChatCompletionMessageToolCall[],
    onAskPermission?: (tool: OpenAITool<R>) => Promise<boolean>
  ) {
    if (!onAskPermission) {
      return true;
    }
    const toolApprovals = tools.filter(
      (tool) =>
        tool.needsPermission &&
        toolCalls.some((call) => call.function.name === tool.name)
    );
    if (toolApprovals.length > 0) {
      const permission = await onAskPermission(toolApprovals[0]);
      return permission;
    }
    return true;
  }

  async promptWithTools<R extends z.ZodObject<any>>(
    prompt: string,
    tools: readonly OpenAITool<R>[],
    onAskPermission?: (tool: OpenAITool<R>) => Promise<boolean>
  ) {
    this.addMessageToHistory("user", prompt);

    const mappedTools = tools.map(zodFunction);

    let response = await this.openai.chat.completions.create({
      model: this.modelName,
      temperature: 0.1,
      messages: this.messages,
      tools: mappedTools,
      tool_choice: "auto",
      parallel_tool_calls: false,
    });

    let result = {
      tool_calls: response.choices[0].message.tool_calls,
      content: response.choices[0].message.content,
      toolWasRun: (response.choices[0].message.tool_calls?.length ?? 0) > 0,
    };

    if (!result.toolWasRun) {
      this.addMessageToHistory("assistant", result.content!);
    } else {
      const toolUseIsApproved = await this.handleToolApprovals(
        tools,
        result.tool_calls!,
        onAskPermission
      );
      if (toolUseIsApproved) {
        this.messages.push(response.choices[0].message);
      } else {
        this.messages.push(response.choices[0].message);
        this.messages.push({
          role: "tool",
          content: "tool use was not approved",
          tool_call_id: response.choices[0].message.tool_calls![0].id,
        });
        return this.runLLM();
      }
    }

    const maxDepth = 5;
    let depth = 0;

    console.log(this.messages);

    while (result.toolWasRun && depth < maxDepth) {
      depth++;
      const toolCall = result.tool_calls![0];
      const toolName = toolCall.function.name;
      const toolArgs = JSON.parse(toolCall.function.arguments);
      const tool = tools.find((t) => t.name === toolName);
      if (tool) {
        console.log("Executing tool:", toolName);
        const functionResultContent = await tool.execute(toolArgs);
        // 1. push tool execution
        this.messages.push({
          role: "tool",
          content: functionResultContent,
          tool_call_id: toolCall.id,
        });
        // this.storedMessages.push({
        //     role: "tool",
        //     content: functionResultContent,
        //     tool_call_id: toolCall.id,
        //     ...this.
        //   });
        // 2. get back response
        response = await this.openai.chat.completions.create({
          model: this.modelName,
          temperature: 0.1,
          messages: this.messages,
          tools: mappedTools,
          tool_choice: "auto",
          parallel_tool_calls: false,
        });
        result = {
          tool_calls: response.choices[0].message.tool_calls,
          content: response.choices[0].message.content,
          toolWasRun: (response.choices[0].message.tool_calls?.length ?? 0) > 0,
        };
        if (!result.toolWasRun) {
          this.addMessageToHistory("assistant", result.content!);
        } else {
          const toolUseIsApproved = await this.handleToolApprovals(
            tools,
            result.tool_calls!,
            onAskPermission
          );
          if (toolUseIsApproved) {
            this.messages.push(response.choices[0].message);
          } else {
            this.messages.push(response.choices[0].message);
            this.messages.push({
              role: "tool",
              content: "tool use was not approved",
              tool_call_id: response.choices[0].message.tool_calls![0].id,
            });
            return this.runLLM();
          }
        }
      }
    }

    this.implementStrategy();

    return result.content;
  }
}

export class OpenAITool<T extends z.ZodObject<any>> {
  constructor(
    public name: string,
    public description: string,
    public parameters: T,
    public cb: (args: z.infer<T>) => Promise<Record<string, any>>
  ) {}

  public needsPermission: boolean = false;
  public setNeedsPermission(permission: boolean) {
    this.needsPermission = permission;
  }

  async execute(args: z.infer<T>) {
    try {
      return JSON.stringify(await this.cb(args));
    } catch {
      return `error: tool ${this.name} not able to be called`;
    }
  }
}
OpenAI Compatibility API
Using the open ai compatibility API, you can connnect different models and use the same exact openAI syntax for all of them, except some may not be able to to use tools or have multimodality.
Google connection
const openai = new OpenAI({
  apiKey: GEMINI_API_KEY,
  baseURL: 'https://generativelanguage.googleapis.com/v1beta/openai/',
});

const response = await openai.chat.completions.create({
  model: 'gemini-2.0-flash',
  messages: [
    {role: 'system', content: 'You are a helpful assistant.'},
    {
      role: 'user',
      content: 'Explain to me how AI works',
    },
  ],
});
Google Genai
Intro
- Install with
npm install @google/generative-ai - Instantiate model like so:
import { GoogleGenerativeAI } from '@google/generative-ai';

// Initialize with API key
const genAI = new GoogleGenerativeAI(process.env.GOOGLE_API_KEY);

// Get model instance
const model = genAI.getGenerativeModel({ model: "gemini-pro" });

// Popular models:
// - gemini-pro: Best for text tasks
// - gemini-pro-vision: For image + text tasks
// - gemini-1.5-pro: Latest with larger context
// - gemini-1.5-flash: Faster, more efficient

// get model instance with configuration
const model2 = genAI.getGenerativeModel({
  model: "gemini-pro",
  generationConfig: {
    temperature: 0.7,        // Creativity (0.0-1.0)
    topK: 40,               // Top-K sampling
    topP: 0.95,             // Top-P sampling
    maxOutputTokens: 1024,   // Max response length
    stopSequences: ["END"]   // Stop generation at these sequences
  }
});
Basic model calling
model.generateContent(prompt): returns the AI responsemodel.generateContentStream(prompt): returns the AI response as a stream
async function generateText() {
  const model = genAI.getGenerativeModel({ model: "gemini-pro" });

  const prompt = "Write a short poem about AI";
  const result = await model.generateContent(prompt);

  console.log(result.response.text());
}

async function streamText() {
  const model = genAI.getGenerativeModel({ model: "gemini-pro" });

  const prompt = "Tell me a long story about space exploration";
  const result = await model.generateContentStream(prompt);

  for await (const chunk of result.stream) {
    const chunkText = chunk.text();
    process.stdout.write(chunkText);
  }
}
chat session
Google genai package offers their own class for keeping track of message history in memory.
async function chatExample() {
  const model = genAI.getGenerativeModel({ model: "gemini-pro" });

  // Start chat with optional history
  const chat = model.startChat({
    history: [
      {
        role: "user",
        parts: [{ text: "Hello, I'm interested in learning about AI." }]
      },
      {
        role: "model",
        parts: [{ text: "Hello! I'd be happy to help you learn about AI. What specific aspect interests you most?" }]
      }
    ]
  });

  // Send message
  const result = await chat.sendMessage("Tell me about machine learning");
  console.log(result.response.text());

  // Continue conversation
  const result2 = await chat.sendMessage("What are some practical applications?");
  console.log(result2.response.text());
}
You can also stream chat responses like so:
async function streamingChat() {
  const model = genAI.getGenerativeModel({ model: "gemini-pro" });
  const chat = model.startChat();

  const result = await chat.sendMessageStream("Explain quantum computing in detail");

  for await (const chunk of result.stream) {
    process.stdout.write(chunk.text());
  }
}
Structured outputs
Here is how you can use structured outputs:
async function structuredOutput() {
  const model = genAI.getGenerativeModel({
    model: "gemini-1.5-pro",
    generationConfig: {
      responseMimeType: "application/json",
      responseSchema: {
        type: "object",
        properties: {
          recipes: {
            type: "array",
            items: {
              type: "object",
              properties: {
                name: { type: "string" },
                ingredients: {
                  type: "array",
                  items: { type: "string" }
                },
                instructions: {
                  type: "array",
                  items: { type: "string" }
                },
                prep_time: { type: "string" },
                difficulty: {
                  type: "string",
                  enum: ["easy", "medium", "hard"]
                }
              },
              required: ["name", "ingredients", "instructions"]
            }
          }
        }
      }
    }
  });

  const prompt = "Give me 2 easy pasta recipes";
  const result = await model.generateContent(prompt);

  const jsonResponse = JSON.parse(result.response.text());
  console.log(jsonResponse);
}
Image generation
async function generateImage() {
  const model = genAI.getGenerativeModel({ model: "imagen-3.0-generate-001" });

  const prompt = "A serene mountain landscape with a crystal-clear lake reflecting snow-capped peaks";

  const result = await model.generateContent({
    contents: [{ role: "user", parts: [{ text: prompt }] }]
  });

  // Get image data
  const imageData = result.response.candidates[0].content.parts[0].inlineData;

  // Save image
  const fs = require('fs');
  const buffer = Buffer.from(imageData.data, 'base64');
  fs.writeFileSync('generated_image.png', buffer);
}
Image and file analysis
By pass in a message with inlineData property, you can send binary data of any mime type to the AI.
async function analyzeImage() {
  const model = genAI.getGenerativeModel({ model: "gemini-pro-vision" });

  // Read image file
  const fs = require('fs');
  const imageBuffer = fs.readFileSync('path/to/image.jpg');
  const imageBase64 = imageBuffer.toString('base64');

  const prompt = "Describe this image in detail and identify any objects, people, or activities";

  const result = await model.generateContent([
    { text: prompt },
    {
      inlineData: {
        mimeType: "image/jpeg",
        data: imageBase64
      }
    }
  ]);

  console.log(result.response.text());
}
Embeddings
async function getTextEmbeddings() {
  const model = genAI.getGenerativeModel({ model: "embedding-001" });

  const texts = [
    "The quick brown fox jumps over the lazy dog",
    "Machine learning is a subset of artificial intelligence",
    "Python is a popular programming language for data science"
  ];

  const embeddings = [];

  for (const text of texts) {
    const result = await model.embedContent(text);
    embeddings.push({
      text: text,
      embedding: result.embedding.values
    });
  }

  return embeddings;
}
function calculateCosineSimilarity(a, b) {
  const dotProduct = a.reduce((sum, val, i) => sum + val * b[i], 0);
  const magnitudeA = Math.sqrt(a.reduce((sum, val) => sum + val * val, 0));
  const magnitudeB = Math.sqrt(b.reduce((sum, val) => sum + val * val, 0));
  return dotProduct / (magnitudeA * magnitudeB);
}

async function findSimilarDocuments(query, documentEmbeddings) {
  const model = genAI.getGenerativeModel({ model: "embedding-001" });

  // Get query embedding
  const queryResult = await model.embedContent(query);
  const queryEmbedding = queryResult.embedding.values;

  // Calculate similarities
  const similarities = documentEmbeddings.map(doc => ({
    ...doc,
    similarity: calculateCosineSimilarity(queryEmbedding, doc.embedding)
  }));

  // Sort by similarity
  return similarities.sort((a, b) => b.similarity - a.similarity);
}
Model info
async function countTokens() {
  const model = genAI.getGenerativeModel({ model: "gemini-pro" });

  const prompt = "Tell me about the history of artificial intelligence";
  const result = await model.countTokens(prompt);

  console.log('Total tokens:', result.totalTokens);
  console.log('Prompt tokens:', result.promptTokens);
}

async function getModelInfo() {
  const model = genAI.getGenerativeModel({ model: "gemini-pro" });

  const info = await model.getModel();
  console.log('Model name:', info.name);
  console.log('Version:', info.version);
  console.log('Input token limit:', info.inputTokenLimit);
  console.log('Output token limit:', info.outputTokenLimit);
}
Best practices
messaging queue
Here is a reusable way to generate AI messages through a messaging queue:
// Implement proper resource management
class GeminiClient {
  constructor(apiKey) {
    this.genAI = new GoogleGenerativeAI(apiKey);
    this.requestQueue = [];
    this.processing = false;
  }

  async generateContent(prompt, options = {}) {
    return new Promise((resolve, reject) => {
      this.requestQueue.push({ prompt, options, resolve, reject });
      this.processQueue();
    });
  }

  async processQueue() {
    if (this.processing || this.requestQueue.length === 0) return;

    this.processing = true;
    const { prompt, options, resolve, reject } = this.requestQueue.shift();

    try {
      const model = this.genAI.getGenerativeModel(options);
      const result = await model.generateContent(prompt);
      resolve(result.response.text());
    } catch (error) {
      reject(error);
    } finally {
      this.processing = false;
      // Process next item
      setTimeout(() => this.processQueue(), 100);
    }
  }
}
Vercel AI
The great thing about the ai npm package from vercel is that it is model-agnostic, meaning it's just plug and play with different models and no need to learn different APIs for google, claude, OpenAI, etc.
You can create a simple model like so:
import { openai } from "@ai-sdk/openai";

const model = openai("gpt-4o-mini")

const { text } = await generateText({
  model: model,
  prompt: "What is the diameter of the sun?",
  system: "you are a friendly AI assistant",
});
Text features
Here is a class wrapper around the AI library, providing abstractions over these different text generation methods from the ai package.
generateText(options): takes in an object of options and returns the AI's response, complete with finish reason, tool calls, etc.streamText(options): takes in an object of options and streams back the AI's response.
Structured outputs
  // 3. JSON example:
  const colorSchema = z.object({
    color: z
      .string()
      .describe("The hex color code") // for prompt engineering
      .refine((color) => color.match(/^#([0-9a-fA-F]{6})$/)),
  });
  const ai = new VercelAI(model);
  const { color } = await ai.getJSONFromPrompt(
    "You are a helpful assistant that generates colors in hexadecimal format as string, like #000000",
    "Generate a random color",
    colorSchema
  );
  console.log("Color: ", color);
Here is an example of using structured outputs with the vercel API:
async function structuredOutputObjectGeneration() {
  const systemPrompt = Deno.readTextFileSync("./structuredoutput.txt");
  const prompt = `
  z.Object({ name: z.string(), age: z.number() }) /nothink
  `;
  const response = await localModel.generateText(prompt, systemPrompt);
  const parsedResponse = response
    .replace("```json", "")
    .replace("```", "")
    .trim();
  console.log(JSON.parse(parsedResponse));
}
enums
  const enumValues = [
    "red",
    "very light blue",
    "green",
    "yellow",
    "purple",
  ] as const;
  const ai = new VercelAI(model);
  const classification = await ai.getClassificationFromPrompt(
    "You are a helpful assistant that classifies colors.",
    "What is the color of the sky?",
    enumValues as unknown as string[]
  );
  console.log("Classification: ", classification); // prints "very light blue"
tOol calls
Tool calls are pretty simple in vercel, but don't work with some providers, like google.
The first step is to create a tool:
  const addNumbersTool = tool({
    description: "Add two numbers together",
    parameters: z.object({
      a: z.number().describe("The first number to add"),
      b: z.number().describe("The second number to add"),
    }),
    execute: async ({ a, b }) => {
      return a + b;
    },
  });
Then you can use it like so, passing in tools to the generate text method, and specifying a maxSteps so that the AI can recurse on itself and print out actual text from the tool call.
  static createTool<T extends z.ZodSchema>(
    description: string,
    parameters: T,
    execute: (args: z.infer<T>) => Promise<any>
  ) {
    return tool({
      description,
      parameters,
      execute: async (args) => {
        const result = await execute(args);
        return JSON.stringify(result, null, 2);
      },
    });
  }

async callWithTools(prompt: string, systemPrompt: string, tools: ToolSet) {
    const { text, toolCalls, toolResults, steps } = await generateText({
      model: this.model,
      prompt,
      system: systemPrompt,
      tools,
      toolChoice: "auto",
      maxSteps: 3,
    });
    if (toolCalls.length > 0) {
      console.log("tools called");
      const lastToolResult = steps.at(-1);
      if (!lastToolResult) {
        return { text };
      }
      const { toolResults: results } = lastToolResult;
      return {
        text,
        finalToolResult: (results.at(-1) as unknown as any)?.result,
        toolCalls,
        toolResults,
      };
    }
    return { text };
  }
You can then use it like so:
const vercelAI = new VercelAI(model, modelOptions);

async function callWithTools(query: string) {
  const movieSearchTool = VercelAI.createTool(
    "A tool to get the top 5 movies that are most similar to the user's query",
    z.object({
      query: z.string(),
    }),
    async (args) => {
      const results = await vectorStore.similaritySearch(args.query, 5);
      return results;
    }
  );
  const results = await vercelAI.callWithTools({
    prompt: query,
    systemPrompt:
      "You are a helpful assistant that can answer questions about the movie database. You have access to the following tools: movieSearch.",
    tools: {
      movieSearch: movieSearchTool,
    },
  });
  console.log(results.text);
}

await callWithTools("What are some good sci fi movies with aliens?");
Embeddings
You can use any embeddings model with vercel ai, and use these three important functions from the ai package:
embed(options): Takes in a string and returns its embeddingembedMany(options): Takes in an array of strings and returns their embeddingscosineSimilarity(emb1, emb2): runs a cosine similarity check between two embeddings
export const embeddingModels = {
  get_lmstudio: (modelName: string) => {
  // 1. create LM studio model
    const model = createOpenAICompatible({
      name: "lmstudio",
      baseURL: `http://localhost:1234/v1`,
      apiKey: "1234567890",
    });

// 2. render text embedding model
    return {
      model: model.textEmbeddingModel(modelName),
      modelOptions: {
        maxRetries: 0,
      },
    };
  },
};
Here is the abstraction:
export class VercelAIEmbedding {
  constructor(
    public readonly model: EmbeddingModel<string>,
  ) {}

  async embedOne(text: string) {
    const response = await embed({
      model: this.model,
      value: text,
    });
    return response.embedding;
  }

  async embedMany(texts: string[]) {
    const response = await embedMany({
      model: this.model,
      values: texts,
    });
    return {
      embeddings: response.embeddings,
      createVectorStore: () => {
        const vectorDatabase = response.embeddings.map((embedding, index) => ({
          value: texts[index],
          embedding,
        }));
        return vectorDatabase;
      },
    };
  }

  async getNearestNeighbors(
    text: string,
    k: number,
    vectorDatabase: {
      value: string;
      embedding: Embedding;
    }[]
  ) {
    const response = await this.embedOne(text);
    const entries = vectorDatabase
      .map((entry) => {
        return {
          value: entry.value,
          similarity: cosineSimilarity(entry.embedding, response),
        };
      })
      .sort((a, b) => b.similarity - a.similarity);
    return entries.slice(0, Math.min(k, entries.length));
  }
}
ANd you can use it like so:
const { model: embeddingModel, modelOptions: embeddingModelOptions } =
  embeddingModels.get_lmstudio("text-embedding-nomic-embed-text-v1.5");
const lmStudioEmbeddings = new VercelAIEmbedding(embeddingModel);

async function getNearestNeighbors() {
  const { createVectorStore, embeddings } = await lmStudioEmbeddings.embedMany([
    "dog",
    "cat",
    "bird",
    "fish",
    "horse",
    "rabbit",
    "snake",
    "tiger",
  ]);
  const vectorDatabase = createVectorStore();
  const nearestNeighbors = await lmStudioEmbeddings.getNearestNeighbors(
    "eagle",
    3,
    vectorDatabase
  );
  console.log(nearestNeighbors);
}
FIles and images
This is how you can add images and files to your messages, by passing them in as base 64.
export const describeImage = async (imageUrl: string) => {
  const base64 = await fetch(imageUrl)
    .then((res) => res.arrayBuffer())
    .then((buffer) => Buffer.from(buffer).toString("base64"));
  const { text } = await generateText({
    model: localModel.model,
    system:
      `You will receive an image. ` +
      `Please create an alt text for the image. ` +
      `Be concise. ` +
      `Use adjectives only when necessary. ` +
      `Do not pass 160 characters. ` +
      `Use simple language. `,
    messages: [
      {
        role: "user",
        content: [
          {
            type: "image",
            image: base64,
          },
        ],
      },
    ],
  });

  return text;
};
Text abstraction
export class VercelAI {
  constructor(
    public readonly model: LanguageModelV1,
    private modelOptions?: VercelAIOptions
  ) {}

  async generateText(prompt: string, systemPrompt?: string) {
    const response = await generateText({
      model: this.model,
      prompt,
      system: systemPrompt,
      maxRetries: this.modelOptions?.maxRetries,
    });
    return this.modelOptions
      ? transformResponse(response.text, this.modelOptions)
      : response.text;
  }

  async callWithTools({
    prompt,
    systemPrompt,
    tools,
  }: {
    prompt: string;
    systemPrompt?: string;
    tools: ToolSet;
  }) {
    const { text, toolCalls, toolResults, steps } = await generateText({
      model: this.model,
      prompt,
      system: systemPrompt,
      tools,
      toolChoice: "auto",
      maxSteps: 3,
      maxRetries: this.modelOptions?.maxRetries,
    });
    if (toolCalls.length > 0) {
      console.log("tools called");
      const lastToolResult = steps.at(-1);
      if (!lastToolResult) {
        return { text };
      }
      const { toolResults: results } = lastToolResult;
      return {
        text,
        finalToolResult: (results.at(-1) as unknown as any)?.result,
        toolCalls,
        toolResults,
      };
    }
    return { text };
  }

  generateTextStream(prompt: string) {
    const { textStream } = streamText({
      model: this.model,
      prompt,
      maxRetries: this.modelOptions?.maxRetries,
    });
    return textStream;
  }

  async getJSONFromPrompt<T extends z.ZodSchema>({
    systemPrompt,
    prompt,
    schema,
  }: {
    systemPrompt?: string;
    prompt: string;
    schema: T;
  }) {
    const response = await generateObject({
      model: this.model,
      system: systemPrompt,
      prompt,
      schema,
      maxRetries: this.modelOptions?.maxRetries,
    });
    return response.object as z.infer<T>;
  }

  async getClassificationFromPrompt<T extends any[]>({
    systemPrompt,
    prompt,
    enumValues,
  }: {
    systemPrompt?: string;
    prompt: string;
    enumValues: T;
  }) {
    const response = await generateObject({
      model: this.model,
      system: systemPrompt,
      prompt,
      enum: enumValues,
      output: "enum",
      maxRetries: this.modelOptions?.maxRetries,
    });
    return response.object as T[number];
  }
}
Chat abstraction
This is an abstraction over text chat, where it has the concept of persistent messages:
export class VercelAIChat {
  constructor(
    public readonly model: LanguageModelV1,
    private messages: CoreMessage[] = []
  ) {}

  addSystemMessage(message: string) {
    this.messages.push({
      role: "system",
      content: message,
    });
  }

  async chat(message: string) {
    this.messages.push({
      role: "user",
      content: message,
    });
    const response = await generateText({
      model: this.model,
      messages: this.messages,
    });
    this.messages.push({
      role: "assistant",
      content: response.text,
    });
    return response.text;
  }

  async chatWithTools(
    message: string,
    tools: ToolSet
  ): Promise<{ text: string; toolResult?: any | undefined }> {
    this.messages.push({
      role: "user",
      content: message,
    });
    const { text, toolCalls, steps } = await generateText({
      model: this.model,
      messages: this.messages,
      tools,
      maxSteps: 3,
    });
    // tool was called
    if (toolCalls.length > 0) {
      const lastToolResult = steps.at(-1);
      if (!lastToolResult) {
        return { text };
      }
      const { text: stepText, toolCalls, toolResults } = lastToolResult;
      this.messages.push({
        role: "assistant",
        content: stepText,
      });
      return {
        text: stepText,
        toolResult: (toolResults.at(-1) as unknown as any)?.result,
      };
    }

    return { text };
  }

  async streamChat(message: string, onChunk: (chunk: string) => Promise<void>) {
    this.messages.push({
      role: "user",
      content: message,
    });
    const { textStream, text } = streamText({
      model: this.model,
      messages: this.messages,
    });
    for await (const chunk of textStream) {
      await onChunk(chunk);
    }
    const finalText = await text;
    this.messages.push({
      role: "assistant",
      content: finalText,
    });
    return finalText;
  }

  async saveChat(path: string) {
    const newPath = z
      .string()
      .regex(/^.*\.(json|md)$/)
      .parse(path);
    const extension = newPath.split(".").pop();
    const type = extension === "json" ? "json" : "markdown";
    if (type === "json") {
      await fs.writeFile(path, JSON.stringify(this.messages, null, 2));
    } else {
      await fs.writeFile(
        path,
        this.messages.map((m) => `\n**${m.role}**: \n\n${m.content}`).join("\n")
      );
    }
  }
}
Complete abstraction
import {
  generateText,
  LanguageModelV1,
  streamText,
  CoreMessage,
  generateObject,
  tool,
  Tool,
  ToolSet,
  Output,
  TextPart,
  ImagePart,
  FilePart,
  EmbeddingModel,
  cosineSimilarity,
  embed,
  embedMany,
  Embedding,
} from "npm:ai";
import { google } from "npm:@ai-sdk/google";
import { xai } from "npm:@ai-sdk/xai";
import { openai } from "npm:@ai-sdk/openai";
import fs from "node:fs/promises";
import { z } from "npm:zod";
import { Buffer } from "node:buffer";
import { createOpenAICompatible } from "npm:@ai-sdk/openai-compatible";

const checkEnv = (key: string) => {
  if (!Deno.env.get(key)) {
    throw new Error(`${key} is not set`);
  }
};

export const embeddingModels = {
  get_lmstudio: (modelName: string, dimensions: number = 1536) => {
    const model = createOpenAICompatible({
      name: "lmstudio",
      baseURL: `http://localhost:1234/v1`,
      apiKey: "1234567890",
    });
    return {
      model: model.textEmbeddingModel(modelName, {
        dimensions,
      }),
      modelOptions: {
        maxRetries: 0,
      },
    };
  },
};

export const models = {
  get_openai: () => {
    checkEnv("OPENAI_API_KEY");
    return openai("gpt-4o-mini");
  },
  get_lmstudio: (modelName: string = "qwen/qwen3-1.7b") => {
    const model = createOpenAICompatible({
      name: "lmstudio",
      baseURL: `http://localhost:1234/v1`,
      apiKey: "1234567890",
    });
    return {
      model: model(modelName),
      modelOptions: {
        maxRetries: 0,
      },
    };
  },
  get_ollama: (modelName: string) => {
    const model = createOpenAICompatible({
      name: "ollama",
      baseURL: `http://localhost:11434/v1`,
      apiKey: "1234567890",
    });
    return {
      model: model(modelName),
      modelOptions: {
        maxRetries: 0,
      },
    };
  },
  get_google: (
    modelType:
      | "gemini-2.5-flash-preview-04-17"
      | "gemini-2.5-flash-lite-preview-06-17"
      | "gemma-3n-e4b-it"
      | "gemma-3-27b-it"
      | "gemma-3-12b-it" = "gemini-2.5-flash-preview-04-17"
  ) => {
    checkEnv("GOOGLE_GENERATIVE_AI_API_KEY");
    // console.log("Tool calling does not work with Google models");
    return google(modelType);
  },
  get_xai: () => {
    checkEnv("XAI_API_KEY");
    return xai("grok-3-beta");
  },
};

interface VercelAIOptions {
  maxRetries?: number;
  noThink?: boolean;
  hideThinking?: boolean;
}

function transformResponse(response: string, options: VercelAIOptions) {
  if (options.hideThinking) {
    return response.replace("<think>", "").replace("</think>", "");
  }
  return response;
}

export class VercelAIEmbedding {
  constructor(
    public readonly model: EmbeddingModel<string>,
    private modelOptions?: VercelAIOptions
  ) {}

  async embedOne(text: string) {
    const response = await embed({
      model: this.model,
      value: text,
      maxRetries: this.modelOptions?.maxRetries,
    });
    return response.embedding;
  }

  async embedMany(texts: string[]) {
    const response = await embedMany({
      model: this.model,
      values: texts,
      maxRetries: this.modelOptions?.maxRetries,
    });
    return {
      embeddings: response.embeddings,
      createVectorStore: () => {
        const vectorDatabase = response.embeddings.map((embedding, index) => ({
          value: texts[index],
          embedding,
        }));
        return vectorDatabase;
      },
    };
  }

  async getNearestNeighbors(
    text: string,
    k: number,
    vectorDatabase: {
      value: string;
      embedding: Embedding;
    }[]
  ) {
    const response = await this.embedOne(text);
    const entries = vectorDatabase
      .map((entry) => {
        return {
          value: entry.value,
          similarity: cosineSimilarity(entry.embedding, response),
        };
      })
      .sort((a, b) => b.similarity - a.similarity);
    return entries.slice(0, Math.min(k, entries.length));
  }
}

export class VercelAI {
  constructor(
    public readonly model: LanguageModelV1,
    private modelOptions?: VercelAIOptions
  ) {}

  async generateText(prompt: string, systemPrompt?: string) {
    const response = await generateText({
      model: this.model,
      prompt,
      system: systemPrompt,
      maxRetries: this.modelOptions?.maxRetries,
    });
    return this.modelOptions
      ? transformResponse(response.text, this.modelOptions)
      : response.text;
  }

  async callWithTools({
    prompt,
    systemPrompt,
    tools,
  }: {
    prompt: string;
    systemPrompt?: string;
    tools: ToolSet;
  }) {
    const { text, toolCalls, toolResults, steps } = await generateText({
      model: this.model,
      prompt,
      system: systemPrompt,
      tools,
      toolChoice: "auto",
      maxSteps: 3,
      maxRetries: this.modelOptions?.maxRetries,
    });
    if (toolCalls.length > 0) {
      console.log("tools called");
      const lastToolResult = steps.at(-1);
      if (!lastToolResult) {
        return { text };
      }
      const { toolResults: results } = lastToolResult;
      return {
        text,
        finalToolResult: (results.at(-1) as unknown as any)?.result,
        toolCalls,
        toolResults,
      };
    }
    return { text };
  }

  static createTool<T extends z.ZodSchema>(
    description: string,
    parameters: T,
    execute: (args: z.infer<T>) => Promise<any>
  ) {
    return tool({
      description,
      parameters,
      execute: async (args) => {
        try {
          const result = await execute(args);
          return JSON.stringify(result, null, 2);
        } catch (error) {
          console.error(error);
          return "Error occurred when trying to execute tool";
        }
      },
    });
  }

  generateTextStream(prompt: string) {
    const { textStream } = streamText({
      model: this.model,
      prompt,
      maxRetries: this.modelOptions?.maxRetries,
    });
    return textStream;
  }

  async getJSONFromPrompt<T extends z.ZodSchema>({
    systemPrompt,
    prompt,
    schema,
  }: {
    systemPrompt?: string;
    prompt: string;
    schema: T;
  }) {
    const response = await generateObject({
      model: this.model,
      system: systemPrompt,
      prompt,
      schema,
      maxRetries: this.modelOptions?.maxRetries,
    });
    return response.object as z.infer<T>;
  }

  async getClassificationFromPrompt<T extends any[]>({
    systemPrompt,
    prompt,
    enumValues,
  }: {
    systemPrompt?: string;
    prompt: string;
    enumValues: T;
  }) {
    const response = await generateObject({
      model: this.model,
      system: systemPrompt,
      prompt,
      enum: enumValues,
      output: "enum",
      maxRetries: this.modelOptions?.maxRetries,
    });
    return response.object as T[number];
  }
}

export class VercelAIChat {
  constructor(
    public readonly model: LanguageModelV1,
    private messages: CoreMessage[] = [],
    private modelOptions?: VercelAIOptions
  ) {}

  addSystemMessage(message: string) {
    this.messages.push({
      role: "system",
      content: message,
    });
  }

  loadChat(content: string) {
    try {
      const data = JSON.parse(content);
      this.messages = data.map((m: any) => ({
        role: m.role,
        content: m.content,
      }));
    } catch (error) {
      throw new Error("Invalid chat format");
    }
  }

  async chat(message: string) {
    this.messages.push({
      role: "user",
      content: message,
    });
    const response = await generateText({
      model: this.model,
      messages: this.messages,
    });
    this.messages.push({
      role: "assistant",
      content: response.text,
    });
    return response.text;
  }

  async chatWithMessage(message: CoreMessage) {
    this.messages.push(message);
    const response = await generateText({
      model: this.model,
      messages: this.messages,
    });
    this.messages.push({
      role: "assistant",
      content: response.text,
    });
    return response.text;
  }

  async chatWithTools(
    message: string,
    tools: ToolSet
  ): Promise<{ text: string; toolResult?: any | undefined }> {
    this.messages.push({
      role: "user",
      content: message,
    });
    const { text, toolCalls, steps } = await generateText({
      model: this.model,
      messages: this.messages,
      tools,
      maxSteps: 3,
    });
    // tool was called
    if (toolCalls.length > 0) {
      const lastToolResult = steps.at(-1);
      if (!lastToolResult) {
        return { text };
      }
      const { text: stepText, toolCalls, toolResults } = lastToolResult;
      this.messages.push({
        role: "assistant",
        content: stepText,
      });
      return {
        text: stepText,
        toolResult: (toolResults.at(-1) as unknown as any)?.result,
      };
    }

    return { text };
  }

  async streamChat(message: string, onChunk: (chunk: string) => Promise<void>) {
    this.messages.push({
      role: "user",
      content: message,
    });
    const { textStream, text } = streamText({
      model: this.model,
      messages: this.messages,
    });
    for await (const chunk of textStream) {
      await onChunk(chunk);
    }
    const finalText = await text;
    this.messages.push({
      role: "assistant",
      content: finalText,
    });
    return finalText;
  }

  async saveChat(path: string) {
    const newPath = z
      .string()
      .regex(/^.*\.(json|md)$/)
      .parse(path);
    const extension = newPath.split(".").pop();
    const type = extension === "json" ? "json" : "markdown";
    if (type === "json") {
      await fs.writeFile(path, JSON.stringify(this.messages, null, 2));
    } else {
      await fs.writeFile(
        path,
        this.messages.map((m) => `\n**${m.role}**: \n\n${m.content}`).join("\n")
      );
    }
  }
}

export class VercelAIFileCompletions {
  constructor(
    public readonly model: LanguageModelV1,
    private modelOptions?: VercelAIOptions
  ) {}

  static createFileMessage(
    prompt: string,
    parts: (
      | {
          type: "file";
          file: Uint8Array | ArrayBuffer | Buffer;
          filename: string;
          mimeType: string;
        }
      | { type: "image"; image: Uint8Array | ArrayBuffer | URL }
    )[]
  ): CoreMessage {
    return {
      role: "user",
      content: prompt,
      parts: parts.map((part) => {
        if (part.type === "file") {
          return {
            type: "file",
            data: part.file,
            filename: part.filename,
            mimeType: part.mimeType,
          };
        } else {
          return {
            type: "image",
            image: part.image,
          };
        }
      }),
    } as CoreMessage;
  }

  async generateTextWithFile(message: CoreMessage) {
    const response = await generateText({
      model: this.model,
      messages: [message],
      maxRetries: this.modelOptions?.maxRetries,
    });
    return this.modelOptions
      ? transformResponse(response.text, this.modelOptions)
      : response.text;
  }
}
Langchain
Creating models
The nice thing about langchain models is that they all expose the same APIs, creating an abstraction over the different implementation details behind different LLMs.
llama model
Here is how you can configure an llm from an ollama model:
import { ChatOllama } from "npm:@langchain/ollama";

// 1. Set up the Ollama LLM
const llm = new ChatOllama({
  baseUrl: "http://localhost:11434",
  model: "llama3.2",
  temperature: 0,
  maxRetries: 0,
});

const result = await llm.invoke("What is the capital of France?");
console.log(result);
invoke + prompt template
There are essentially three ways to query an LLM in langchain:
- Using
llm.invoke()and passing in a one time promtp - Using
llm.invoke()and passing in an array of tuples, where each 2-element string tuple represents a message in the chat history.
llm.invoke(prompt): takes in a prompt and returns the result along with its metadata.llm.invoke(messages): takes in an array of chat messages, each message a tuple, and returns the result along with its metadata.
You can also use chat prompt templates with message history:
Here is an example of how to use chat prompt templates to simplify the pipeline of injecting variables into chat history, making it configurable for each invocation.
import { ChatPromptTemplate } from "@langchain/core/prompts";

const prompt = ChatPromptTemplate.fromMessages([
  [
    "system",
    "You are a helpful assistant that translates {input_language} to {output_language}.",
  ],
  ["human", "{input}"],
]);

const chain = prompt.pipe(llm);
await chain.invoke({
  input_language: "English",
  output_language: "German",
  input: "I love programming.",
});
And here is a complete class put together:
import { ChatOllama, ChatOllamaCallOptions } from "npm:@langchain/ollama";
import { ChatPromptTemplate } from "npm:@langchain/core/prompts";

export class OllamaLangchain {
  private llm: ChatOllama;

  constructor(model: string, options: ChatOllamaCallOptions = {}) {
    this.llm = new ChatOllama({
      baseUrl: "http://localhost:11434",
      model: model,
      maxRetries: 0,
      ...options,
    });
  }

  async invoke(prompt: string) {
    return await this.llm.invoke(prompt);
  }

  async invokeWithMessages(messageTuples: [string, string][]) {
    return await this.llm.invoke(messageTuples);
  }

  createChain<T extends Record<string, unknown>>(
    messageTuples: [string, string][]
  ) {
    const prompt = ChatPromptTemplate.fromMessages(messageTuples);
    const chain = prompt.pipe(this.llm);
    return {
      chain,
      invokeChain: async (data: T) => {
        return await chain.invoke(data);
      },
    };
  }
}

export class MessageCreator {
  static createMessage(
    role: "user" | "assistant" | "system" | "tool",
    content: string
  ) {
    return [role, content];
  }

  static createSystemMessage(content: string) {
    return this.createMessage("system", content);
  }

  static createUserMessage(content: string) {
    return this.createMessage("user", content);
  }

  static createAssistantMessage(content: string) {
    return this.createMessage("assistant", content);
  }

  static createToolMessage(content: string) {
    return this.createMessage("tool", content);
  }
}
Tool use
Here is how you can easily create tools based on a zod schema, bind that to a langchain LLM:
import { tool } from "@langchain/core/tools";
import { ChatOllama } from "@langchain/ollama";
import { z } from "zod";

// 1. create the tool
const weatherTool = tool(
  ({ location }) => {
    return `The weather in ${location} is sunny`;
  },
  {
    name: "get_current_weather",
    description: "Get the current weather in a given location",
    schema: z.object({
      location: z
        .string()
        .describe("The city and state, e.g. San Francisco, CA"),
    }),
  }
);

// 2. ollama
const llmForTool = new ChatOllama({
  baseUrl: "http://localhost:11434",
  model: "llama3.2",
  maxRetries: 0,
});

// 3. Bind the tool to the model, returns a new model with those tools
const llmWithTools = llmForTool.bindTools([weatherTool]);

const resultFromTool = await llmWithTools.invoke(
  "What's the weather like today in San Francisco? Ensure you use the 'get_current_weather' tool."
);

console.log(resultFromTool);
This is what the tool response looks like:
AIMessage {
  "content": "",
  "additional_kwargs": {},
  "response_metadata": {
    "model": "llama3-groq-tool-use",
    "created_at": "2024-08-01T18:43:13.2181Z",
    "done_reason": "stop",
    "done": true,
    "total_duration": 2311023875,
    "load_duration": 1560670292,
    "prompt_eval_count": 177,
    "prompt_eval_duration": 263603000,
    "eval_count": 30,
    "eval_duration": 485582000
  },
  "tool_calls": [
    {
      "name": "get_current_weather",
      "args": {
        "location": "San Francisco, CA"
      },
      "id": "c7a9d590-99ad-42af-9996-41b90efcf827",
      "type": "tool_call"
    }
  ],
  "invalid_tool_calls": [],
  "usage_metadata": {
    "input_tokens": 177,
    "output_tokens": 30,
    "total_tokens": 207
  }
}
And here is my abstraction over using tools:
import { ChatOllama, ChatOllamaCallOptions } from "npm:@langchain/ollama";
import { ChatPromptTemplate } from "npm:@langchain/core/prompts";
import { tool, DynamicStructuredTool } from "npm:@langchain/core/tools";
import { z } from "npm:zod";

export class OllamaLangchain {
  private llm: ChatOllama;

  static createTool = tool;

  constructor(model: string, options: ChatOllamaCallOptions = {}) {
    this.llm = new ChatOllama({
      baseUrl: "http://localhost:11434",
      model: model,
      maxRetries: 0,
      ...options,
    });
  }

  addTools(tools: DynamicStructuredTool[]) {
    const toolLLM = this.llm.bindTools(tools);
    return toolLLM;
  }

 // ... rest of tools
}
import { ChatOllama } from "npm:@langchain/ollama";
import { OllamaLangchain } from "./OllamaLangchain.ts";
import { z } from "npm:zod";

const ollamaLangchain = new OllamaLangchain("llama3.2:latest");

const weatherTool = OllamaLangchain.createTool(
  ({ location }) => {
    return `The weather in ${location} is sunny`;
  },
  {
    name: "get_current_weather",
    description: "Get the current weather in a given location",
    schema: z.object({
      location: z
        .string()
        .describe("The city and state, e.g. San Francisco, CA"),
    }),
  }
);

const newLlm = ollamaLangchain.addTools([weatherTool]);

const response = await newLlm.invoke(
  "What is the current weather in San Francisco? Use the weather tool to get the weather. Ensure you use the 'get_current_weather' tool."
);
console.log(response);
Adding images
The HumanMessage and AIMessage classes are encapsulated ways around providing conversions to message history format.
In this example, it shows how to pass in an image as a user message:
import { ChatOllama } from "@langchain/ollama";
import { HumanMessage } from "@langchain/core/messages";
import * as fs from "node:fs/promises";

const imageData = await fs.readFile("../../../../../examples/hotdog.jpg");
const llmForMultiModal = new ChatOllama({
  model: "llava",
  baseUrl: "http://127.0.0.1:11434",
});
const multiModalRes = await llmForMultiModal.invoke([
  new HumanMessage({
    content: [
      {
        type: "text",
        text: "What is in this image?",
      },
      {
        type: "image_url",
        image_url: `data:image/jpeg;base64,${imageData.toString("base64")}`,
      },
    ],
  }),
]);
console.log(multiModalRes);
Structured outputs
Llama models have a thing called "json" mode which forces all responses to be structured outputs in JSON format. Unfortunately, they do not follow the structured output spec of zod converting to structured output JSON, but you can get similar results by passing in the "format": "json" option when instantiating the model:
const ollamaLangchain = new OllamaLangchain("llama3.2:latest", {
  format: "json",
});

const promptForJsonMode = ChatPromptTemplate.fromMessages([
  [
    "system",
    `You are an expert translator. Format all responses as JSON objects with two keys: "original" and "translated".`,
  ],
  ["human", `Translate "{input}" into {language}.`],
]);

const chainForJsonMode = promptForJsonMode.pipe(ollamaLangchain.llm);

const resultFromJsonMode = await chainForJsonMode.invoke({
  input: "I love programming",
  language: "German",
});

console.log(JSON.parse(resultFromJsonMode.content as string));
Langchain loaders
Rag and Cag
RAG stands for retrieval augmented generation while CAG stands for cache-augmented generation.
- RAG: search documents related to query, and then inject most similar documents into query.
- More complex and prone to error, but allows for smaller context window.
- CAG: fetch all possibly relevant documents and then inject into prompt.
- Needs a large context window but less complex
Upstash
The most basic way to get started with using usptash vector stores is to first create an index online, and then access that indes programmatically through the upstash API:
const index = new Index({
  url: "https://allowing-gazelle-54329-us1-vector.upstash.io",
  token: apiKey,
});
You can then use these methods on the index:
index.upsert(options): takes in an object of options that represents the embedding and its metadata and pushes it to the cloud vector store. here are the options:vector: the embedding. This must match the dimension you set on the index previously. required.data: the plain text representation of the embedding.metadata: an object of metadata used for filtering via in-app logic.id: a unique identifier for the embedding.
index.query(options): performs similarity search of a query embedding against a vector database. Here are the options:includeVector: a boolean of whether to return the entire embedding or not in the object of returned infoincludeData: a boolean of whether to return the initial text data or not in the object of returned infoincludeMetadata: a boolean of whether to return the metadata or not in the object of returned infovector: the embedding version of the querytopK: the number of documents to return
import { Index } from "npm:@upstash/vector";
import { parse } from "npm:csv-parse/sync";
import {
  embeddingModels,
  VercelAIEmbedding,
  models,
  VercelAI,
} from "./VercelAI.ts";
import { z } from "npm:zod";

export class UpstashVectorStore {
  private index: Index;

  constructor(
    url: string,
    apiKey: string,
    private embeddingModel: VercelAIEmbedding
  ) {
    this.index = new Index({
      url,
      token: apiKey,
    });
  }

  async upsert({
    id,
    metadata,
    text,
  }: {
    id: string;
    text: string;
    metadata: Record<string, unknown>;
  }) {
    const embedding = await this.embeddingModel.embedOne(text);
    await this.index.upsert({
      id,
      vector: embedding,
      data: text,
      metadata,
    });
  }

  async similaritySearch(query: string, k: number) {
    const embedding = await this.embeddingModel.embedOne(query);
    const results = await this.index.query({
      vector: embedding,
      topK: k,
      includeData: true,
      includeMetadata: true,
      // includeVectors: true,
    });
    return results;
  }
}
Then here is how you can use it to parse a CSV and add each row as a document:
const { model: embeddingModel, modelOptions: embeddingModelOptions } =
  embeddingModels.get_lmstudio("text-embedding-nomic-embed-text-v1.5", 1536);
const lmStudioEmbeddings = new VercelAIEmbedding(embeddingModel, {
  ...embeddingModelOptions,
});

const apiKey = Deno.env.get("UPSTASH_API_KEY");
if (!apiKey) {
  throw new Error("UPSTASH_API_KEY is not set");
}

const vectorStore = new UpstashVectorStore(
  "https://allowing-gazelle-54329-us1-vector.upstash.io",
  apiKey,
  lmStudioEmbeddings
);
Then you would parse some text source, split the source into text chunks, and invidually add each chunk to the vector store:
import { parse } from "npm:csv-parse/sync";
async function addMoviesToVectorStore() {
  const records = parse(await Deno.readTextFile("imdb_movie_dataset.csv"), {
    columns: true,
  });
  console.log(records.length);
  for (const movie of records) {
    const text = `${movie.Title}. ${movie.Genre}. ${movie.Description}`;
    await vectorStore.upsert({
      id: movie.Title,
      text,
      metadata: {
        title: movie.Title,
        year: movie.Year,
        genre: movie.Genre,
        director: movie.Director,
        actors: movie.Actors,
        rating: movie.Rating,
        votes: movie.Votes,
        revenue: movie.Revenue,
        metascore: movie.Metascore,
      },
    });
    console.log(`Added ${movie.Title}`);
  }
  console.log("Done");
}
Finetuning
Finetuning is the act of doing training on the last layer of the LLM with all the other layers being frozen, thus modifying the weights for your use case.
Evals
If you don't use evals (tests and finidng metrics for your LLM service), you will have a terrible LLM wrapper app. Here are some metrics to test for:
- Is the model calling the correct tool we expected?
Important Local Models
OpenAI Whisper
Python
Here is how you can use open ai whisper to transcribe or translate audio files:
import whisper

model = whisper.load_model("base.en")

filepath = os.path.join(pathlib.Path.home(), "Downloads", "totranscribe.webm")
result = model.transcribe(filepath)

print(result["text"])
Here are the different models you have access to, all unquantized.
"tiny.en": the smallest english version, at 39M params"base.en": the smallest english version, at 74M params
Command line
whisper <audio-file-path>: transcribes the audio file with auto detecting the language
Here are the different options you have
--model <model>: chooses the specific model--language <language-code>: specifies the language the audio file is in. Pass in a language code, likeenores.
TranslateGemma
This is an Ollama LLM that excels at translation.
OpenClaw
Gateway
The openclaw gateway is a long-running process where the AI is available as long as your computer is up.
Here are the commands to manage the gateway:
openclaw gateway: starts the gatewayopenclaw gateway stop: stops the gatewayopenclaw gateway restart: restarts the gateway
Dashboard vs interactive CLI
- GUI: You can then open up the webui using the
openclaw dashboardcommand for the web UI - cli: Run the
openclaw tuicommand to chat with openclaw in the CLI, which is better because you can run slash commands easily.
Markdown Files
SOUL.md: for telling the AI its personality, purpose, and how it should behave, like a persona.USER.md: for telling the AI who the human user is, their name, any info about them, etc.HEARTBEAT.md: a periodic long-polling check that the AI runs on a schedule.AGENTS.md: instructions for how the agent should run, like commands to run on startup, memory protocol, and safety rules.TOOLS.md: environment specific keys and config
The entire point of OpenClaw is based on the HEARTBEAT.md, where tasks are run in a loop every 15 min or so.
Agents
Agents are a way of saving a particular openclaw profile so you can quickly open a Copilot, OpenAI, Claude, or local agent with specific settings.
openclaw agents add <agent-name>: adds an agentopenclaw agents delete <agent-name>: deletes an agent by its nameopenclaw agents list: lists all agents.
Skills
Here is the basic skills cli
openclaw skills list: lists all downloaded skills
You can create a custom skill by creating folders that contain SKILL.md files within the ~/.openclaw/skills directory, and then enable those skills to be registered in the ~/.openclaw/openclaw.json config file:
{
	// ...
	"skills": {
	    "install": {
	      "nodeManager": "npm"
	    },
	    "entries": {
	      "nano-banana-pro": {
	        "apiKey": "AI***"
	      },
	      "email_brief": {
	        "enabled": true
	      },
	      "waadlingaadil_read_email": {
	        "enabled": true
	      },
	      "send_telegram_message": {
	        "enabled": true
	      }
	    }
	},
}
Cron job
You can set a cron job in openclaw using the openclaw cron CLI:
openclaw cron add \
  --name "Daily Telegram Brief" \
  --cron "0 8 * * *" \
  --tz "America/New_York" \
  --session isolated \
  --message "Check my calendar and unread emails, then text me a summary of my day." \
  --announce \
  --channel telegram \
  --to "chat:123456789"
openclaw cron add [...OPTIONS]: adds a cron jobopenclaw cron list: lists all registered cron jobs with their job IDsopenclaw cron run <job-id>: runs a specific job by its idopenclaw cron runs --id <job-id>: gets details of a specific job run
Launching models
Some local models have commands right out of the gate to launch openclaw with:
ollama launch openclaw --model ministral-3: launches ministral3 in openclaw.ollama launch openclaw --model nemotron-3-nano:4b: launches nemotron in openclaw
You can also launch these cloud provider models:
N8N
To run N8N locally, you can use npx or docker:
npx route
npx n8n
docker route
docker volume create n8n_data
docker run -it --rm --name n8n -p 5678:5678 -v n8n_data:/home/node/.n8n docker.n8n.io/n8nio/n8n
Claude Skills
Intro
Claude skills are like MCP but just markdown files, whcih based off of that, claude creates some code attached to the skill.
Skills are flexible, project-agnostic, and all around great.
Here are 4 built in skills that claude already uses:
| Skill | ID | Description |
|---|---|---|
| Excel | xlsx | Create and manipulate Excel workbooks with formulas, charts, and formatting |
| PowerPoint | pptx | Generate professional presentations with slides, charts, and transitions |
pdf | Create formatted PDF documents with text, tables, and images | |
| Word | docx | Generate Word documents with rich formatting and structure |
A claude skill is a zip fiel of a directory with one SKILL.md file. This file should:
- Have yaml frontmatter
- Markdown instructions describing the skill
So a claude skill looks like this:
my-skill/
├── SKILL.md          # Required: instructions + metadata
├── scripts/          # Optional: executable code
├── references/       # Optional: documentation
└── assets/           # Optional: templates, resources
Claude chooses to activate a skill in three steps:
- Preload skill: claude loads the name and description of all skills it has available
- Choose relevant skill: Claude chooses a skill that is relevant to the task based off of its metadata. It then loads the entire
SKILL.mdinto its context - Executes skill: Claude executes the skill based on the contents of the
SKILL.md, running any tools or python scripts as appropriate.
Or
- Discovery: At startup, agents load only the name and description of each available skill, just enough to know when it might be relevant.
- Activation: When a task matches a skill’s description, the agent reads the full
SKILL.mdinstructions into context. - Execution: The agent follows the instructions, optionally loading referenced files or executing bundled code as needed.
SKill metadata
Here is an example SKILL.md:
---
name: pdf-processing
description: Extract text and tables from PDF files, fill forms, merge documents. Use when working with PDF files.
allowed-tools: Bash(git:*) Bash(jq:*) Read
---

# PDF Processing

## Quick Start
Use pdfplumber to extract text from PDFs...

## Advanced Usage
For form filling, see [FORMS.md](FORMS.md).
In the yaml frontmatter, describing the metadata of the skill is really important. Here are the properties you have:
name: skill name, < 64 characters, lowercase, numbers, and hyphens only.description: text description of skill, which claude uses to determine the relevance of the skill to a task.allowedTools: a list of claude code tools the skill has approved access for.
Optional Folders and Entire Skills process
Skills should be structured for efficient use of context:
- Metadata (~100 tokens): The
nameanddescriptionfields are loaded at startup for all skills - Instructions (< 5000 tokens recommended): The full
SKILL.mdbody is loaded when the skill is activated - Resources (as needed): Files (e.g. those in
scripts/,references/, orassets/) are loaded only when required
Keep your main SKILL.md under 500 lines. Move detailed reference material to separate files.
Here are the optional subfolders you can have in your skill:
scripts/: folder of coding scripts liek python or bash that act as tools the skill can execute.references/: folder of more detailed markdown files going more into depth on what the skill has, maybe like documentation or something inREFERENCES.md
When referencing other files in your skill, use relative paths from the skill root:
See [the reference guide](references/REFERENCE.md) for details.

Run the extraction script:
scripts/extract.py
Keep file references one level deep from SKILL.md. Avoid deeply nested reference chains.
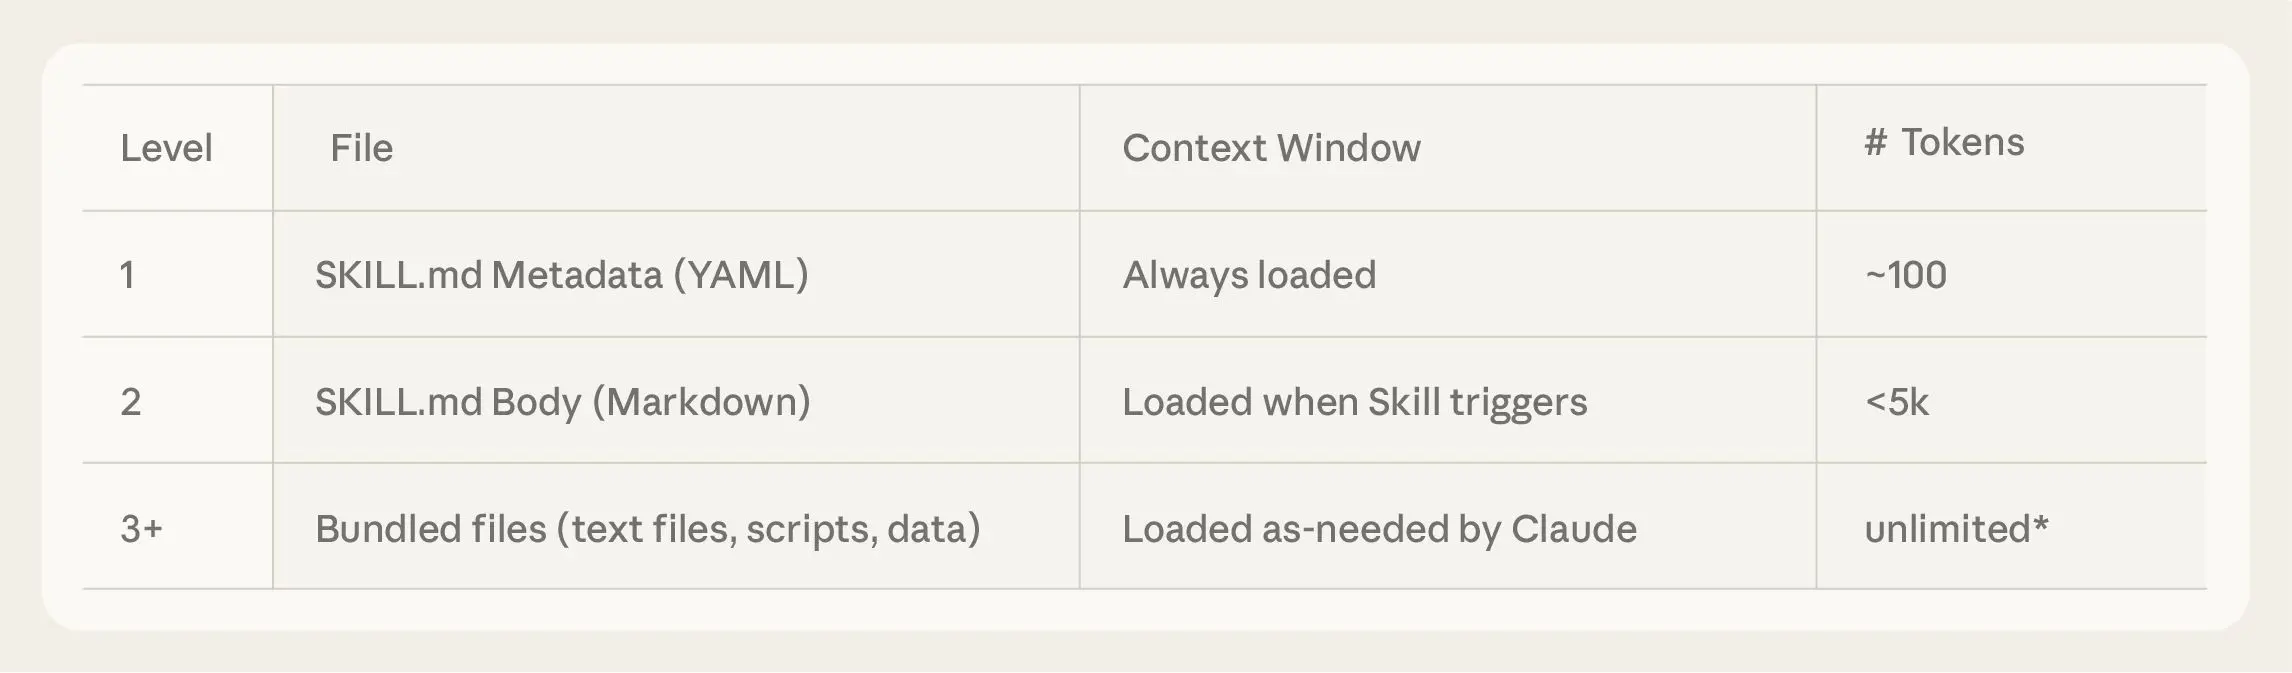
Add skills to claude code
The easiest way to add simple SKILL.md files to claude code is to just include them in your system prompt and give the filepaths to the SKILL.md files:
<available_skills>
  <skill>
    <name>pdf-processing</name>
    <description>Extracts text and tables from PDF files, fills forms, merges documents.</description>
    <location>/path/to/skills/pdf-processing/SKILL.md</location>
  </skill>
  <skill>
    <name>data-analysis</name>
    <description>Analyzes datasets, generates charts, and creates summary reports.</description>
    <location>/path/to/skills/data-analysis/SKILL.md</location>
  </skill>
</available_skills>
MCP
MCP is a layer between tools available to the LLM and the LLM itself, making it very simple for the LLM to know what tools are available and when to use them.
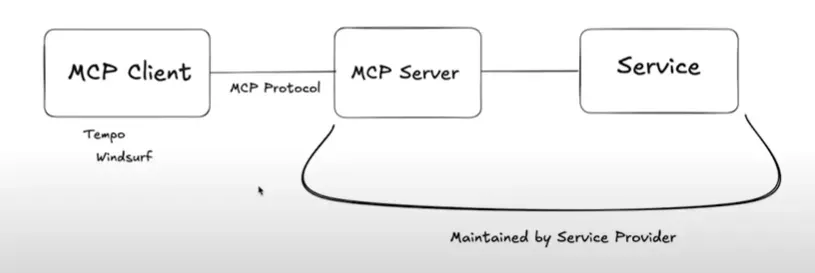

Here is the terminology:
- MCP Hosts: Programs like Claude Desktop, IDEs, or AI tools that want to access data through MCP
- MCP Clients: Protocol clients that maintain 1:1 connections with servers, like Cursor, Claude Desktop.
- MCP Servers: Lightweight programs that each expose specific capabilities through the standardized Model Context Protocol
- Local Data Sources: Your computer’s files, databases, and services that MCP servers can securely access
- Remote Services: External systems available over the internet (e.g., through APIs) that MCP servers can connect to
There are two types of MCP servers you can set up:
- stdio server: A server that bases the MCP protocol off of reading from stdin and stdout
- sse server: A server that bases MCP protocol off of server sent events (SSE).

MCP under the hood
Under the hood, MCP is really just a fancy way of sending specially formatted messages that describe tool usage info, the parameters a tool accepts, and how to call a tool. This is how the transfer of info via MCP changes for both transports:
- SSE transport: sends MCP-formatted messages using server sent events
- stdio transport: sends MCP-formatted messages by console logging it.
If using a stdio transport, using console.log() breaks the server. This is because stdio transport servers will crash if anything in stdout is not of the special format that MCP accepts.
Creating MCP Servers
There are three basic steps when creating MCP servers using the SDK:
- Create an MCP server that either runs on stdio or sse
- Register tools and optional resources
- Start the server
You can create a server like so:
import { McpServer} from "@modelcontextprotocol/sdk/server/mcp.js";
import { StdioServerTransport } from "@modelcontextprotocol/sdk/server/stdio.js";

// 1. create the server
const server = new McpServer({
	name: "my-mcp-server",
	version: "1.0.0",
	description: "My MCP Server",
})

// in between here register resources and tool calls ...

// 2. create the transport (stdio in this case)
const transport = new StdioServerTransport();

// 3. start the server
await server.connect(transport);
I created a class wrapper around this:
import { McpServer } from "npm:@modelcontextprotocol/sdk/server/mcp.js";
import { StdioServerTransport } from "npm:@modelcontextprotocol/sdk/server/stdio.js";

export class MCPServerHandler {
  constructor(public server: McpServer) {}

  async startStdioServer() {
    const transport = new StdioServerTransport();
    await this.server.connect(transport);
  }
}
For a more in depth abstraction on how to use MCP, use my repo:
Resources
Resources are collections of data that provide tools easy access to them, if configured. Think of them as GET endpoints.
You declare a resource with the server.resource() method, which takes in these arguments:
- the resource name
- the URI identifier of the resource
- a callback where you perform some data fetching and then return an object with a
contentsproperty, which is an array of text or blob contents.
export type TextResourceReturn = {
  uri: string;
  text: string;
  mimeType: string;
  [key: string]: any;
};
export type BlobResourceReturn = {
  uri: string;
  blob: string; // base64 encoded
  mimeType: string;
  [key: string]: any;
};
export type ResourceReturn = {
  contents: (TextResourceReturn | BlobResourceReturn)[];
};

const path = "http://localhost:3000/dogs"
const resource = server.resource("resource-name", path, async (uri: URL) => {
	let path = uri.href // uri is URL instance

	return {
		contents: [
			{mimeType: "text/plain", data: "Aadil Mallick" }
		]
	} as ResourceReturn
})

// 2. enable the resource
resource.enable()
And then when the MCP server with the resource starts working, you can add it to claude desktop and then access it like so:

Tools
Tools are by far the most useful aspect of mcp.
You create a tool with the server.tool() method, which takes in a name, description, an object of parameters to pass (which can be a zod schema), and then a callback where you return an object with a content property.
Here is an example of the type you need to return in a tool call:
type ToolReturn = {
    content: ({
        [x: string]: unknown;
        type: "text";
        text: string;
    } | {
        [x: string]: unknown;
        type: "image";
        data: string;
        mimeType: string;
    } | {
        [x: string]: unknown;
        type: "audio";
        data: string;
        mimeType: string;
    }
}
And here's the tool call syntax:
const tool = server.tool("tool-name", "tool description", {
		dogName: z.string()
	},
	async ({dogName}) => {
		return {
			content: [{type: "text", text: `dog name is ${dogName}`}]
		}
	}
)
tool.enable()
Prompts
import { McpServer } from "@modelcontextprotocol/sdk/server/mcp.js";
import { StdioServerTransport } from "@modelcontextprotocol/sdk/server/stdio.js";
import { z } from "zod";
import { readFileSync } from "fs";

const airbnbMarkdownPath = "/Users/brianholt/personal/hello-mcp/airbnb.md";
const airbnbMarkdown = readFileSync(airbnbMarkdownPath, "utf-8");

const server = new McpServer({
  name: "code-review-server",
  version: "1.0.0",
});

server.registerPrompt(
  "review-code",
  {
    title: "Code Review",
    description: "Review code for best practices and potential issues",
    argsSchema: { code: z.string() },
  },
  ({ code }) => ({
    messages: [
      {
        role: "user",
        content: {
          type: "text",
          text: `Please review this code to see if it follows our best practices. Use this Airbnb style guide as a reference:\n\n=============\n\n${airbnbMarkdown}\n\n=============\n\n${code}`,
        },
      },
    ],
  })
);

const transport = new StdioServerTransport();
await server.connect(transport);
SSE transport
Here is example code showing how you can create MCP servers using the SSE transport and run it as an online server, which then lets you integrate it with other agent automation systems like N8N.
import express from "express";
import { SSEServerTransport } from "@modelcontextprotocol/sdk/server/sse.js";
import { McpServer } from "@modelcontextprotocol/sdk/server/mcp.js";
import { z } from "zod";

// 1. crete mcp server
const server = new McpServer({
  name: "Weather Service",
  version: "1.0.0",
});

// 2. create tool
server.tool(
  "getWeather",
  {
    city: z.string(),
  },
  async ({ city }) => {
    return {
      content: [
        {
          type: "text",
          text: `The weather in ${city} is sunny!`,
        },
      ],
    };
  },
);

const app = express();

let transport: SSEServerTransport | undefined =
  undefined;

// 3. create sse route that sets transport and exposes it
app.get("/sse", async (req, res) => {
  // point to POST /messages to handle all the logic
  transport = new SSEServerTransport("/messages", res);
  await server.connect(transport);
});

// 4. handle app logic.
app.post("/messages", async (req, res) => {
  if (!transport) {
    res.status(400);
    res.json({ error: "No transport" });
    return;
  }
  await transport.handlePostMessage(req, res);
});
Troubleshooting and caveats
This is a very new API, and maybe the python version will be a lot better, but for typescript, keep these tips in mind:
- no console logging: Side effects are not allowed in this server - only when registering a tool - so you are not allowed to invoke
console.log() - resource for tools not available : Returning a
type: "resource"object does not work in tool calls. Just stick to text, image, audio.
Streamable HTTP
Streamable HTTP is a much better option for creating an MCP server that is hosted on the web.
Here's an example of a streamable HTTP server:
MCP inspector
RUn the npx @modelcontextprotocol/inspector package to run a local mcp inspector dashboard which lets you debug online streamable http MCPs.
Deploying to MCP clients
All MCP clients have the same way of deploying, which is listing the commands to run the MCP servers or the existing urls hosting MCP servers in a JSON file like so:
{
  "mcpServers": {
    "local-mcp-server": {
      "command": "deno",
      "args": [
        "run",
        "-A",
        "C:/Users/Waadl/OneDrive/Documents/dbdildev/mcp/local-mcp-server/main.ts"
      ],
      "env": {
        "GOOGLE_GENERATIVE_AI_API_KEY": "Eafsadfdsafasfdsafsd",
        "OPENAI_API_KEY": "sk-pasfsafsadfaHfsadsfdEgsRIsaffdsDNVsafdfsdad"
      }
    },
    "memory": {
      "command": "npx",
      "args": ["-y", "@modelcontextprotocol/server-memory"]
    },
    "github": {
      "command": "npx",
      "args": ["-y", "@modelcontextprotocol/server-github"],
      "env": {
        "GITHUB_PERSONAL_ACCESS_TOKEN": "ghp_FfadffdsasadRW9p"
      }
    }
  }
}
Claude desktop
you can add MCP servers in the ~\AppData\Roaming\Claude\claude_desktop_config.json path
Cursor
Go to cursor MCP settings and you can add MCP servers in the ~\.cursor\mcp.json file, or you can just go to cursor settings -> MCP settings.
You can also set local MCP settings for your workspace, which is often way more efficient by creating a .cursor/mcp.json file:
{
  "mcpServers": {
    "mcpmcp": {
      "command": "npx",
      "args": ["-y", "mcp-remote@latest", "https://mcpmcp.io/mcp"]
    }
  }
}
Awesome MCP: list of MCP servers
- https://mcpmcp.io/#install: mcp server to ask your agent about what MCP servers there are
- https://github.com/regenrek/deepwiki-mcp: to find info about a specific repo
Image transformation MCP servers
MCP strategies
Ideas
- Github MCP/skill: The most powerful way to use this MCP server is:
- creating issues: ask claude code to create a github issue, tag other AIs (like claude, jules, gemini cli, codex) as assignees
- creating pull requests: create a nicely formatted pull request
- solve issues: ask claude to look at a specific issue, read it, and then solve it.
- Playwright: You can use this to create integration tests and take screenshots.
Vibing with MCP
Here is the ultimate way to vibe code using MCP servers:
- github skill: create issues, PRs, assign AI bots to your pull requests
- neon MCP: connect to a database so the schemas are known at all times.
- playwright MCP: Tell it to "make liberal use of Playwright to make sure that UI looks and acts correctly and set up integration tests."
- context7: context7 for docs, tell the model to use context7 for some libraries that might be esoteric.
Tech stack:
- neon auth
- neon db: Use neon with drizzle, and specifically prompt it, "DO NOT MODIFY THE MIGRATIONS DIRECTLY, ONLY USE DRIZZLE"
- nextjs + typescript + shadcdn + tailwindcss: specify nextjs 15 modern strategies like limiting client components
- zod, react query, zustand
Here is the full vibing prompt
---REPLACE PROMPT BELOW-----
I am making a Todoist clone. I want it to have the following features

- Multiple users
- Users can CRUD their todos
- Users can mark their todos as done
- Users cannot share todos - you can assume that a todo belongs to one person
- Users can use tags to tag their todos. Examples would be work, personal, or fun. Users can CRUD tags. A todo can have multiple tags.
- Users can sign, sign out, and log out.
------------------------------

For the tech stack, please use

- Next.js 16 and TypeScript
- shadcn - please use shadcn as the styling method as much as possible to be consistent
- Neon Postgres for the database, connected via neon MCP
- Neon Auth for the auth - please use Context7 to make sure you have up to date docs on Neon Auth
- Drizzle for the ORM
- TypeScript
- ESLint
- Vitest for testing
- Playwright for integration tests

Please:

- include decent coverage of tests
- use Playwright MCP server to test that UI is styled correctly and interactions work as planned
- use Context7 liberally to make sure you have the latest docs for various libraries.
- prepare this to be deployed to Vercel afterwards.
- DO NOT WRITE OR MODIFY MIGRATIONS YOURSELF. ONLY USE DRIZZLE FOR MIGRATIONS.
Condensing docs
One of the most important uses of MCP is giving online, up-to-date docs for an AI agent to consume. There are two ways you can do this:
- Context7: An MCP server that has tools to fetch online documentation and return it as markdown.
- RepoMix: Go to the Repomix website to download the entire docs as a markdown file you cna then feed into LLMs.
Agentic AI Development
Agent fundamentals
What is an Agent?
Agents are proactive in determining what tools to use, and can take action without human input. They can generate chains of tool calls because essentially they just run in a loop.
Agents are best suited for multi-step, dynamic problems.
All agents are composed of three building blocks:
- Model: the LLM being used. This component makes the decisions for which tools to use and whether to continue the chain of tool use or stop and output a response.
- Tools: MCP, skills, etc.
- Orchestration: the inner workings of the agent loop and how input is passed to the LLM.
Here is when to use agents over normal LLM calls:
- Use agents when you need reasoning + adaptation + multi-step execution.
- Skip agents when the task is simple, single-step, or deterministic.
Agent loop
Intelligent agents don't just act - they plan. here is the main loop:

- Perceive: plans how to comply with user's query
- Think: selects which tool to use
- Act: executes tool
- Check: based on tool response, checks if the tool result has finished what the user wants and either ends and spits out a response or continues the loop.
Here's an example of the loop in action:

Google ADK
Installation and CLI
You install the adk cli like so
pipx install google-adk
- Create a new folder and CD into it
- Create the necessary AI boilerplate with the
adk createcommand. - Install dependencies, put stuff in gitignore.

IMPORTANT
Your agent.py file must be in a subfolder.
You can now run the agent via these different options:
adk web <agent-subfolder-name>: runs a server and displays a dashboard on localhost 8000adk api_server <agent-subfolder-name>: deploys the specific agent in the subfolder as an API serviceadk run <agent-subfolder-name>: runs in the terminal the specific agent in the subfolder
Basic Agent Code with Python
from google.adk.agents.llm_agent import Agent

# main agent variable
root_agent = Agent(
    model='gemini-2.5-flash',
    name='root_agent',
    description='A helpful assistant for user questions.',
    instruction='Answer user questions to the best of your knowledge',
)
Here are the important kwargs to understand:
model: LLM to usename: agent identifierdescription: what other agents look at so they can decide whether or not to call upon this agent based on the description.instruction: a system instruction for the agent detailing what tools it has and its purpose.
IMPORTANT
The variable name root_agent is a convention that allows Gemini ADK to find this agent as the main orchestrator agent, and it must be named that.
Using other models
You can use other models like so, using the LiteLlm class to instantiate an LLM provider with a specific API key.
import os
from google.adk.models.lite_llm import LiteLlm
from google.adk.agents import Agent
from dotenv import load_dotenv

load_dotenv()

CONSTANTS = {
    "GITHUB_API_KEY": os.getenv("GITHUB_API_KEY")
}

if not CONSTANTS["GITHUB_API_KEY"]:
    raise ValueError("GITHUB_API_KEY not found in environment variables")


AGENT_MODEL = LiteLlm(
    model="github/gpt-4o-mini", # Note the 'github/' prefix
    api_key=CONSTANTS["GITHUB_API_KEY"]
)


root_agent = Agent(
    name="gh_agent",
    description="An agent that welcomes the user.",
    instruction="Answer user questions to the best of your knowledge",
    model=AGENT_MODEL
)
Creating a yaml based agent
Instead of writing Python code to define agents, you can define agents using YAML, by creating the boilerplate first with adk create --type=config command:
adk create --type=config <agent-subfolder-name>
Architecture and main flow
| Primitive | Purpose |
|---|---|
| Agent | The fundamental worker — LLM-powered or deterministic workflow controller |
| Tool | Gives agents capabilities beyond conversation (APIs, search, code execution) |
| Session | Manages conversation context, event history, and working state |
| Memory | Long-term cross-session knowledge store |
| Runner | Engine orchestrating execution flow via events |
| Event | Basic communication unit — everything that happens is an event |
| Callback | Hook points for guardrails, logging, and behavior modification |
Sessions and runners
Since hundreds of people have have concurrent requests with a single agent, you need some way to distinguish between different chat sessions, which is where the idea of sessions come into play.
We uniquely identify a session with a session id, app name, and user id.
from google.adk.sessions import InMemorySessionService

session_service = InMemorySessionService()

APP_NAME = "math_tutor_app"
USER_ID = "student_1"
SESSION_ID = "session_001"

async def init_session():
	await session_service.create_session(
	        app_name=APP_NAME,
	        user_id=USER_ID,
	        session_id=SESSION_ID
	    )
A runner defines the agent loop and executes the agent for a single session. Here are the kwargs it takes:
agent: theAgentinstance to executesession_service: theSessionServiceinstance to run in the context of.app_name: app to run in.
from google.adk.runners import Runner

runner = Runner(
    agent=agent,
    app_name=APP_NAME,
    session_service=session_service
)
Here is a complete example:
import asyncio
import os
from dotenv import load_dotenv
from google.adk.agents.llm_agent import Agent
from google.adk.runners import Runner
from google.adk.sessions import InMemorySessionService
from google.genai.types import Content, Part

load_dotenv()

# 1. Define the Agent
agent = Agent(
    model='gemini-2.5-flash',
    name='math_tutor',
    instruction="""You are a patient math tutor.
    Guide students through problems step-by-step.
    Don't just give answers help them discover solutions."""
)

# 2. Setup Orchestration
APP_NAME = "math_tutor_app"
USER_ID = "student_1"
SESSION_ID = "session_001"

session_service = InMemorySessionService()
runner = Runner(
    agent=agent,
    app_name=APP_NAME,
    session_service=session_service
)

# 3. Define the Execution Logic
async def run_agent():
    # Initialize the session
    await session_service.create_session(
        app_name=APP_NAME,
        user_id=USER_ID,
        session_id=SESSION_ID
    )

    # Format the user message
    user_message = Content(
        role="user",
        parts=[Part(text="How do I solve $2x+5=13$?")]
    )

    # Stream the response
    async for event in runner.run_async(
        user_id=USER_ID,
        session_id=SESSION_ID,
        new_message=user_message
    ):
        if event.is_final_response() and event.content and event.content.parts:
            print(f"Agent: {event.content.parts[0].text}")

# 4. Run the script
if __name__ == "__main__":
    asyncio.run(run_agent())
And here is the same example, but adapted to be a long-running agent loop:
from google.adk.agents.llm_agent import Agent
from google.adk.runners import Runner
from google.adk.sessions import InMemorySessionService
from google.genai.types import Content, Part


class AgentSession:
    def __init__(
	    self,
	    agent: Agent,
	    app_name: str,
	    session_service: InMemorySessionService
    ):
        self.agent = agent
        self.app_name = app_name
        self.session_service = session_service
        self.runner = Runner(
	        agent=agent,
	        session_service=session_service,
	        app_name=app_name
	    )

    @staticmethod
    def create_agent_session(agent: Agent, app_name: str):
        session_service = InMemorySessionService()
        return AgentSession(agent, app_name, session_service)


	# instantiates a session if not already created, runs query against LLM
    async def call_agent_async(self, query: str, user_id: str, session_id: str):
        if not await self.session_service.get_session(
			app_name=self.app_name,
			user_id=user_id,
			session_id=session_id
		):
            await self.session_service.create_session(
	            app_name=self.app_name,
	            user_id=user_id,
	            session_id=session_id
	        )

        # Package the user's query into ADK format
        content = Content(role='user', parts=[Part(text=query)])
        final_response_text = "Agent did not produce a final response."

        # Iterate through streamed agent responses
        async for event in self.runner.run_async(
	        user_id=user_id,
	        session_id=session_id,
	        new_message=content
        ):
            if event.is_final_response():
                if event.content and event.content.parts:
                    final_response_text = event.content.parts[0].text #
                break # Stop listening after final response is received
        print(f"<<< Agent Response: {final_response_text}")
And here is how we implement it:
import asyncio
import os
from dotenv import load_dotenv
from google.adk.agents.llm_agent import Agent
from google.adk.runners import Runner
from google.adk.sessions import InMemorySessionService
from google.genai.types import Content, Part
from agent_utils import AgentSession

load_dotenv()

# 1. Define the Agent
agent = Agent(
    model='gemini-2.5-flash',
    name='math_tutor',
    instruction="""You are a patient math tutor.
    Guide students through problems step-by-step.
    Don't just give answers help them discover solutions."""
)

# 2. Setup Orchestration
APP_NAME = "math_tutor_app"
USER_ID = "student_1"
SESSION_ID = "session_001"

agent_session = AgentSession.create_agent_session(agent, APP_NAME)

# 4. Run the script
if __name__ == "__main__":
    while True:
        user_input = input(">>> User Query: ")
        response = asyncio.run(
	        agent_session.call_agent_async(user_input, USER_ID, SESSION_ID)
        )
Session state
You can pass agent results from one agent to another in the pipeline via the output_key= kwarg when instantiating an LLM agent.
structured_agent = LlmAgent(
 model="gemini-2.5-flash",
 instruction="Extract capital city as JSON",
 output_schema=CapitalOutput,
 output_key="found_capital" # Store in session.state["found_capital"]
)
You can then retrieve that value in one of two ways:
- method 1 (access from session state): Whatever agent gets run in a session, you can access any output key via the
session.state[output_key]syntax - method 2 (interpoalte in an agent chain): when using a parallel or sequential agent pipeline with multiple subagents, a subagent running immediately after another one can access the value of the
output_keyof the previous agent during runtime via interpolation, which lets you dynamically craft the instructions of a subagent in a pipeline based on the results of the previous agent output
Here's an example of method 2, where you interpolate the output_key in an agent chain:
# pipeline_agent/agent.py
from google.adk.agents import Agent
from google.adk.agents.sequential_agent import SequentialAgent

MODEL = "gemini-2.0-flash"

# Step 1: Generate initial code from a specification
code_writer = Agent(
    name="CodeWriter",
    model=MODEL,
    instruction="""You are a Python code generator. Write clean, well-documented
    Python code based on the user's request. Output ONLY the Python code,
    wrapped in a code block.""",
    description="Writes initial Python code based on a specification.",
    output_key="generated_code",  # Saves response to state["generated_code"]
)

# Step 2: Review the code — reads from state via {generated_code} template
code_reviewer = Agent(
    name="CodeReviewer",
    model=MODEL,
    instruction="""You are an expert Python code reviewer. Review this code:

```python
{generated_code}
Basic Tools
You can write your own custom tools as Python functions which return a python dictionary, where the best practice is to return an object interface like so:
interface FunctionResponse {
	status: "error" | "success";
	error_message?: string;
	data?: any;
}
def my_tool(param: str) -> dict:
    """Tool description here.

    Args:
        param (str): Parameter description.

    Returns:
        dict: Result with status.
    """
    try:
        result = perform_operation(param)
        return {"status": "success", "data": result}
    except ValueError as e:
        return {"status": "error", "error_message": f"Invalid input: {e}"}
    except Exception as e:
        return {"status": "error", "error_message": f"Unexpected error: {e}"}
Here's a complete example of the pipeline to hook up tools:
- Define a custom tool function or import a built-in tool
- Pass in a list of tools to register to the
tools=kwarg in theAgentclass.
import asyncio
import os
from google.adk.agents.llm_agent import Agent
from google.adk.runners import Runner
from google.adk.sessions import InMemorySessionService
from google.adk.tools import FunctionTool, google_search # New imports
from google.genai.types import Content, Part

# 1. Define a Custom Tool
# The docstring below is critical; it's how the AI understands what the tool does.
def calculate_tax(price: float, rate: float = 0.07) -> dict:
    """Calculates the tax amount for a given price and tax rate.
    Args:
        price: The total price of the item.
        rate: The tax rate as a decimal (default is 0.07).
    """
    tax = price * rate
    return {"status": "success", "tax_amount": round(tax, 2)}

# 2. Define the Agent with Tools
agent = Agent(
    model='gemini-2.5-flash',
    name='shopping_assistant',
    instruction="""You are a helpful shopping assistant.
    Use the calculate_tax tool for all price calculations.
    Use google_search to find current prices if the user asks.""",
    # Add your tools to this list
    tools=[FunctionTool(calculate_tax), google_search]
)

# 3. Execution Setup (same as before)
APP_NAME = "shop_app"
USER_ID = "user_123"
SESSION_ID = "session_456"

session_service = InMemorySessionService()
runner = Runner(agent=agent, app_name=APP_NAME, session_service=session_service)

async def run_agent():
    await session_service.create_session(APP_NAME, USER_ID, SESSION_ID)

    # Try a query that triggers the custom tool
    user_message = Content(role="user", parts=[Part(text="What is the tax on a $150 jacket?")])

    async for event in runner.run_async(USER_ID, SESSION_ID, user_message):
        if event.is_final_response() and event.content and event.content.parts:
            print(f"Agent: {event.content.parts[0].text}")

if __name__ == "__main__":
    asyncio.run(run_agent())
Tools and session state
Agent Types
Type 1: LLM agents
LLM agents use a language model for reasoning, tool selection, and response generation. Read the Docs here.
You use an LLM agent with the LLMAgent or more commonly, the Agent class.
from google.adk.agents import Agent  # Agent is an alias for LlmAgent

agent = Agent(
    name="my_agent",              # Required: unique identifier (avoid "user")
    model="gemini-2.0-flash",     # Required: model string
    description="Handles weather queries.",  # Recommended for multi-agent routing
    instruction="You are a helpful weather assistant.",  # System prompt
    tools=[get_weather],          # List of tools (functions auto-wrapped)
    output_key="result",          # Auto-save response to state["result"]
)
model: LLM to usename: agent identifierdescription: what other agents look at so they can decide whether or not to call upon this agent based on the description.instruction: a system instruction for the agent detailing what tools it has and its purpose.tools: list of toolsoutput_key: for state managementgenerate_content_config: LLM param settingsoutput_schema: Pydantic model for structured output
Type 2: workflow agents
There are three types of workflow agents:
SequentialAgent: Executes sub-agents in order. Data passes between steps via shared session state usingoutput_key.ParallelAgent: Executes sub-agents concurrently. Each should write to distinct state keys to avoid race conditions.LoopAgent: Repeatedly executes sub-agents untilmax_iterationsis hit or a sub-agent escalates.
Type 3: custom agents
Structured Output
You cna tell an agent to output structured output as JSON via a Pydantic model schema:
from pydantic import BaseModel, Field


class ProductInfo(BaseModel):
 product_name: str = Field(description="The name of the product")
 price: float = Field(description="The price in USD")
 storage: str = Field(description="The storage capacity")


structured_agent = LlmAgent(
 model="gemini-2.5-flash",
 instruction="""Extract product information and respond with JSON.
 Format: {"product_name": "name", "price": 999.99, "storage": "256GB"}""",
 output_schema=ProductInfo # Enforces this exact structure
)
Tools deep deive
This is how you can add custom tools, where the tool name, args, and description must be put in the docstring, and the AI will dynamically read the docstring at runtime to understand how to use the tool.
It's good practice to write your tools like so:
def my_tool(param: str) -> dict:
    """Tool description here.

    Args:
        param (str): Parameter description.

    Returns:
        dict: Result with status.
    """
    try:
        result = perform_operation(param)
        return {"status": "success", "data": result}
    except ValueError as e:
        return {"status": "error", "error_message": f"Invalid input: {e}"}
    except Exception as e:
        return {"status": "error", "error_message": f"Unexpected error: {e}"}
Here is the modern way to use tools:
import asyncio
import os
from google.adk.agents.llm_agent import Agent
from google.adk.runners import Runner
from google.adk.sessions import InMemorySessionService
from google.adk.tools import FunctionTool, google_search # New imports
from google.genai.types import Content, Part

# 1. Define a Custom Tool
# The docstring below is critical; it's how the AI understands what the tool does.
def calculate_tax(price: float, rate: float = 0.07) -> dict:
    """Calculates the tax amount for a given price and tax rate.
    Args:
        price: The total price of the item.
        rate: The tax rate as a decimal (default is 0.07).
    """
    tax = price * rate
    return {"status": "success", "tax_amount": round(tax, 2)}

# 2. Define the Agent with Tools
agent = Agent(
    model='gemini-2.5-flash',
    name='shopping_assistant',
    instruction="""You are a helpful shopping assistant.
    Use the calculate_tax tool for all price calculations.
    Use google_search to find current prices if the user asks.""",
    # Add your tools to this list
    tools=[FunctionTool(calculate_tax), google_search]
)

# 3. Execution Setup (same as before)
APP_NAME = "shop_app"
USER_ID = "user_123"
SESSION_ID = "session_456"

session_service = InMemorySessionService()
runner = Runner(agent=agent, app_name=APP_NAME, session_service=session_service)

async def run_agent():
    await session_service.create_session(APP_NAME, USER_ID, SESSION_ID)

    # Try a query that triggers the custom tool
    user_message = Content(role="user", parts=[Part(text="What is the tax on a $150 jacket?")])

    async for event in runner.run_async(USER_ID, SESSION_ID, user_message):
        if event.is_final_response() and event.content and event.content.parts:
            print(f"Agent: {event.content.parts[0].text}")

if __name__ == "__main__":
    asyncio.run(run_agent())
Here is a complete example:
# weather_agent/agent.py
import datetime
from zoneinfo import ZoneInfo
from google.adk.agents import Agent

def get_weather(city: str) -> dict:
    """Retrieves the current weather report for a specified city.

    Args:
        city (str): The name of the city for which to retrieve the weather report.

    Returns:
        dict: status and result or error msg.
    """
    # Mock database — replace with real API in production
    mock_db = {
        "new york": "Sunny, 25°C (77°F)",
        "london": "Cloudy, 15°C (59°F)",
        "tokyo": "Light rain, 18°C (64°F)",
    }
    weather = mock_db.get(city.lower())
    if weather:
        return {"status": "success", "report": f"Weather in {city}: {weather}"}
    return {"status": "error", "error_message": f"No weather data for '{city}'."}

def get_current_time(city: str) -> dict:
    """Returns the current time in a specified city.

    Args:
        city (str): The name of the city for which to retrieve the current time.

    Returns:
        dict: status and result or error msg.
    """
    timezones = {
        "new york": "America/New_York",
        "london": "Europe/London",
        "tokyo": "Asia/Tokyo",
    }
    tz_id = timezones.get(city.lower())
    if not tz_id:
        return {"status": "error", "error_message": f"No timezone info for {city}."}

    now = datetime.datetime.now(ZoneInfo(tz_id))
    return {"status": "success", "report": f"Current time in {city}: {now.strftime('%Y-%m-%d %H:%M:%S %Z')}"}

# The LLM decides which tool to call based on the user's question
root_agent = Agent(
    name="weather_time_agent",
    model="gemini-2.0-flash",
    description="Agent to answer questions about the time and weather in a city.",
    instruction="You are a helpful agent who can answer user questions about "
                "the time and weather in a city.",
    tools=[get_weather, get_current_time],  # Functions auto-wrapped as FunctionTool
)
When creating a custom tool function, you can pass any arguments you want, but a useful thing to pass in as the last argument is the ToolContext instance:
# multi_tool_agent/agent.py
from google.adk.agents import Agent
from google.adk.tools import ToolContext

def search_products(query: str) -> dict:
    """Searches the product catalog for items matching the query.

    Args:
        query (str): Search terms to find products.

    Returns:
        dict: Search results with status.
    """
    catalog = {
        "laptop": [
            {"name": "ProBook 15", "price": 999, "id": "PB15"},
            {"name": "AirLight 13", "price": 1299, "id": "AL13"},
        ],
        "headphones": [
            {"name": "SoundMax Pro", "price": 249, "id": "SM01"},
        ],
    }
    for keyword, products in catalog.items():
        if keyword in query.lower():
            return {"status": "success", "products": products}
    return {"status": "error", "error_message": f"No products found for '{query}'."}

def add_to_cart(product_id: str, tool_context: ToolContext) -> dict:
    """Adds a product to the user's shopping cart.

    Args:
        product_id (str): The unique product identifier to add.

    Returns:
        dict: Confirmation of the cart update.
    """
    # ToolContext gives access to session state — auto-injected, not in docstring
    cart = tool_context.state.get("user:cart", [])
    cart.append(product_id)
    tool_context.state["user:cart"] = cart  # Persists across sessions for this user
    return {"status": "success", "message": f"Added {product_id}. Cart: {cart}"}

def get_cart(tool_context: ToolContext) -> dict:
    """Returns the current contents of the user's shopping cart.

    Returns:
        dict: Current cart contents.
    """
    cart = tool_context.state.get("user:cart", [])
    return {"status": "success", "cart": cart, "item_count": len(cart)}

root_agent = Agent(
    name="shopping_agent",
    model="gemini-2.0-flash",
    description="A shopping assistant that helps find and purchase products.",
    instruction="You are a shopping assistant. Help users search for products, "
                "add items to their cart, and review their cart. Always confirm "
                "actions with the user.",
    tools=[search_products, add_to_cart, get_cart],
)
The tool_context parameter is automatically injected by ADK — it provides read/write access to session state. These are the different prefixes you can use:
| Prefix | Scope | Persists across sessions? |
|---|---|---|
| No prefix | Current session only | With persistent SessionService |
user: | All sessions for this user | Yes |
app: | All users and sessions | Yes |
temp: | Current invocation only | Never |
# In a tool or callback:
tool_context.state["current_query"] = "weather"        # Session-scoped
tool_context.state["user:language"] = "en"              # User-scoped (persistent)
tool_context.state["app:version"] = "2.1"               # App-wide (persistent)
tool_context.state["temp:intermediate"] = raw_data       # Gone after invocation
Here's another example:
# typed_tools/agent.py
from google.adk.agents import Agent
from google.adk.tools import ToolContext
from typing import Optional

def create_task(
    title: str,
    priority: str,
    description: Optional[str] = None,
    tool_context: ToolContext = None,
) -> dict:
    """Creates a new task in the task management system.

    Args:
        title (str): The title of the task.
        priority (str): Priority level - must be 'low', 'medium', or 'high'.
        description (str): Optional detailed description of the task.

    Returns:
        dict: The created task details with status.
    """
    # Validate priority
    if priority.lower() not in ("low", "medium", "high"):
        return {"status": "error", "error_message": f"Invalid priority '{priority}'. Use low/medium/high."}

    # Read existing tasks from state, create if not present
    tasks = tool_context.state.get("user:tasks", [])
    task_id = f"TASK-{len(tasks) + 1:03d}"

    new_task = {
        "id": task_id,
        "title": title,
        "priority": priority.lower(),
        "description": description or "",
        "status": "open",
    }
    tasks.append(new_task)
    tool_context.state["user:tasks"] = tasks  # Persist across sessions

    return {"status": "success", "task": new_task}

def list_tasks(status_filter: Optional[str] = None, tool_context: ToolContext = None) -> dict:
    """Lists all tasks, optionally filtered by status.

    Args:
        status_filter (str): Optional filter — 'open', 'done', or 'all'. Defaults to 'all'.

    Returns:
        dict: List of matching tasks.
    """
    tasks = tool_context.state.get("user:tasks", [])
    if status_filter and status_filter != "all":
        tasks = [t for t in tasks if t["status"] == status_filter]
    return {"status": "success", "tasks": tasks, "count": len(tasks)}

root_agent = Agent(
    name="task_manager",
    model="gemini-2.0-flash",
    instruction="You are a task management assistant. Help users create, list, "
                "and manage their tasks. Always confirm task creation details.",
    tools=[create_task, list_tasks],
)
Delegating to subagents
For all Agent instances and subclasses, you can define a subagents= kwarg and pass in a list of subagents to delegate tasks to.
In the example below, we create a root Agent instance that delegates to other agents based on their description and usefulness to the query.
# team_agent/agent.py
from google.adk.agents import Agent
from typing import Optional

# --- Specialist tools ---
def get_weather(city: str) -> dict:
    """Retrieves the current weather report for a specified city.

    Args:
        city (str): The name of the city.

    Returns:
        dict: Weather information with status.
    """
    db = {
        "new york": {"status": "success", "report": "New York: Sunny, 25°C"},
        "london": {"status": "success", "report": "London: Cloudy, 15°C"},
        "tokyo": {"status": "success", "report": "Tokyo: Light rain, 18°C"},
    }
    return db.get(city.lower(), {"status": "error", "error_message": f"No data for '{city}'."})

def say_hello(name: Optional[str] = None) -> str:
    """Provides a friendly greeting, optionally personalized with a name.

    Args:
        name (str): Optional name to personalize the greeting.

    Returns:
        str: A greeting message.
    """
    return f"Hello, {name}! Welcome!" if name else "Hello there! Welcome!"

def say_goodbye() -> str:
    """Provides a polite farewell message.

    Returns:
        str: A farewell message.
    """
    return "Goodbye! Have a wonderful day."

# --- Specialist agents (sub-agents) ---
greeting_agent = Agent(
    model="gemini-2.0-flash",
    name="greeting_agent",
    # description is CRITICAL — the coordinator reads this to decide routing
    description="Handles greetings, hellos, and welcoming users.",
    instruction="You are the Greeting Agent. Your ONLY task is to provide a "
                "friendly greeting using the 'say_hello' tool. Do not handle "
                "any other type of request.",
    tools=[say_hello],
)

farewell_agent = Agent(
    model="gemini-2.0-flash",
    name="farewell_agent",
    description="Handles farewells, goodbyes, and ending conversations.",
    instruction="You are the Farewell Agent. Your ONLY task is to provide a "
                "polite goodbye using the 'say_goodbye' tool.",
    tools=[say_goodbye],
)

# --- Coordinator agent ---
# The coordinator handles weather itself, delegates greetings/farewells to sub-agents
root_agent = Agent(
    name="team_coordinator",
    model="gemini-2.0-flash",
    description="Main coordinator that routes requests to the right specialist.",
    instruction="You are the main coordinator agent managing a team. "
                "For weather questions, handle them yourself using 'get_weather'. "
                "For greetings, delegate to 'greeting_agent'. "
                "For farewells, delegate to 'farewell_agent'.",
    tools=[get_weather],
    sub_agents=[greeting_agent, farewell_agent],  # Enables automatic delegation
)
Sequential agents
Sequential agents run other agents sequentially in order as part of a pipeline:
root_agent = SequentialAgent(
    name="pipeline",
    sub_agents=[agent1, agent2, agent3],
)
Here is a complete example, where you can pass agent results from one agent to another in the pipeline via the output_key= kwarg when instantiating an LLM agent. You can then interpolate that output key langchain style to access the previous agent's output.
# pipeline_agent/agent.py
from google.adk.agents import Agent
from google.adk.agents.sequential_agent import SequentialAgent

MODEL = "gemini-2.0-flash"

# Step 1: Generate initial code from a specification
code_writer = Agent(
    name="CodeWriter",
    model=MODEL,
    instruction="""You are a Python code generator. Write clean, well-documented
    Python code based on the user's request. Output ONLY the Python code,
    wrapped in a code block.""",
    description="Writes initial Python code based on a specification.",
    output_key="generated_code",  # Saves response to state["generated_code"]
)

# Step 2: Review the code — reads from state via {generated_code} template
code_reviewer = Agent(
    name="CodeReviewer",
    model=MODEL,
    instruction="""You are an expert Python code reviewer. Review this code:
```python
{generated_code}
```

Provide specific feedback on:
1. Correctness and potential bugs
2. Code style and readability
3. Performance considerations
4. Suggested improvements

Be constructive and specific.""",
    description="Reviews the generated code and provides feedback.",
    output_key="code_review",  # Saves review to state["code_review"]
)

# Step 3: Refine based on review feedback
code_refiner = Agent(
    name="CodeRefiner",
    model=MODEL,
    instruction="""You are a code refiner. Here is the original code:
```python
{generated_code}
```

And here is the review feedback:
{code_review}

Rewrite the code incorporating ALL the review feedback. Output the final,
improved Python code.""",
    description="Refines code based on reviewer feedback.",
    output_key="final_code",
)

# SequentialAgent runs CodeWriter → CodeReviewer → CodeRefiner in order
root_agent = SequentialAgent(
    name="CodePipeline",
    sub_agents=[code_writer, code_reviewer, code_refiner],
)
Parallel agent
The ParallelAgent agent runs all subagents in parallel.
# ParallelAgent runs all three concurrently
root_agent = ParallelAgent(
    name="parallel_pipeline",
    sub_agents=[agent1, agent2, agent3],
)
# parallel_agent/agent.py
from google.adk.agents import Agent
from google.adk.agents.parallel_agent import ParallelAgent
from google.adk.agents.sequential_agent import SequentialAgent

MODEL = "gemini-2.0-flash"

# These three agents run concurrently — each writes to a distinct state key
weather_fetcher = Agent(
    name="WeatherFetcher",
    model=MODEL,
    instruction="Provide a brief weather summary for San Francisco today. "
                "Keep it to 2-3 sentences.",
    output_key="weather_info",  # Each parallel agent needs a unique key
)

news_fetcher = Agent(
    name="NewsFetcher",
    model=MODEL,
    instruction="Provide 3 brief headline summaries of today's top tech news.",
    output_key="news_info",
)

stock_fetcher = Agent(
    name="StockFetcher",
    model=MODEL,
    instruction="Provide a brief summary of how major tech stocks (AAPL, GOOG, "
                "MSFT) are performing today.",
    output_key="stock_info",
)

# ParallelAgent runs all three concurrently
info_gatherer = ParallelAgent(
    name="InfoGatherer",
    sub_agents=[weather_fetcher, news_fetcher, stock_fetcher],
)

# After parallel execution, a summarizer reads all gathered data
summarizer = Agent(
    name="Summarizer",
    model=MODEL,
    instruction="""Create a morning briefing from these sources:

**Weather:** {weather_info}
**News:** {news_info}
**Stocks:** {stock_info}

Format as a concise, professional morning briefing.""",
    output_key="briefing",
)

# Sequential wraps parallel gathering → summarization
root_agent = SequentialAgent(
    name="MorningBriefing",
    sub_agents=[info_gatherer, summarizer],
)
Persistent sessions
Use the DatabaseSessionService class to persesit sessions to a SQL db
# persistent_agent.py
import asyncio
from google.adk.agents import Agent
from google.adk.runners import Runner
from google.adk.sessions import DatabaseSessionService
from google.adk.memory import InMemoryMemoryService
from google.adk.tools import load_memory
from google.genai import types

# DatabaseSessionService requires an async database driver
# pip install aiosqlite  (for SQLite)
# pip install asyncpg    (for PostgreSQL)
DB_URL = "sqlite+aiosqlite:///./agent_sessions.db"

APP_NAME = "persistent_app"
USER_ID = "user_1"

# Agent that can recall information from past sessions
agent = Agent(
    name="memory_agent",
    model="gemini-2.0-flash",
    instruction="You are a helpful assistant with long-term memory. "
                "Use the 'load_memory' tool to recall information from "
                "past conversations when the user asks about something "
                "you discussed before.",
    tools=[load_memory],  # Built-in tool for searching memory service
)

async def main():
    # DatabaseSessionService persists sessions to SQLite
    # Tables created automatically: app_state, raw_events, sessions, user_state
    session_service = DatabaseSessionService(db_url=DB_URL)
    memory_service = InMemoryMemoryService()

    runner = Runner(
        agent=agent,
        app_name=APP_NAME,
        session_service=session_service,
        memory_service=memory_service,  # Pass memory service to Runner
    )

    # Session 1: Capture information
    session1_id = "session_info"
    await session_service.create_session(
        app_name=APP_NAME, user_id=USER_ID, session_id=session1_id
    )
    content = types.Content(
        role="user",
        parts=[types.Part(text="My favorite project is Project Alpha and I work on AI.")],
    )
    async for event in runner.run_async(
        user_id=USER_ID, session_id=session1_id, new_message=content
    ):
        if event.is_final_response() and event.content and event.content.parts:
            print(f"Agent: {event.content.parts[0].text}")

    # Add completed session to long-term memory
    completed = await session_service.get_session(
        app_name=APP_NAME, user_id=USER_ID, session_id=session1_id
    )
    await memory_service.add_session_to_memory(completed)

    # Session 2: Recall from memory in a new session
    session2_id = "session_recall"
    await session_service.create_session(
        app_name=APP_NAME, user_id=USER_ID, session_id=session2_id
    )
    recall_content = types.Content(
        role="user",
        parts=[types.Part(text="What is my favorite project?")],
    )
    async for event in runner.run_async(
        user_id=USER_ID, session_id=session2_id, new_message=recall_content
    ):
        if event.is_final_response() and event.content and event.content.parts:
            print(f"Agent (recall): {event.content.parts[0].text}")

asyncio.run(main())
Reasoning
You can make models think and output their think trace before answering as to get better answers by passing in a ReAct type planner into the planner= kwarg when creating an Agent instance.
BuiltInPlanner: basic planner to enable thinking tokensPlanReActPlanner: ReAct style thinking
Here is how to use the built-in planner. When passing in a ThinkingConfig() object, these are the kwargs you can pass:
include_thoughts: boolean. If set to true, then the thinking trace is shown.thinking_budget: int. THe maximum amount of tokens to allow for thinking
from google.adk.agents import Agent
from google.adk.planners import BuiltInPlanner
from google.genai.types import ThinkingConfig

reasoning_agent = Agent(
    model="gemini-2.5-flash",  # Thinking works best with 2.5+ models
    name="reasoning_agent",
    instruction="You are a research assistant. Think through problems carefully "
                "before answering. Break complex questions into smaller parts.",
    planner=BuiltInPlanner(
        thinking_config=ThinkingConfig(
            include_thoughts=True,   # Include reasoning in response
            thinking_budget=1024,    # Token budget for thinking
        )
    ),
    tools=[],  # Add your tools here
)
The PlanReActPlanner() planner type enables ReAct type reasoning, which is great for dumber models which don't usually have reasoning capabilities. It manually simulates model reasoning via intelligent prompting.
from google.adk.agents import Agent
from google.adk.planners import PlanReActPlanner

def search_database(query: str) -> dict:
    """Searches the knowledge database for relevant information.

    Args:
        query (str): The search query.

    Returns:
        dict: Search results.
    """
    return {"status": "success", "results": f"Found 3 articles about '{query}'."}

def calculate(expression: str) -> dict:
    """Evaluates a mathematical expression.

    Args:
        expression (str): A mathematical expression to evaluate.

    Returns:
        dict: The calculation result.
    """
    try:
        result = eval(expression)  # Use a safe evaluator in production
        return {"status": "success", "result": result}
    except Exception as e:
        return {"status": "error", "error_message": str(e)}

# PlanReActPlanner injects structured reasoning directives
root_agent = Agent(
    model="gemini-2.5-flash",
    name="research_agent",
    instruction="You are a research analyst. For complex questions, break them "
                "into steps, research each part, and synthesize findings.",
    planner=PlanReActPlanner(),  # Enables Plan-Reason-Act-Replan cycle
    tools=[search_database, calculate],
)
Use cases
OpenAPI built-in integration: Github API master
For any API that has an OpenAPI specification, you can immediately give an agent up to date, complete knowledge on how to use that API and all tools available by just linking the APIs openapi.json file.
import os
import asyncio
from google.adk.agents.llm_agent import Agent
from google.adk.tools.openapi_tool import OpenAPIToolset
from google.adk.runners import Runner

# Step 1: Load GitHub OpenAPI Spec & Credentials
# You would download the github_openapi.json from GitHub's docs
GITHUB_TOKEN = os.getenv("GITHUB_TOKEN")

toolset = OpenAPIToolset(
    spec_path="github_openapi.json",
    headers={"Authorization": f"Bearer {GITHUB_TOKEN}"}
)

# Step 2: Create the Agent
agent = Agent(
    model='gemini-2.5-pro',
    name='github_expert',
    instruction="You help manage GitHub repos. You can list, create, and edit issues.",
    tools=toolset.get_tools() # This adds hundreds of GitHub actions as tools
)

# Step 3: Run the Agent
runner = Runner(agent=agent)

async def main():
    user_msg = {"role": "user", "parts": [{"text": "List my open issues in the 'adk-project' repo."}]}
    async for event in runner.run_async(user_id="u1", session_id="s1", new_message=user_msg):
        if event.is_final_response():
            print(f"Agent: {event.content.parts[0].text}")

if __name__ == "__main__":
    asyncio.run(main())
AI resources
Voice
image
This lets you create shirts:
lexica, stable diffusion search engine: