AWS-local-testing
LocalStack
Installation and authentication
There are 6 ways to use localstack:
- standalone docker image
- localstack operator with kubernetes
- docker compose
- localstack CLI
- localstack desktop
- localstack VSCode extension
All the different ways to use LocalStack require the same thing: an auth token.
There are two ways to supply an auth token:
- env var method: export the
LOCALSTACK_AUTH_TOKENenvironment variable into the shell session before interacting with the CLI - CLI way: run the
lstkCLI to authenticate.
To debug if the localstack process is currently running, you can make a curl request to localhost:4566, which is the port the localhost process runs on.
curl http://localhost:4566/_localstack/info | jq
Connecting to Localstack
AWS credential overrides
There are two ways to programmatically use LocalStack with AWS:
- CLI: use the
awslocalCLI or theawsCLI and point environment variables to localstack. - AWS local profile: create a dedicated "localstack" profile in your
~/.aws/configand~/.aws/credentialsfiles. Once this is set up, all IaC solutions like Cloudformation, SAM, and AWS CDK will pull the localstack credentials from the localstack profile and be able to work.
method 1: aws way with --endpoint-url
The localstack process runs on a dedicated URL and has its own access keys for programmatic access, so all we have to do is change the endpoint url and some environment variables.
export AWS_ACCESS_KEY_ID="test"
export AWS_SECRET_ACCESS_KEY="test"
export AWS_DEFAULT_REGION="us-east-1"

# example where we just point to localstack endpoint URL and dummy access keys
aws --endpoint-url=http://localhost.localstack.cloud:4566 kinesis list-streams
method 2: aws way with --profile
This method is a tad more convenient than the first because it works with IaC solutions for AWS automatically pulling from the currently authenticated AWS profile, so if you set the currently authenticated AWS profile to a localstack profile, then all IaC actions will automatically connect to LocalStack.
- Add the following profile to your AWS configuration file (by default, this file is at
~/.aws/config):
[profile localstack]
region=us-east-1
output=json
endpoint_url = http://localhost.localstack.cloud:4566
- Add the
localstackprofile to your AWS credentials file witht he exact dummy access keys being the value"test"(by default, this file is at~/.aws/credentials):
[localstack]
aws_access_key_id=test
aws_secret_access_key=test
You can now use the localstack profile with the aws CLI by specifying the --profile localstack flag on every single command:
aws s3 mb s3://test --profile localstack
aws s3 ls --profile localstack
NOTE
Alternatively, you can also set the AWS_PROFILE=localstack environment variable, in which case the --profile localstack parameter can be omitted in the commands above.
method 3: awslocal way
awslocal is the official LocalStack AWS CLI and serves as a thin wrapper and a substitute for the standard aws command, enabling you to run AWS CLI commands within the LocalStack environment without specifying the --endpoint-url parameter or a profile.
Here is how to install it:
pip install awscli-local[ver1] # installs version compatiable of v1 of AWS CLI
Docker compose
Use Docker Compose when you want a reusable configuration file that can be shared across a team or checked into a project repository. Create a docker-compose.yml with the following configuration:
services:
  localstack:
    container_name: '${LOCALSTACK_DOCKER_NAME:-localstack-main}'
    image: localstack/localstack
    ports:
      - '127.0.0.1:4566:4566' # LocalStack Gateway
      - '127.0.0.1:4510-4559:4510-4559' # external services port range
      - '127.0.0.1:443:443' # LocalStack HTTPS Gateway
    environment:
      # Activate LocalStack for AWS: https://docs.localstack.cloud/getting-started/auth-token/
      - LOCALSTACK_AUTH_TOKEN=${LOCALSTACK_AUTH_TOKEN:?}
      # LocalStack configuration: https://docs.localstack.cloud/references/configuration/
      - DEBUG=${DEBUG:-0}
      - PERSISTENCE=${PERSISTENCE:-0}
    volumes:
      - '${LOCALSTACK_VOLUME_DIR:-./volume}:/var/lib/localstack'
      - '/var/run/docker.sock:/var/run/docker.sock'
Execute docker compose up to start.
Docker CLI
Use the Docker CLI for one-off starts or when you want to test a container configuration before moving it into Compose:
docker run \
  --rm -it \
  -p 127.0.0.1:4566:4566 \
  -p 127.0.0.1:4510-4559:4510-4559 \
  -p 127.0.0.1:443:443 \
  -e LOCALSTACK_AUTH_TOKEN=${LOCALSTACK_AUTH_TOKEN:?} \
  -v /var/run/docker.sock:/var/run/docker.sock \
  localstack/localstack
The Docker Compose and Docker CLI examples above use the same runtime settings:
- The
4566port exposes the LocalStack Gateway. - The
4510-4559range exposes external service ports used by services that bind additional endpoints. - The
443port exposes the LocalStack HTTPS Gateway. - The Docker socket mount is required for services that start additional containers, such as Lambda.
- Docker reuses a local image if one already exists. Pull explicitly or pin an image tag, such as
localstack/localstack:<version>, when you need reproducible CI or team environments. - If you use Docker bridge networking, container name resolution may not work as expected from other containers. Prefer the default LocalStack networking setup unless you have a specific reason to customize it.
- Configuration variables can be prefixed with
LOCALSTACK_in Docker. For instance, settingLOCALSTACK_PERSISTENCE=1is equivalent toPERSISTENCE=1.
lstk CLI
lstk is a high-performance command-line interface for LocalStack, built in Go. It provides a built-in terminal UI (TUI) for interactive use and plain text output for CI/CD pipelines and scripting.
lstk handles the full emulator lifecycle: authentication, pulling the Docker image, starting, stopping, and restarting the container, streaming logs, and checking status.
- It can also save and load emulator state (as local snapshots or Cloud Pods) reset running state, run AWS CLI commands against the emulator, and manage the on-disk volume.
- Running
lstkwith no arguments takes you through the entire startup flow automatically.
lstk also proxies developer tools so they run directly against LocalStack: the AWS CLI (lstk aws), the Azure CLI (lstk az), Terraform (lstk terraform), the AWS CDK (lstk cdk), and the AWS SAM CLI (lstk sam).
Installation and updating
Here's how to install with brew:
brew install localstack/tap/lstk
Here's how to install with npm globally
npm install -g @localstack/lstk
You can then update with lstk update:
# Check for updates without installing
lstk update --check

# Update to the latest version
lstk update
lstk drop-ins
The amazing thing about lstk is that it covers drop-in replacements for all sorts of tools with a single CLI:
lstk aws: thelstk awsCLI is a drop-in replacement wrapper for theawsCLI, where all AWS CLI actions now are applied to the localstack backend.lstk terraform: thelstk terraformCLI is a drop-in replacement wrapper for theterraformCLI, where all AWS CLI actions now are applied to the terraform backend.lstk cdk: drop-in replacement for thecdkpackagelstk sam: drop-in replacement for thesampackage.
Connecting to AWS
lstk aws proxies your host aws CLI with the endpoint, credentials, and region pre-configured, so you don’t have to pass --endpoint-url or set test credentials yourself.
lstk aws s3 ls
lstk aws sqs list-queues
lstk aws s3 mb s3://my-bucket
It is equivalent to running with AWS_ACCESS_KEY_ID, AWS_SECRET_ACCESS_KEY, and AWS_DEFAULT_REGION and the --endpoint-url flag set automatically:
aws --endpoint-url http://localhost:4566 <args>
lstk aws injects credentials in one of two ways:
- Profile mode: if a complete
localstackprofile exists in both~/.aws/configand~/.aws/credentials,lstkappends--profile localstackand letsawsread the region, credentials, and endpoint from that profile. - Profile-less mode: if the profile is not present,
lstkrunsawswithAWS_ACCESS_KEY_ID=test,AWS_SECRET_ACCESS_KEY=test, andAWS_DEFAULT_REGION=us-east-1injected only when those variables are not already set in your environment.
lstk config
You can configure the behavior of the emulator and emulated services with changing the localstack config, of which there are two ways to do so:
- pass in environment variables when starting localstack: when running
lstk start, you can export environment variables into the current shell session so localstack reads those env vars and uses it as config overrides:
BEDROCK_PREWARM=1 lstk start
- change the lstk TOML: You can retrieve the path to the global
lstkconfig through thelstk config pathcommand, or use a project-scoped TOML that overrides the global one.
vi $(lstk config path)
Here are the important vars you need to know:
BEDROCK_PREWARM: Type is (0 or 1, boolean). If set to 1/true, then prewarms the local bedrock service so there are no cold starts when calling the AI models.PERSISTENCE: Type is (0 or 1, boolean). If set to 1/true, then persists data in Localstack like emulated cloud resources across restarts using a volume.DEBUG: Type is (0 or 1, boolean). If set to 1/true, then enables verbose logging, which is helpful for debugging.
Environment variable method
Since lstk start forwards host environment variables prefixed with LOCALSTACK_ to the emulator, for all of the possible env vars to set, if you are doing it the manual way, you must prefix those vars with LOCALSTACK_:
# run lstk start with persistence
LOCALSTACK_PERSISTENCE=1 lstk start
lstk injects several environment variables into the LocalStack container on every start, in addition to any profiles you configure:
| Variable | Default value | Description |
|---|---|---|
LOCALSTACK_AUTH_TOKEN | (your resolved token) | Passed from the CLI to activate the license. |
GATEWAY_LISTEN | :4566,:443 | Ports the emulator binds inside the container. |
MAIN_CONTAINER_NAME | localstack-aws | Container name for internal references. |
LOCALSTACK_HOST | localhost.localstack.cloud:<host port> | Hostname/port the emulator advertises. |
LOCALSTACK_PERSISTENCE | 1 (only with --persist) | Enables state persistence across restarts. |
LOCALSTACK_CLIENT_NAME | lstk | Identifies the client that started the emulator. |
LOCALSTACK_CLIENT_VERSION | (the lstk version) | Version of the client that started the emulator. |
Config basics
lstk uses a TOML configuration file, created automatically on first run.
lstk uses the first config.toml it finds in this order:
./.lstk/config.toml: project-local config in the current directory.$HOME/.config/lstk/config.toml: user config (created here if$HOME/.config/exists).
To see the global active config file path:
lstk config path
To use a specific config file, pass the --config <config-filepath> flag when using the lstk CLI.
lstk --config /path/to/config.toml start
This is what the default config.toml looks like:
# lstk configuration file
# Run 'lstk config path' to see where this file lives.

# Each [[containers]] block defines an emulator instance.
# Only one [[containers]] block may be enabled at a time — running multiple
# emulators together (e.g. AWS and Snowflake) is not supported yet, so
# 'lstk start' refuses to start with more than one block.

[[containers]]
type = "aws"     # Emulator type. Currently supported: "aws", "snowflake", "azure"
tag  = "latest"  # Docker image tag, e.g. "latest", "2026.4"
port = "4566"    # Host port the emulator will be accessible on
# container_name = ""   # Container name (default: "localstack-<type>", plus "-<tag>"
#                # when tag is not "latest"). Set it when something outside lstk
#                # addresses the emulator by a fixed name, e.g. a sidecar proxy on a
#                # CI agent. It is also what the emulator reports as MAIN_CONTAINER_NAME.
# image = ""     # Custom image to use instead of the default Docker Hub image, e.g.
#                # an internal registry mirror or a locally loaded offline image.
#                # If it carries no tag, 'tag' above is appended; if it already
#                # carries a tag, 'tag' above is dropped.
# volume = ""    # Host directory for persistent state (default: OS cache dir)
# env = []       # Named environment profiles to apply (see [env.*] sections below)
# volumes = []   # Extra bind mounts, each "host:container[:ro]". Relative host paths
#                # resolve against this config file's directory; a leading ~/ is expanded.
#                # A "volumes" entry targeting /var/lib/localstack sets the persistent
#                # state directory (equivalent to "volume" above).
#                #
#                # Mount Snowflake init hooks (scripts run on startup) — see
#                # https://docs.localstack.cloud/snowflake/capabilities/init-hooks/
#                # volumes = ["./test.sf.sql:/etc/localstack/init/ready.d/test.sf.sql"]
# snapshot = "pod:my-baseline"  # Snapshot REF auto-loaded on start (AWS only); skip once with 'lstk start --no-snapshot'

# Environment profiles let you group environment variables and reference
# them by name in one or more containers via the 'env' field above.
#
# Example variables based on commonly used current config options:
#
#   DEBUG=1                 - Enable verbose logging
#   PERSISTENCE=1           - Persist LocalStack state across restarts
#   ENFORCE_IAM=1           - Enable IAM policy enforcement
#   SERVICES=s3,sqs         - Limit services to load
#   EAGER_SERVICE_LOADING=1 - Preload services at startup
#
#   GATEWAY_LISTEN=:4566,:443  - Ports the gateway listens on (default shown).
#                                The first entry's host sets what IP published
#                                ports bind to — use "0.0.0.0:4566,0.0.0.0:443"
#                                to make the emulator reachable from other
#                                machines (e.g. on EC2). Extra ports listed
#                                (e.g. :8443) are published too.
#
# See full list of configuration options:
# > https://docs.localstack.cloud/references/configuration/
#
# Example profiles:
#
# [env.debug]
# DEBUG = "1"
# PERSISTENCE = "1"
# ENFORCE_IAM = "1"
#
# [env.ci]
# SERVICES = "s3,sqs"
# EAGER_SERVICE_LOADING = "1"
These are the important meta-arguments that determine how localstack works:
| Field | Type | Default | Description |
|---|---|---|---|
type | string | "aws" | Emulator type. One of "aws", "snowflake", "azure". Run a single [[containers]] block at a time. See Emulator types. |
tag | string | "latest" | Docker image tag ("latest", "2026.4", etc.). Useful for pinning a specific version. Zero-padded months ("2026.04") are normalized to "2026.4". |
port | string | "4566" | Host port the emulator listens on (1–65535). The in-container port is always 4566. |
image | string | (default) | Full image reference that overrides the default Docker Hub image, e.g. an internal-registry mirror or a locally loaded offline image. If it already carries a tag, tag is ignored; otherwise tag (or latest) is appended. |
volume | string | (OS cache) | Host directory for persistent emulator state. Defaults to <os-cache>/lstk/volume/<container-name>. See also volumes. |
volumes | string[] | [] | Docker-style "host:container[:ro]" bind mounts (e.g. init hooks). May also carry the persistence mount (target /var/lib/localstack). See Volume mounts. |
env | string[] | [] | List of named environment profiles to inject into the container (see below). |
snapshot | string | "" | Snapshot REF (e.g. pod:my-baseline or a local path) to auto-load after the emulator starts. AWS emulator only. See Auto-loading a snapshot on start. |
Passing environment variables with environment profiles
If passing environment variables manually isn't your thing, you can use environment profiles in the config.toml.
Define reusable environment profiles under [env.<name>] and reference them in your container config:
[[containers]]
type = "aws"
tag  = "latest"
port = "4566"
env  = ["debug", "ci"] # load the "debug" and "cli" profiles as available

# create a "debug" profile with these env vars set
[env.debug]
DEBUG = "1"
ENFORCE_IAM = "1"
PERSISTENCE = "1"

# create a "ci" profile with these env vars set
[env.ci]
SERVICES = "s3,sqs"
EAGER_SERVICE_LOADING = "1"
When lstk start runs, the key-value pairs from each referenced profile are injected as environment variables into the LocalStack container.
- Keys are uppercased automatically.
- This is most useful for project-level overrides, when you have
.lstk/config.tomlin the CWD and then you override with certain environment variables that are automatically loaded.
lstk TUI vs non-interactive
lstk automatically selects its output mode:
- Interactive mode (TUI): used when both stdin and stdout are connected to a terminal. Commands like
start,stop,restart,status,login,update, and the confirmation prompts ofreset/volume cleardisplay a Bubble Tea-powered terminal UI. - Non-interactive mode (plain text): used when the output is piped, redirected, or running in CI. Force this in a TTY with
--non-interactive.
# Force plain output even in an interactive terminal
lstk --non-interactive start
lstk emulator management commands
lstk # downloads latest image
lstk login # authenticates
lstk start # starts emulator
lstk start: authenticates and starts the emulator.lstk logs: view logs from emulator
lstk start
The lstk start command starts the LocalStack emulator.
- Launches the TUI in interactive terminals and prints plain output otherwise.
lstk startlaunches the emulator defined in the first[[containers]]entry of the resolvedconfig.toml(not necessarily AWS).
lstk start
lstk start --persist
lstk start --non-interactive
| Option | Description |
|---|---|
--persist | Persist emulator state across restarts (sets LOCALSTACK_PERSISTENCE=1 in the container) |
--type <type>, -t <type> | Select the emulator to start (aws, snowflake, or azure) non-interactively, recording the choice in config.toml. See Selecting the emulator with --type. |
--snapshot <REF> | Auto-load this snapshot after the emulator starts, overriding the configured snapshot for one run (AWS only) |
--no-snapshot | Skip auto-loading the configured snapshot for this run |
--timeout <duration> | Maximum time to wait for the emulator to become ready, as a Go duration (e.g. 90s, 2m). Overrides LSTK_STARTUP_TIMEOUT for this run; 0 uses the per-mode default. |
--non-interactive | Disable the interactive TUI and use plain output |
NOTE
lstk start forwards host environment variables prefixed with LOCALSTACK_ to the emulator
enabling persistence
By default the emulator starts with a fresh state on every run.
- Pass
--persistto keep data across restarts:lstkinjectsLOCALSTACK_PERSISTENCE=1into the container so state is written to the mountedvolumeand reloaded on the next start. - When persistence is active, the AWS emulator’s startup summary includes a
• Persistence: Enabledline.
# Start with persistent state
lstk start --persist
lstk restart
The lstk restart command stops the localstack emulator container and then restarts it, pulling in any fresh config changes.
lstk restart
lstk restart --persist
By default, emulator state is not retained across the restart and the container starts clean. Pass --persist to keep the emulator’s state so it survives the restart.
lstk status
Show the status of a running emulator and its deployed resources.
lstk status
lstk --non-interactive status
lstk reset
lstk reset
lstk reset --force
lstk logs
Show or stream emulator logs:
lstk logs [options]
| Option | Description |
|---|---|
--follow, -f | Stream logs in real-time. Without this flag, lstk prints the currently available logs and exits. |
--verbose, -v | Show all logs without filtering. By default, lstk drops noisy lines (internal request logs, provider chatter); --verbose shows every line verbatim. |
--tail <N>, -n <N> | Show only the last N lines from the end of the logs. Accepts a non-negative integer or all (the default, showing all available lines). |
Logging in localstack
lstk writes its own diagnostic logs to lstk.log in the same directory as the active config file. This is separate from the LocalStack container logs (which you view with lstk logs).
- The log file is created automatically and appended to across runs.
- When the file exceeds 1 MB, it is cleared on the next run.
- Use
lstk config pathto find the config directory;lstk.logsits alongsideconfig.toml.
lstk CI/CD
A typical CI job with LocalStack follows this flow:
- Check out your application code.
- Start localstack in the background with
lstk start- Start LocalStack non-interactively as part of the job.
- Configure a CI Auth Token through the CI provider’s secret manager to pass the
LOCALSTACK_AUTH_TOKENto the runner.- Store
LOCALSTACK_AUTH_TOKENas a protected CI secret.
- Store
- Provision test infrastructure with tools such as
awslocal,tflocal,cdklocal, or usinglstk. - Run integration tests against the LocalStack endpoint.
- Collect logs, test reports, and artifacts from the job.
For CI or headless environments, set LOCALSTACK_AUTH_TOKEN and use --non-interactive so you automatically authenticate with lstk
LOCALSTACK_AUTH_TOKEN=<your-ci-auth-token> lstk --non-interactive
So here are the steps to create a basic action:
- Create a new localstack auth token: CI environments should use a CI Auth Token. Create one from the Auth Tokens page, then store it as
LOCALSTACK_AUTH_TOKENin your CI provider’s secret manager. - Install
lstk: Install via brew - Install localstack in the action: Use the
LocalStack/setup-localstack@maingithub action workflow to install localstack and authenticate with it
- name: Start LocalStack
  uses: LocalStack/setup-localstack@main
  with:
    image-tag: 'latest'
    install-awslocal: 'true'
  env:
    LOCALSTACK_AUTH_TOKEN: ${{ secrets.LOCALSTACK_AUTH_TOKEN }}
- Authenticate with
lstk: use theLOCALSTACK_AUTH_TOKENvariable to non-interactively authenticate withlstk
Here is the full file:
name: Test on LocalStack

on:
  push:
    branches: [ main ]           # run on pushes to main
  pull_request:
    branches: [ main ]           # run on PRs targeting main
  workflow_dispatch:              # allow manual runs from the Actions tab

jobs:
  localstack-test:
    name: Deploy on LocalStack
    runs-on: ubuntu-latest

    steps:
      # 1) Get your repo files onto the runner
      - name: Checkout code
        uses: actions/checkout@v4

      # 2) Python for tests and boto3
      - name: Set up Python
        uses: actions/setup-python@v4
        with:
          python-version: '3.11'

      # 3) Node for AWS CDK tooling
      - name: Set up Node
        uses: actions/setup-node@v4
        with:
          node-version: '20'

      # 4) Install your app and test dependencies
      - name: Install dependencies
        run: |
          python -m pip install --upgrade pip
          pip install -r requirements.txt

      # 5) Install CDK and CDKLocal, confirm cdklocal is available
      - name: Install CDK and CDKLocal
        run: |
          npm install -g aws-cdk-local aws-cdk
          cdklocal --version

      # 6) Start LocalStack with Pro features enabled
      - name: Start LocalStack
        uses: LocalStack/setup-localstack@main
        with:
          image-tag: 'latest'        # pull the latest LocalStack image
          install-awslocal: true     # also install the awslocal helper
          use-pro: true              # turn on Pro features
        env:
          LOCALSTACK_AUTH_TOKEN: ${{ secrets.LOCALSTACK_AUTH_TOKEN }}

      # 7) Deploy your CDK app into LocalStack
      - name: Deploy CDK stack
        run: |
          cdklocal bootstrap                # one-time infra bootstrap in LocalStack
          cdklocal deploy --require-approval never

      # 8) Run your tests against the deployed stack
      - name: Run tests
        env:
          AWS_DEFAULT_REGION: us-east-1     # dummy creds are fine with LocalStack
          AWS_REGION: us-east-1
          AWS_ACCESS_KEY_ID: test
          AWS_SECRET_ACCESS_KEY: test
          # Optional, helps boto3 find LocalStack if your tests read this env:
          # AWS_ENDPOINT_URL: http://localhost:4566
        run: |
          pip3 install boto3 pytest
          pytest --disable-warnings
Most CI jobs should start with a clean LocalStack instance. A fresh instance makes test runs reproducible and avoids hidden dependencies between jobs.
If your pipeline needs state across jobs or workflow stages, use one of the state management options documented outside this getting started page:
- Cloud Pods to save and restore named LocalStack state snapshots.
- State export and import to move state through artifacts or caches.
- Persistence when the same runner keeps a mounted LocalStack volume.
deprecated localstack CLI
NOTE
lstk is our new Go-based CLI with an interactive terminal UI for lifecycle (start, stop), monitoring (status, logs), storage (snapshot), and more.
Here are the basic localstack CLI commands:
localstack start: starts localstack onlocalhost:4566localstack logs: views the logs on localstack
Localstack VSCode extension development
Read this for more info:
- Install AWS toolkit
- Install the localstack VSCode extension
- Install the localstack CLI with brew
- Go to the command palette and then run Localstack: Run LocalStack setup Wizard. This will automatically authenticate with your account to use the localstack auth token for localstack actions.
- Go to the command palette and then run Localstack: Configure LocalStack profile
The 4th step adds a dummy login and credentials to your ~/.aws/config and ~/.aws/credentials file that you can use so you can AWS through the context of localstack.
As part of the setup, a new localstack profile will have been added to your ~/.aws/config file. If you examine the file, you’ll see the following entry:
[profile localstack]
region = us-east-1
output = json
endpoint_url = http://localhost.localstack.cloud:4566
and the corresponding entry in ~/.aws/credentials:
[localstack]
aws_access_key_id = test
aws_secret_access_key = test
NOTE
Note that the installer will add these entries to the end of your existing files, but only if you don’t already have a localstack profile. Nothing else in these files will be modified.
Localstack MCP server
The LocalStack MCP server allows AI agents to interact with your provisioned LocalStack resources, making it pretty much identical to the AWS MCP server but there are no security vulnerabilities since you're not dealing with real infra.
The quickest way to get started with the MCP server is to use the interactive setup wizard:
npx -y @localstack/localstack-mcp-server init
The wizard detects your installed clients, asks how you want to run the server, and writes the configuration for you. You need a valid Auth Token to configure the server.
If you want to manually configure the MCP, use this JSON config
{
  "mcpServers": {
    "localstack-mcp-server": {
      "command": "npx",
      "args": ["-y", "@localstack/localstack-mcp-server"],
      "env": {
        "LOCALSTACK_AUTH_TOKEN": "<YOUR_TOKEN>"
      }
    }
  }
}
Localstack with AWS SDK
You have two methods for connecting SDK clients to localstack, both of which override the AWS endpoint for the client.
- localhost method: set the endpoint to
endpoint: 'http://localhost:4566'
const localhostConfig = {
  endpoint: 'http://localhost:4566',
  region: 'us-east-1',
  credentials: {
    accessKeyId: 'test',
    secretAccessKey: 'test',
  },
}
- localhost localstack method: set the endpoint to
localhost.localstack.cloud:4566, but then you need to add an additional property to deal with DNS errors:
const localhoststackConfig = {
  region: 'us-east-1',
  forcePathStyle: true, // If you want to use virtual host addressing of buckets, you can remove `forcePathStyle: true`.
  endpoint: 'http://s3.localhost.localstack.cloud:4566',
  credentials: {
    accessKeyId: 'test',
    secretAccessKey: 'test',
  },
})
Here's a full example showcasing both methods
const { LambdaClient, ListFunctionsCommand } = require('@aws-sdk/client-lambda');
const { S3Client, ListBucketsCommand } = require('@aws-sdk/client-s3');

// Configure the AWS SDK to use the LocalStack endpoint and credentials
const lambda = new LambdaClient({
  endpoint: 'http://localhost:4566',
  region: 'us-east-1',
  credentials: {
    accessKeyId: 'test',
    secretAccessKey: 'test',
  },
});

// Call a Lambda API using the LocalStack endpoint
lambda.send(new ListFunctionsCommand({}))
  .then((data) => console.log(data))
  .catch((error) => console.error(error));

// By default, @aws-sdk/client-s3 will using virtual host addressing:
// -> http://<bucket-name>.s3.localhost.localstack.cloud:4566/<key-name>
// To allow those requests to be directed to LocalStack, you need to set a specific endpoint.
// If this is not possible, you can set the special S3 configuration flag to use path
// addressing instead:
// -> http://s3.localhost.localstack.cloud:4566/<bucket-name>/<key-name>
// You can read the S3 documentation to learn more about the different endpoints.

const s3 = new S3Client({
  region: 'us-east-1',
  forcePathStyle: true, // If you want to use virtual host addressing of buckets, you can remove `forcePathStyle: true`.
  endpoint: 'http://s3.localhost.localstack.cloud:4566',
  credentials: {
    accessKeyId: 'test',
    secretAccessKey: 'test',
  },
});

// Call an S3 API using the LocalStack endpoint
s3.send(new ListBucketsCommand({}))
  .then((data) => console.log(data))
  .catch((error) => console.error(error));
Localstack services
Bedrock CLI
If you have the localstack student plan, that allows you to actually use bedrock models hosted on localstack cloud so you have actual AI inference you can use.
LocalStack’s Bedrock emulation supports models from the Ollama Models library.
WARNING
Keep in mind they only offer shitty as fuck models like Llama 3.
Bedrock has a huge cold start so to start bedrock warm, you can set this environment variable or set it in the lstk config path filepath.
BEDROCK_PREWARM=1 lstk start
You can then use bedrock as normal through the lstk aws CLI:
list foundation models
lstk aws bedrock list-foundation-models
run inference
This example saves inference output to a text file:
lstk aws bedrock-runtime invoke-model \
    --model-id "meta.llama3-8b-instruct-v1:0" \
    --body '{
        "prompt": "<|begin_of_text|><|start_header_id|>user<|end_header_id|>\nSay Hello!\n<|eot_id|>\n<|start_header_id|>assistant<|end_header_id|>",
        "max_gen_len": 2,
        "temperature": 0.9
    }' --cli-binary-format raw-in-base64-out outfile.txt
run conversation inference:
Bedrock provides a higher-level conversation API that makes it easier to maintain context in a chat-like interaction using the Converse API. You can specify both system prompts and user messages.
lstk aws bedrock-runtime converse \
    --model-id "meta.llama3-8b-instruct-v1:0" \
    --messages '[{
        "role": "user",
        "content": [{
            "text": "Say Hello!"
        }]
    }]' \
    --system '[{
        "text": "You'\''re a chatbot that can only say '\''Hello!'\''"
    }]'
Bedrock SDK
Localstack with CDK
To run localstack with CDK, use the lstk cdk drop-in replacment:
lstk cdk bootstrap
lstk cdk --region us-west-1 deploy
lstk cdk synth
- Setup a
localstackprofile in your AWS profile and credentials, if you haven't done so already:
lstk setup aws
- Bootstrap the app
lstk cdk bootstrap
Localstack with SAM
Use lstk sam as a drop-in replacement to run the AWS SAM CLI against LocalStack.
IMPORTANT
Requires the AWS SAM CLI version 1.95.0 or newer on your PATH (older versions ignore AWS_ENDPOINT_URL and would target real AWS).
lstk sam build
lstk sam --region us-west-2 deploy
lstk sam validate
The lstk sam is syntactic sugar over providing the following configuration:
--region <region>(defaultus-east-1)--account <id>(12 digits, default000000000000).- Relevant environment variables:
AWS_ENDPOINT_URLAWS_ENDPOINT_URL_S3LSTK_SAM_CMD(defaultsam)AWS_REGION(fallback for--region)AWS_ACCESS_KEY_ID(fallback for--account).
NOTE
Compared with samlocal, image/container-based Lambda (ECR) deploys and nested CloudFormation stacks are not supported; use samlocal for those workflows.
Localstack with Amplify
Gen 1: Installation and setup
Amplify LocalStack Plugin allows the amplify CLI tool to create resources on your local machine instead of AWS. It achieves this by redirecting any requests to AWS to a LocalStack container running locally on your machine.
To install the Amplify LocalStack Plugin, install the amplify-localstack package from the npm registry and add the plugin to your Amplify setup:
npm install -g amplify-localstack
amplify plugin add amplify-localstack
After installing the plugin, you can deploy your resources to LocalStack using the amplify init or amplify push commands. The console will prompt you to select whether to deploy to LocalStack or AWS.
You can also add the parameter --use-localstack true to your commands to avoid being prompted and automatically use LocalStack. Here is an example:
amplify init --use-localstack true
amplify add api
amplify push --use-localstack true
Gen 2: Installation and setup
The hard thing about gen 2 is that localstack doesn't officially support it yet, so we have to find a workaround by just deploying the provisioned Amplify backend resources via CDK.
- Start the emulator with
lstk start - Make sure these environment variables are defined and exported into the current shell environment
# Choose EITHER a profile OR explicit credentials, not both.
# For LocalStack, setting explicit test credentials is easiest:
unset AWS_PROFILE
export AWS_ACCESS_KEY_ID="test"
export AWS_SECRET_ACCESS_KEY="test"
export AWS_DEFAULT_REGION="us-east-1"
export AWS_REGION="us-east-1"

# Target localstack edge port
export AWS_ENDPOINT_URL="http://localhost:4566"
- Force Amplify to synthesize your backend code into CloudFormation templates without deploying them to the cloud:
npx ampx pipeline-deploy --dry-run
- Deploy the resulting CDK stack directly into your running localstack container:
lstk cdk deploy --all
- Manually configure your frontend client: Because you are bypassing
ampx sandbox, Amplify will not automatically generate a local-friendlyamplify_outputs.jsonfile. You will need to manually pass your LocalStack endpoints toAmplify.configure()in your frontend code (e.g.,main.tsorApp.tsx)
import { Amplify } from 'aws-amplify';

Amplify.configure({
  Auth: {
    Cognito: {
      userPoolId: 'us-east-1_localPoolId', // Get this from cdklocal deploy output
      userPoolClientId: 'localClientId',
      endpoint: 'http://localhost:4566' // Force Auth to use LocalStack
    }
  },
  API: {
    GraphQL: {
      endpoint: 'http://localhost:4566/graphql',
      region: 'us-east-1',
      defaultAuthMode: 'userPool'
    }
  }
});
Resource browser
The LocalStack Web Application provides a Resource Browser for managing Amplify applications. You can access the Resource Browser by opening the LocalStack Web Application in your browser, navigating to the Resource Browser section, and then clicking on Amplify under the Front-end Web & Mobile section.
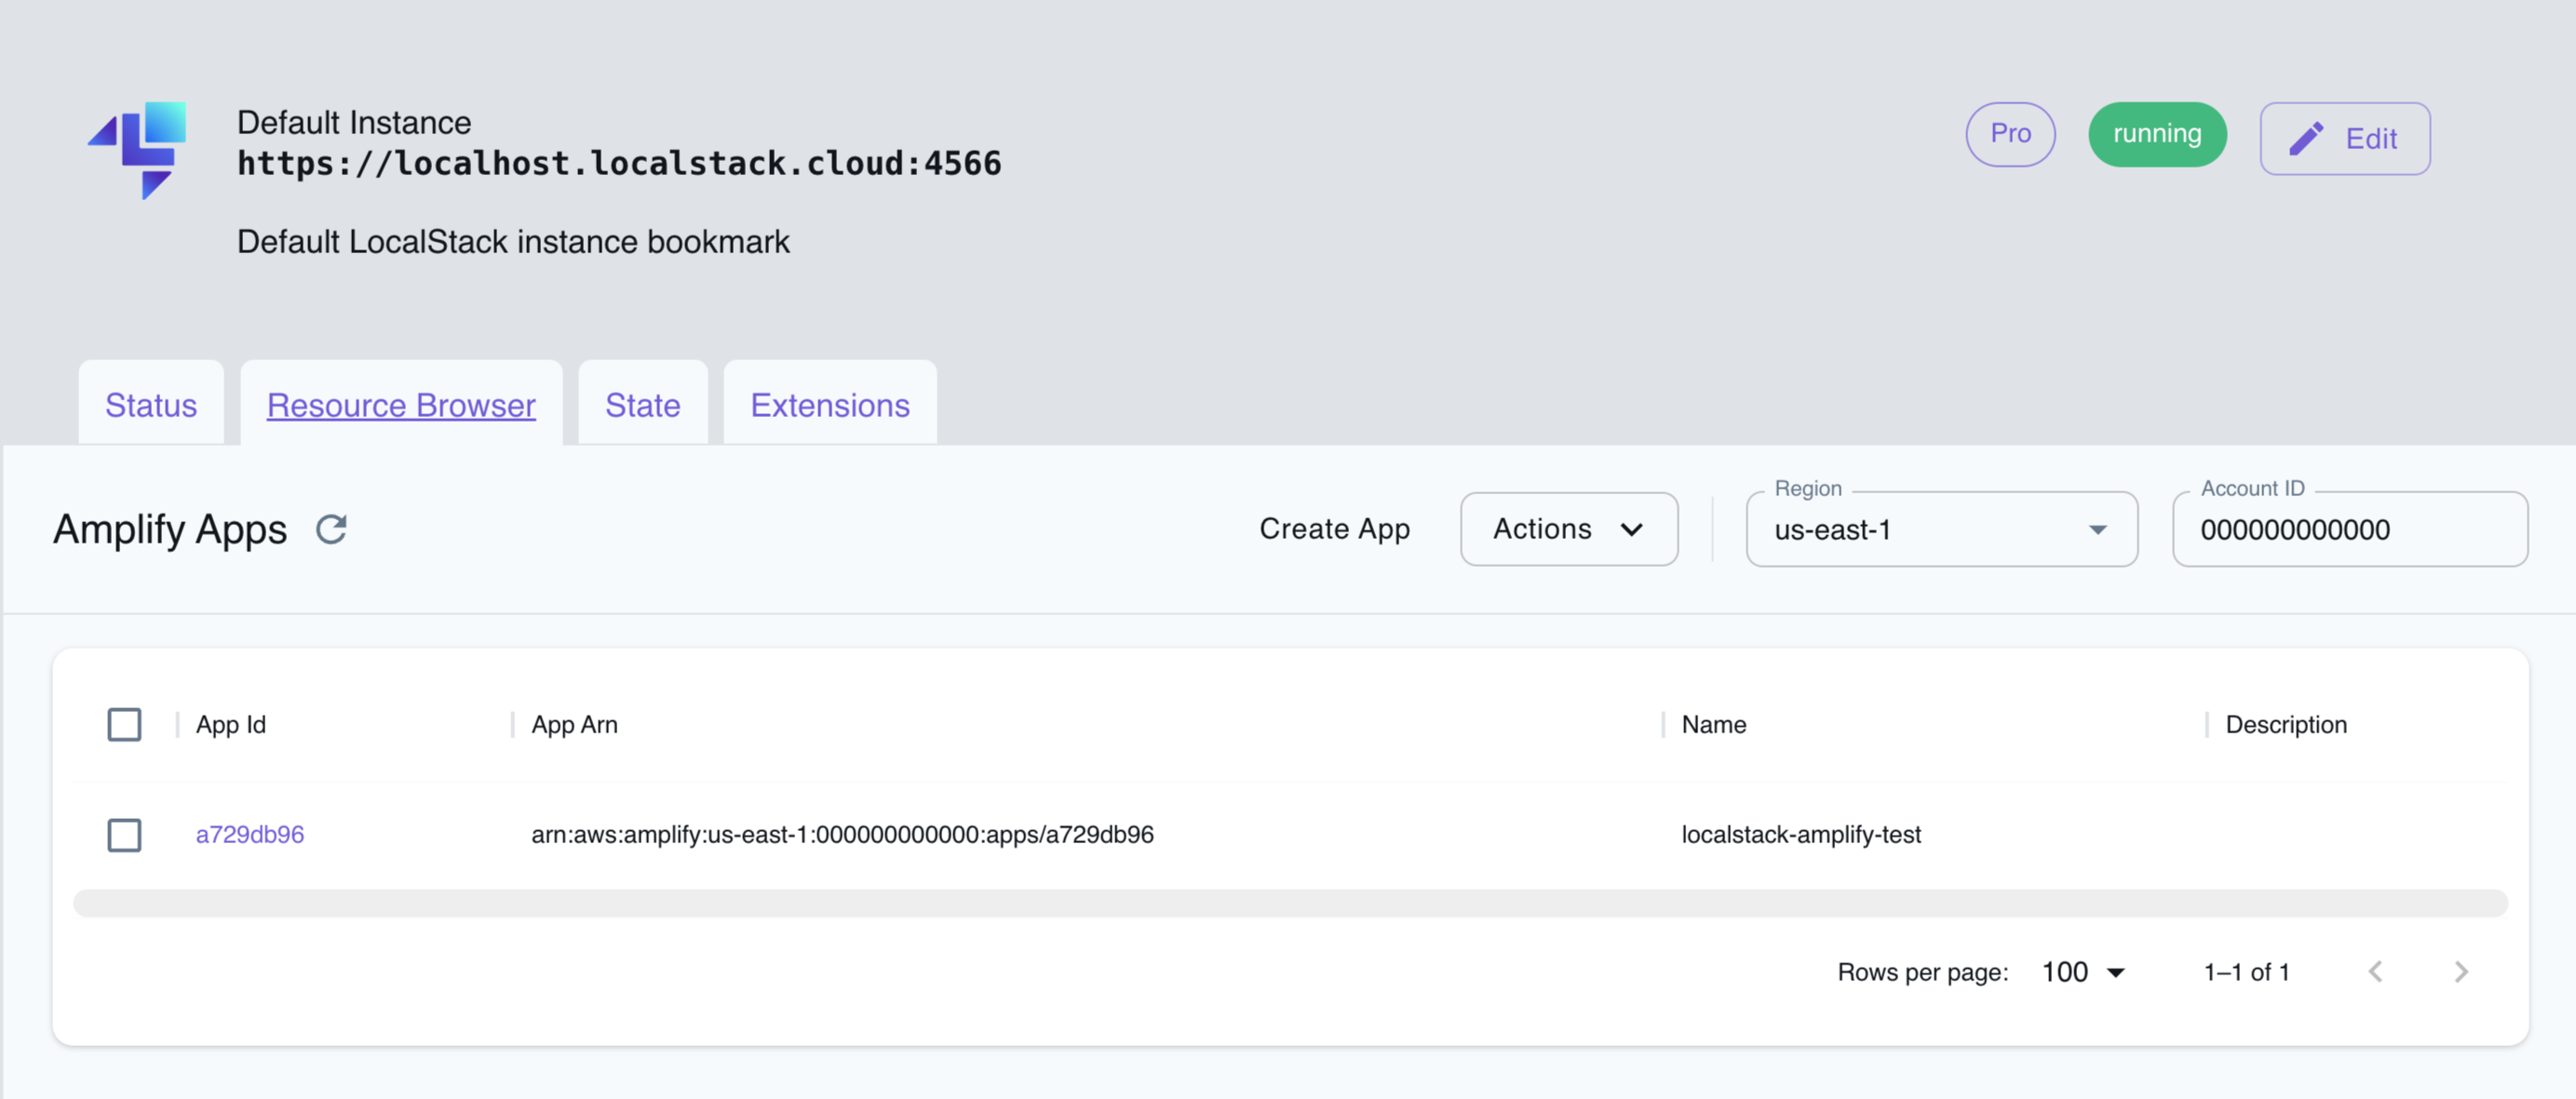
The Resource Browser allows you to perform the following actions:
- Create new Amplify applications: Create new Amplify applications by clicking Create App and filling in the required details.
- View Amplify applications: View the list of Amplify applications created in LocalStack by clicking on the application ID.
- Edit Amplify applications: Edit the configuration of an existing Amplify application by clicking on the application ID and then clicking Edit App.
- Delete Amplify applications: Delete an existing Amplify application by selecting the application, followed by clicking Actions and then Remove Selected.
Localstack with Terraform
using lstk
The lstk terraform CLI is used as a better tflocal, and is a drop-in replacement for the terraform CLI.
using tflocal: deprecated
- Install the
tflocalwrapper around theterraformCLI:
brew install terraform-local
- In a
main.tffile, override the AWS provider to point to localstack
provider "aws" {
 access_key = "test"
 secret_key = "test"
 region = "us-east-1"
 skip_credentials_validation = true
 skip_metadata_api_check = true
 skip_requesting_account_id = true
 endpoints {
   sqs = "http://localhost:4566"
 }
}
- Initialize and apply configuration:
tflocal init
tflocal plan
tflocal apply
EC2
For EC2 instances in localstack, make sure you have these two gotchas covered:
- AWS EC2 endpoint is set to localstack endpoint: make sure that the AWS EC2 endpoint is set to
localhost:4566. - You are using Localstack-compatible AMI: LocalStack comes shipped with two AMIs that are available for use. You can't use normal Amazon AMI IDs.
- Ubuntu 26.04:
ami-61ad6e59d7b0 - Amazon Linux 2023:
ami-024f768332f0
- Ubuntu 26.04:
Here is an example of all the provider and variable setup:
variable "aws_region" {
  description = "The AWS region to deploy resources in"
  type        = string
  default     = "us-east-1"
}

provider "aws" {
  access_key                  = "test"
  secret_key                  = "test"
  region                      = var.aws_region
  skip_credentials_validation = true
  skip_metadata_api_check     = true
  skip_requesting_account_id  = true
  endpoints {
    sqs                    = "http://localhost:4566"
    ec2                    = "http://localhost:4566"
    vpclattice             = "http://localhost:4566"
    account                = "http://localhost:4566"
    elasticloadbalancing   = "http://localhost:4566"
    elasticloadbalancingv2 = "http://localhost:4566"
    autoscaling            = "http://localhost:4566"
    applicationautoscaling = "http://localhost:4566"
    cloudwatch             = "http://localhost:4566"
  }
}

variable "aws_localstack_ami_ubuntu" {
  description = "The AMI ID for the localstack Ubuntu image"
  type        = string
  default     = "ami-61ad6e59d7b0" // localstack ubuntu AMI
}

variable "aws_localstack_ami_amazon_linux" {
  description = "The AMI ID for the localstack Amazon Linux image"
  type        = string
  default     = "ami-024f768332f0" // localstack amazon linux AMI
}

variable "ec2_instance_config" {
  type = object({
    instance_type = string
    ami           = string
    tags          = map(string)
  })

  description = "Configuration for the EC2 instance"

  default = {
    instance_type = "t2.micro"
    ami           =  "ami-61ad6e59d7b0"
    tags = {
      Name = "HelloWorld"
    }
  }
}
Examples
Creating Lambdas and SNS with aws CLI
NOTE
The 000000000000 is the AWS account ID for localstack.
#!/bin/bash

export AWS_DEFAULT_REGION=us-east-1

# 1. create S3 buckets
awslocal s3 mb s3://localstack-thumbnails-app-images
awslocal s3 mb s3://localstack-thumbnails-app-resized

# 2. create an SNS topic
awslocal sns create-topic --name failed-resize-topic
awslocal sns subscribe \
    --topic-arn arn:aws:sns:us-east-1:000000000000:failed-resize-topic \
    --protocol email \
    --notification-endpoint my-email@example.com

# 3. create a python lambda function
	# --role: for lambdas, set this to arn:aws:iam::000000000000:role/lambda-role
	#c
awslocal lambda create-function \
    --function-name presign \
    --runtime python3.11 \
    --timeout 10 \
    --zip-file fileb://lambdas/presign/lambda.zip \
    --handler handler.handler \
    --role arn:aws:iam::000000000000:role/lambda-role \
    --environment Variables="{STAGE=local}"

awslocal lambda wait function-active-v2 --function-name presign

awslocal lambda create-function-url-config \
    --function-name presign \
    --auth-type NONE
Lambda with dynamoDB CLI
- Write the code in Python using
boto3to handle DynamoDB and lambda code:
import json, boto3, os, uuid

def handler(event, context):
	# 1. get table
    table = boto3.resource('dynamodb').Table(os.environ['TABLE_NAME'])
    # 2. get HTTP method
    method = event
			    .get('requestContext', {}) \
			    .get('http', {}) \
			    .get('method', 'GET')
    # 3. if Function URL POST, or direct invoke (e.g. Resource Browser) with a message
    if method == 'POST' or 'message' in event:
        data = json.loads(event.get('body', '{}')) if method == 'POST' else event
        # add an item to the table
        item = {'id': str(uuid.uuid4()), **data}
        table.put_item(Item=item)
        return {'statusCode': 200, 'body': json.dumps(item)}

    # 4. on GET, return all items in table
    result = table.scan()
    return {'statusCode': 200, 'body': json.dumps(result['Items'])}
- Create the dynamoDB table:
lstk aws dynamodb create-table \
  --table-name Messages \
  --attribute-definitions AttributeName=id,AttributeType=S \
  --key-schema AttributeName=id,KeyType=HASH \
  --billing-mode PAY_PER_REQUEST
- Deploy the lambda function:
lstk aws lambda create-function \
  --function-name messages-api \
  --runtime python3.12 \
  --handler handler.handler \
  --zip-file fileb:///tmp/localstack-demo/handler.zip \
  --role arn:aws:iam::000000000000:role/lambda-role \
  --environment Variables={TABLE_NAME=Messages}

lstk aws lambda wait function-active --function-name messages-api
- Configure a function URL and retrieve the endpoint:
lstk aws lambda create-function-url-config \
  --function-name messages-api \
  --auth-type NONE

LAMBDA_URL=$(lstk aws lambda list-function-url-configs \
  --function-name messages-api \
  --query 'FunctionUrlConfigs[0].FunctionUrl' \
  --output text)

echo $LAMBDA_URL
- Test the lambda
# 1. make a POST request to the lambda
curl -X POST "$LAMBDA_URL" \
  -H "Content-Type: application/json" \
  -d '{"message": "Hello, LocalStack!"}'

# 2. make a get request to the lambda
curl "$LAMBDA_URL"
Advanced LocalStack
Localstack Cloud pods and snapshots
LocalStack Cloud pods allow you to save your LocalStack state and storage and share it on the cloud so other teammates can use the exact same configuration and storage and provisioned resources.
A snapshot captures the running emulator’s state, either as a local file on disk, as a Cloud Pod on the LocalStack platform, or in your own S3 bucket.
Snapshots come in two types:
- snapshot: locally stored on your device
- cloud pod: stored on the localstack managed cloud or in your own S3 bucket, able to be remotely accessed with use cases in CI/CD or collaboration.
Use the lstk snapshot CLI to manage cloud pods and emulator snapshots.
The lstk snapshot command groups five subcommands — save, load, list, remove, and show.
lstk save: Save a snapshot of the currently running emulator’s state. The emulator must already be running; this command does not auto-start it.lstk load: Load a snapshot into the emulator, auto-starting it first if it is not already running.lstk snapshot list: List the Cloud Pod snapshots available on the LocalStack platform.- By default, only snapshots you created are listed; pass
--allto include every snapshot in your organization. - This subcommand operates on Cloud Pods, so it requires authentication.
- By default, only snapshots you created are listed; pass
lstk snapshot remove: Delete a Cloud Pod snapshot from the LocalStack platform. Only cloud snapshots (thepod:prefix) can be removed; local snapshots are plain files you delete yourself.- This operation cannot be undone.
lstk snapshot show: Show metadata for a single Cloud Pod snapshot on the LocalStack platform: its name, created date, size, LocalStack version, message, the services it contains, and per-service resource counts (resource counts render only when the platform has them for that snapshot).- This subcommand is cloud-only and requires authentication.
NOTE
The first two are also exposed as the top-level aliases lstk save and lstk load.
Cloud Pods
Cloud pods are able to stored and managed via localstack cloud or uploaded to your own S3 bucket via an S3 url.
For localstack to understand what is a cloud pod vs snapshot, you need to follow a special naming scheme, also accounting for cloud pod storage medium:
- localstack cloud-stored cloud pod: Localstack recognizes cloud pods stored in the localstack cloud via the
pod:prefix when naming pods.
# Save to a Cloud Pod on the LocalStack platform (requires auth)

lstk snapshot save pod:my-pod-name
- S3-stored cloud pod: A cloud pod stored in S3 is referenced by a combination of the pod name and the S3 file URL to where it is stored:
# Save to your own S3 bucket (pod name is auto-generated if omitted)

lstk snapshot save my-pod s3://my-bucket/prefix
NOTE
Pod operations require an auth token (LOCALSTACK_AUTH_TOKEN or a prior lstk login); local-file snapshots do not.
Snapshots
Snapshots are completely local and don't require authentication or any special naming scheme.
CLI
lstk snapshot save
Save a snapshot of the running emulator’s state with the lstk snapshot save command, also aliased as lstk save.
The basic syntax is as so:
lstk save [destination] [options]
# Auto-named snapshot file in the current directory
lstk snapshot save

# Save to a specific local path
lstk snapshot save ./my-snapshot

# Save to a Cloud Pod on the LocalStack platform (requires auth)
lstk snapshot save pod:my-baseline

# Save to your own S3 bucket (pod name is auto-generated if omitted)
lstk snapshot save my-pod s3://my-bucket/prefix

# Limit the snapshot to a subset of services
lstk snapshot save --services s3,lambda
The optional [destination] argument takes one of these forms:
| Destination | Description |
|---|---|
| (omitted) | Auto-generates a timestamped snapshot file in the current directory (./snapshot-<timestamp>-<hex>.snapshot). |
| local path | Writes a snapshot archive to that path. The .snapshot extension is forced. |
pod:<name> | Saves a Cloud Pod to the LocalStack platform. Requires authentication. |
<pod-name> s3://bucket/prefix | Saves to your own S3 bucket. The pod name is a separate positional (auto-generated when omitted). See S3 remotes. |
By default a snapshot captures every service’s state. Pass -s/--services with a comma-separated list to limit it to a subset; this applies uniformly to local files, pod: Cloud Pods, and s3:// remotes. |
| Option | Description |
|---|---|
--services <list>, -s <list> | Comma-separated list of services to include in the snapshot (all services by default). Applies to local, pod:, and s3:// destinations. |
--profile <name> | AWS profile to read S3 credentials from (used only for s3:// destinations). Defaults to AWS_* env vars, then AWS_PROFILE. |
lstk snapshot load
Load a snapshot into the emulator, auto-starting it first if it is not already running.
# Load a local snapshot by path or name

lstk snapshot load my-baseline

lstk snapshot load ./checkpoint

# Load from a Cloud Pod (requires auth)

lstk snapshot load pod:my-baseline

# Load from your own S3 bucket (pod name is required)

lstk snapshot load my-pod s3://my-bucket/prefix

# Control how the snapshot merges with running state

lstk snapshot load pod:my-baseline --merge=overwrite

# Preview what a Cloud Pod load would change, without applying it

lstk snapshot load pod:my-baseline --dry-run
| Option | Description |
|---|---|
--merge <strategy> | How the loaded state combines with running state. One of account-region-merge (default), overwrite, service-merge. |
--dry-run | Preview the resource additions and modifications the load would produce, per service, without changing any state. Supported for pod: refs only; requires a running emulator (it does not auto-start one). |
--profile <name> | AWS profile to read S3 credentials from (used only for s3:// sources). Defaults to AWS_* env vars, then AWS_PROFILE. |
Want finer control when loading? Use the --merge flag:
--merge service-mergecombines new resources without overwriting--merge overwritewipes the running state before loading--merge account-region-merge(the default) lets the snapshot win on overlapping resources
In depth:
account-region-merge(default): the snapshot wins on any(service, account, region)overlap.overwrite: running state is reset first, then the snapshot is imported onto a clean state.service-merge: the snapshot wins per resource; non-overlapping resources are combined.
lstk snapshot list
List the Cloud Pod snapshots available on the LocalStack platform.
By default, only snapshots you created are listed; pass --all to include every snapshot in your organization, which includes cloud pods.
# Snapshots you created locally
lstk snapshot list

# Every snapshot in your organization (includes cloud pods)
lstk snapshot list --all

# List snapshots in your own S3 bucket (requires a running emulator)
lstk snapshot list s3://my-bucket/prefix
| Option | Description |
|---|---|
--all | List all snapshots in your organization, not just your own. |
--profile <name> | AWS profile to read S3 credentials from (used only with an s3:// location). Defaults to AWS_* env vars, then AWS_PROFILE. |
lstk snapshot remove
Delete a Cloud Pod snapshot from the LocalStack platform.
lstk snapshot remove pod:my-baseline

# Skip the confirmation prompt (required in non-interactive mode)
lstk snapshot remove pod:my-baseline --force
- This subcommand is cloud-only and requires authentication.
- The snapshot reference to pass must be a
pod:<name>Cloud Pod reference.
lstk snapshot show
Show metadata for a single Cloud Pod snapshot on the LocalStack platform: its name, created date, size, LocalStack version, message, the services it contains, and per-service resource counts (resource counts render only when the platform has them for that snapshot).
lstk snapshot show pod:my-baseline
- This subcommand is cloud-only and requires authentication.
- The snapshot reference to pass must be a
pod:<name>Cloud Pod reference.
Auto-loading snapshot on start
For the AWS emulator, you can have lstk load a snapshot automatically every time it starts the emulator via overriding the lstk config.
- Set the
snapshotfield on the container block to any load REF (apod:<name>Cloud Pod or a local path):
[[containers]]
type     = "aws"
port     = "4566"
snapshot = "pod:my-baseline"
- The snapshot is loaded only when the emulator is freshly started this run; if it is already running, the auto-load is skipped. Override it for a single run with
--snapshot REF, or skip it entirely with--no-snapshot:
# Start and load a different snapshot for this run only
lstk start --snapshot pod:other-baseline

# Start without loading the configured snapshot
lstk start --no-snapshot
Cloud pods in CI/CD
The great thing about cloud pods is that they save you time from having to wait for provisioning resources, which may take several minutes and thus cost you expensive runner time when running your CI/CD pipeline to provision those resources and then test them.
Cloud pods avoid most of the time spent syncing by skipping the provisioning of resources, allowing you to just test a preloaded provisioned environment and go off of that to save time in your GitHub Actions.
Here are the steps to take to enable cloud pods in your CI/CD environment:
- Save your current state as a cloud pod
lstk snapshot save pod:my-pod-name
- Create a github action that installs
lstk, authenticates with it, and then runs thelstk snapshotCLI to load a snapshot:
- name: Load Cloud Pod before testing
  run: |
    export LOCALSTACK_AUTH_TOKEN=${{ secrets.LOCALSTACK_AUTH_TOKEN }}
    lstk snapshot load pod:my-pod-name
Chaos Engineering
Localemu
Installation
Virtual environment method
- Create a virtual environment using the Python version as Python 3.12
uv --python 3.12 venv .venv
- Activate the virtual environment
source .venv/bin/activate
- Install localemu v1.2.0 into the virtual environment
uv pip install "localemu==1.2.0"
Now follow the verification steps:
- List and find
localemuin the isntalled packages within the virtual environment:
pip list
pip show localemu
- Deactivate the virtual environment once done with using localemu.
deactivate
uv method
pipx method
- Install
pipxto manage global packages for you
brew install pipx
- Use
pipxto installlocalemu
pipx install localemu
Setup
- Set these environment variables in your current shell session
export AWS_ENDPOINT_URL="http://localhost:4566"
export AWS_ACCESS_KEY_ID="AKIAIOSFODNN7EXAMPLE"
export AWS_SECRET_ACCESS_KEY="wJalrXUtnFEMI/K7MDENG/bPxRfiCYEXAMPLEKEY"
export AWS_DEFAULT_REGION="us-east-1"
- Start localemu
localemu start
CLI
Commands:
  export    Export running LocalEmu state to deployable Terraform /...
  import    Replay a snapshot into a LocalEmu or AWS endpoint.
  services  List supported services, or show operations for a specific...
  ssh       SSH into a Docker-backed EC2 instance.
  start     Start LocalEmu.
  status    Check LocalEmu status and running services.
  stop      Stop LocalEmu.
  vpc-ip    Show the addressing-redesign view of a container or instance.
localemu start: start the emulatorlocalemu stop: stop the emulatorlocalemu status: check emulator statuslocalemu services: List supported services
# List all supported services
localemu services

# Show operations for a specific service
localemu services s3
localemu services lambda
localemu services dynamodb

# Check running services
localemu status

# Stop
localemu stop
By default, LocalEmu state is ephemeral. To keep your resources across restarts:
# Local
PERSISTENCE=1 localemu start
AWSEMU
awsemu is a thin wrapper around the standard AWS CLI. When you run any awsemu command, it automatically sets:
- *
--endpoint-url=http://localhost:4566 - *
AWS_ACCESS_KEY_ID=AKIAIOSFODNN7EXAMPLE - *
AWS_SECRET_ACCESS_KEY=wJalrXUtnFEMI/K7MDENG/bPxRfiCYEXAMPLEKEY - *
AWS_DEFAULT_REGION=us-east-1
NOTE
Every AWS CLI command works with awsemu. Just replace aws with awsemu.
# Without awsemu (verbose, error-prone)
$ aws --endpoint-url=http://localhost:4566 \
    --region us-east-1 \
    s3 ls

# With awsemu (same result, zero config)
$ awsemu s3 ls
$ awsemu s3 mb s3://my-bucket
make_bucket: my-bucket

$ awsemu dynamodb create-table --table-name Users \
    --key-schema AttributeName=id,KeyType=HASH \
    --attribute-definitions AttributeName=id,AttributeType=S \
    --billing-mode PAY_PER_REQUEST
TableStatus: ACTIVE

$ awsemu sqs create-queue --queue-name my-queue
QueueUrl: http://sqs.us-east-1.localhost:4566/000000000000/my-queue
LocalEmu dashboard
LocalEmu includes a built-in web dashboard for monitoring and exploring your local AWS environment in real time.
http://localhost:4566/_localemu/dashboard
The dashboard shows:
- Service overview with resource counts and status indicators for all active services
- Resource drill-down: click any service to see tables, buckets, queues, functions, instances, and more
- S3 object browser and DynamoDB item viewer with click-through navigation
- CloudTrail event history with expandable request/response details
- Live activity feed showing API calls as they happen, filterable by service
The dashboard starts automatically with LocalEmu. No configuration needed.
LocalEmu with Amplify
LocalEmu with Terraform
Setup
- Start the emulator with
localemu start - Point the AWS provider endpoints to
http://localhost:4566
provider "aws" {
  access_key                  = "AKIAIOSFODNN7EXAMPLE"
  secret_key                  = "wJalrXUtnFEMI/K7MDENG/bPxRfiCYEXAMPLEKEY"
  region                      = "us-east-1"
  skip_credentials_validation = true
  skip_metadata_api_check     = true

  endpoints {
    s3       = "http://localhost:4566"
    dynamodb = "http://localhost:4566"
    lambda   = "http://localhost:4566"
    sqs      = "http://localhost:4566"
    # all services on the same endpoint
  }
}
Floci
Floci is faster than Localstack and is just 90mb for the docker iamge size, and is better than localstack and is free.
Floci is a proper emulator - it actually runs the containers the same way they would run in AWS, so it's a proper tester and mocker.
Installation and setup
- Start the docker container
docker run -d --name floci -p 4566:4566 floci/floci:latest
- Override the AWS-specific environment variables to point to floci
export AWS_ACCESS_KEY_ID="test"
export AWS_SECRET_ACCESS_KEY="test"
export AWS_DEFAULT_REGION="us-east-1"
export AWS_ENDPOINT_URL="http://localhost:4566"
- create a dedicated "floci" profile in your
~/.aws/configand~/.aws/credentialsfiles.
[profile floci]
region=us-east-1
output=json
endpoint_url = http://localhost:4566
[floci]
aws_access_key_id=test
aws_secret_access_key=test