AWS-amplify
Basics
How amplify works
Behind the scenes, amplify is just a glue service that uses CloudFormation and CDK to basically abstract over provisioning infra for you, where Amplify manages the infra and all you manage is the code.
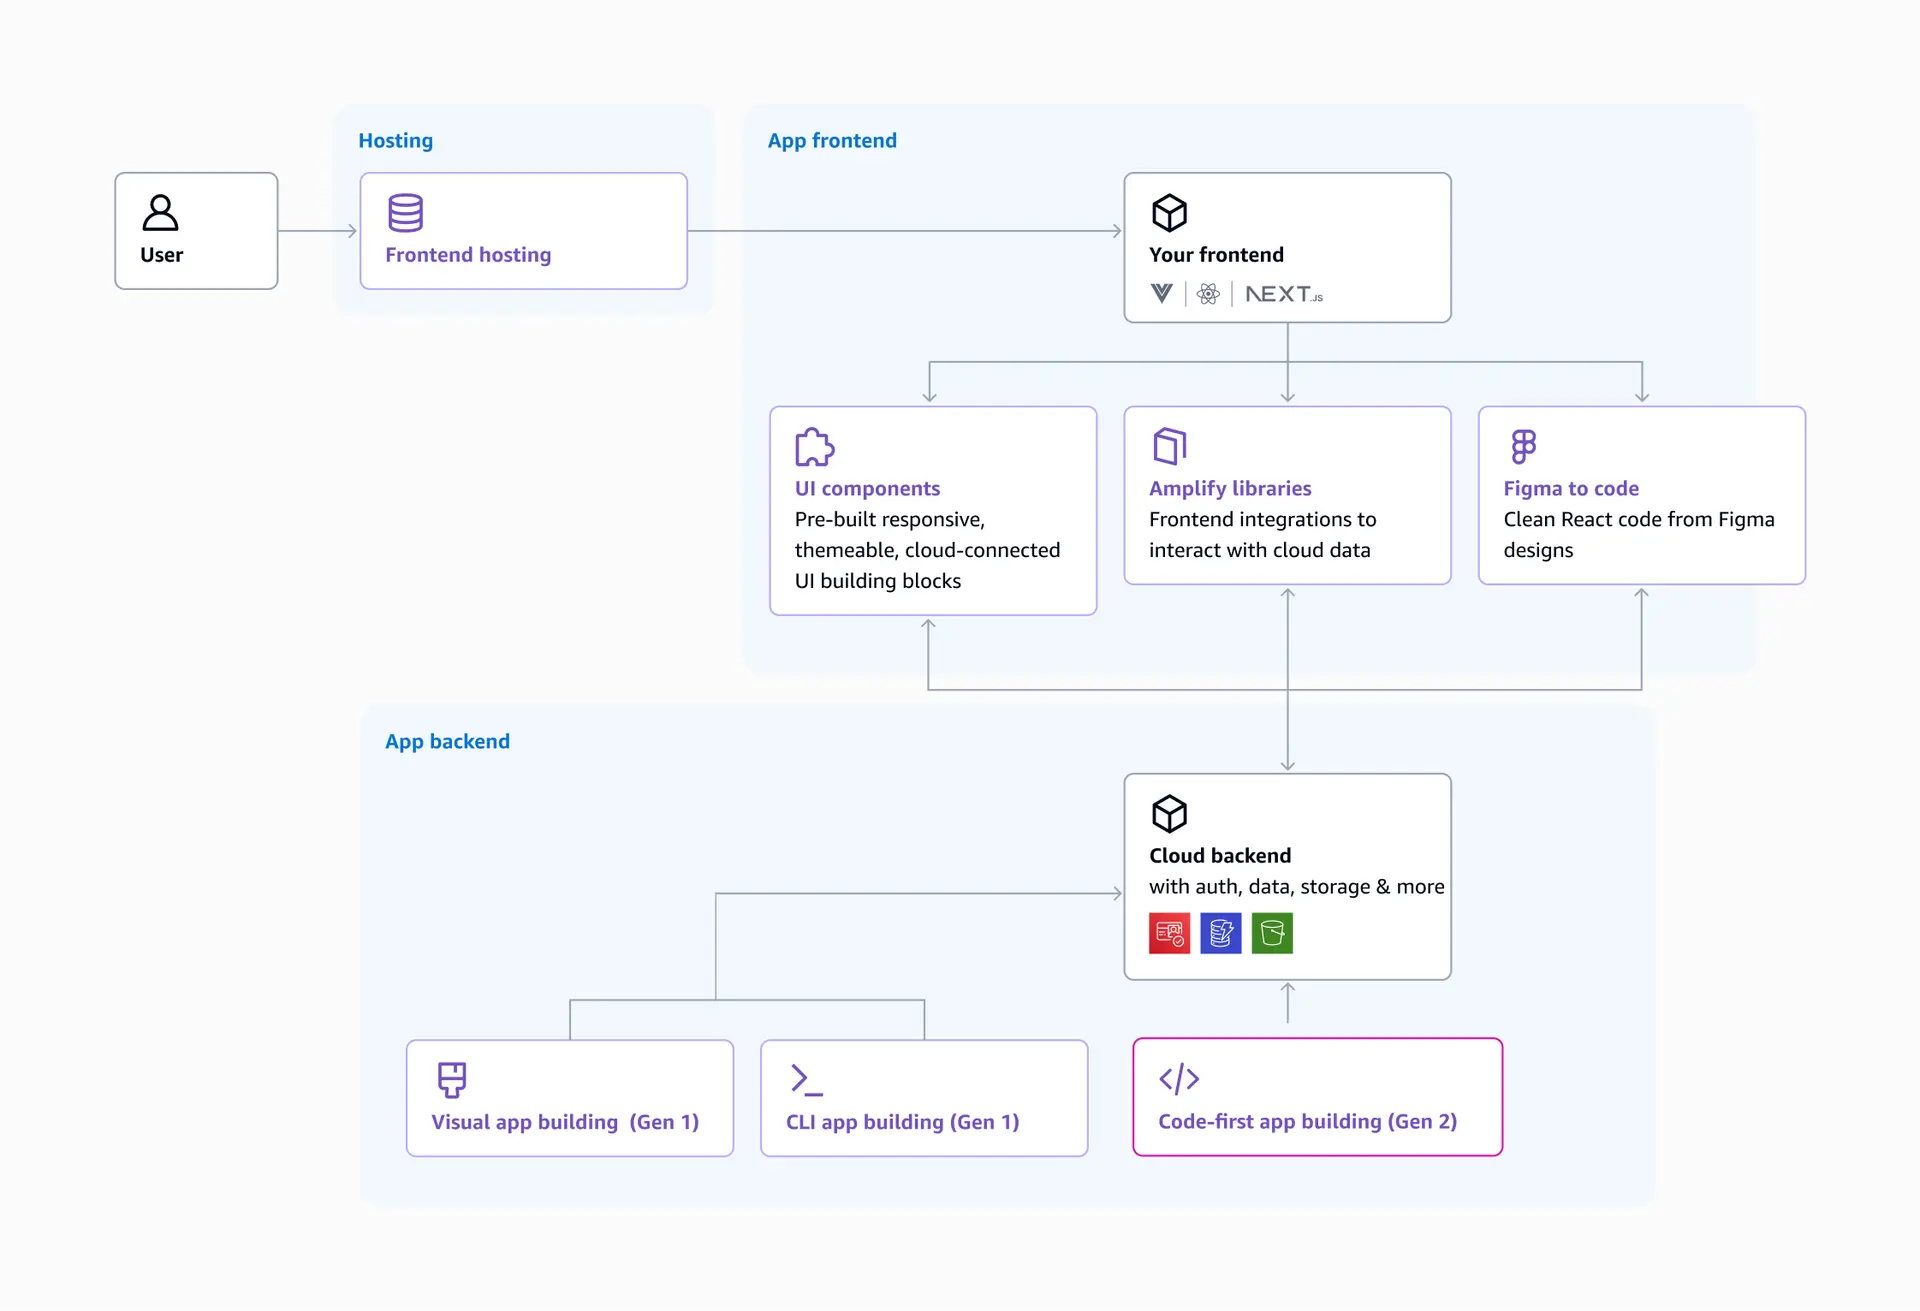 Here is a list of all the services you can enable with Amplify, where all you do is write the code to use the service and then Amplify will provision the required infra and manage it for you behind the scenes.

Gen 1 v Gen 2
- Gen 1: In Gen 1, you would use Studio's console or the CLI to provision infrastructure;
- Gen 2: in Gen 2, you author TypeScript code in files following a file-based convention (such as amplify/auth/resource.ts or amplify/auth/data.ts)
AWS Amplify Gen 2 is a code-first rework of Amplify. Instead of running an interactive CLI (amplify add auth, amplify push) that mutates a hidden configuration, you write your entire backend as TypeScript inside your app's repository.
That backend code — auth rules, data models, storage buckets, Lambda functions — lives next to your frontend code, gets type-checked, and can be reviewed in a normal pull request.
Why gen2 is better
With TypeScript types and classes for resources, you gain strict typing and IntelliSense in Visual Studio Code to prevent errors. A breaking change in the backend code immediately reflects as a type error in the co-located frontend code.
NOTE
The file-based convention follows the "convention over configuration" paradigm—you know exactly where to look for resource definitions when you group them by type in separate files.
AWS Amplify Gen 2 is a code-first rework of Amplify. Instead of running an interactive CLI (amplify add auth, amplify push) that mutates a hidden configuration, you write your entire backend as TypeScript inside your app's repository
NOTE
You do not need to install a global Amplify CLI for Gen 2. Gen 2 tooling is invoked through npx ampx from inside your project.
Key ideas that make Gen 2 different:
- Backend-as-code: You define resources (
defineAuth,defineData,defineStorage,defineFunction) in.tsfiles under anamplify/folder. There's no proprietary DSL — it's just TypeScript, so you get autocomplete and compile-time errors. - End-to-end type safety: The shape of your data schema flows automatically into your frontend code. If you rename a field in your schema, your React component that uses it will fail to compile.
- Per-developer cloud sandboxes: Every developer can spin up their own isolated, real AWS backend (
npx ampx sandbox) for local development — no more shared dev environments stepping on each other. - Git-based deployment: Your Git branch is the source of truth. Connecting a repository to the Amplify Console means every push can trigger a full-stack deployment (frontend build + backend infrastructure).
- Built on CDK: Under the hood, Gen 2 constructs generate AWS CDK, so you can drop down to raw CDK constructs whenever the built-in categories (Auth, Data, Storage, Functions) aren't enough.
New feature: CDK support
Gen 2 currently ships first-class support for four backend categories: Auth, Data, Storage, and Functions. Anything beyond that (custom AWS services, third-party integrations) can be added using AWS CDK constructs directly inside backend.ts.
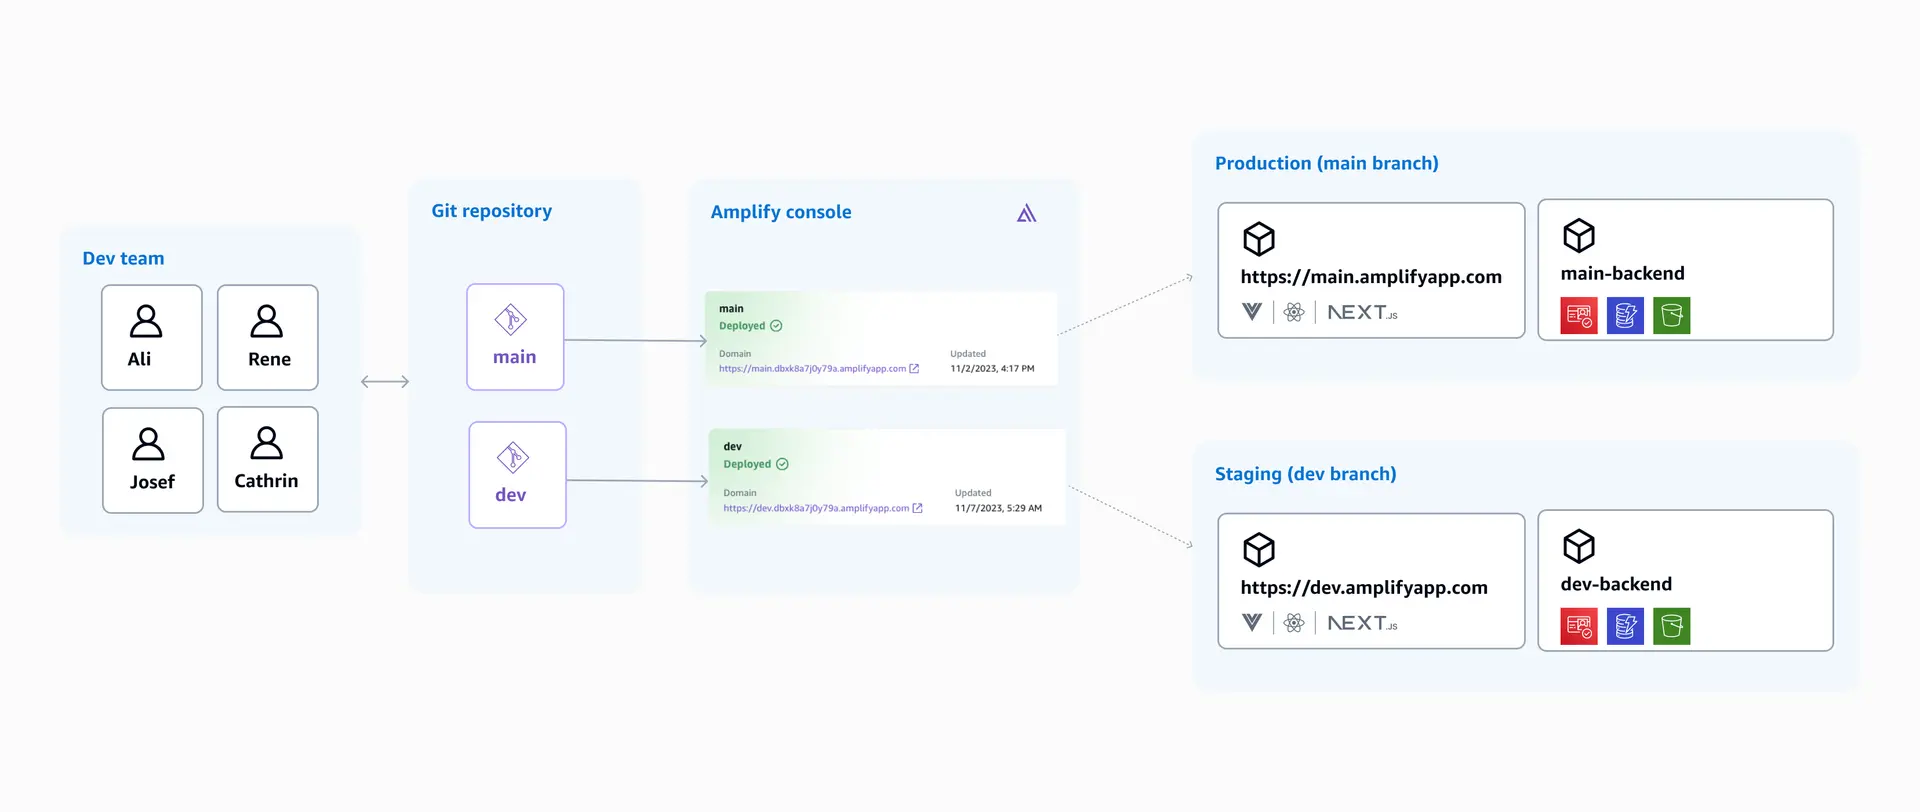
New feature: Staging environments
If deploying your dev git branch, a staging dev environment is created and becomes linked to the dev git branch, allowing you to provision cloud resources in a staging/test environment and then when you finally push up to main, the cloud resources are provisioned in production.
Quick demo (amplify V1): host static React site
- Create a React app with Vite
- Run the
amplify initcommand, which walks you through your project root and which AWS profile to use. - Setup hosting for the app by running
amplify add hosting - Publish the app by running
amplify publish
Installation
To get started with AWS Amplify we recommend that you use our quickstart starter template. However, for some use cases, it may be preferable to start from scratch, either with a brand new directory or an existing frontend app. In that case we recommend to use npm with create-amplify.
Manual installation
- Run
npm create amplify@latestto go through the app creation wizard - Create a vite app with
npm create vite@latest - Install necessary backend dependencies
npm add --save-dev @aws-amplify/backend@latest @aws-amplify/backend-cli@latest typescript
- Next, create the entry point for your backend,
amplify/backend.ts, with the following code:
import { defineBackend } from '@aws-amplify/backend';

defineBackend({});
- Now you can run
npx ampx sandboxto create your first backend!
Bootstrapping the environment
- Run the
npx ampx sandboxcommand to bootstrap amplify with your locally stored AWS credentials, for a specific profile:
npx ampx sandbox # boostrap with default profile

npx ampx sandbox --profile admin-developer # bootstrap with specific profile
React setup
Check out [[#Amplify with React]] to understand how to set up the frontend to call AWS services provisioned by amplify.
Examining folder structure
This is what a bare-bones folder structure should look like:
├── amplify/                     # All backend code lives here
│   ├── auth/
│   │   └── resource.ts          # defineAuth(...)
│   ├── data/
│   │   └── resource.ts          # defineData(...) + your schema
│   ├── storage/
│   │   └── resource.ts          # defineStorage(...)  (added as needed)
│   ├── functions/
│   │   └── my-function/
│   │       ├── resource.ts      # defineFunction(...)
│   │       └── handler.ts       # Lambda handler code
│   ├── backend.ts               # Wires everything together
│   ├── tsconfig.json
│   └── package.json             # (optional, for ESM scoping)
├── src/                          # Your React application
│   ├── App.tsx
│   ├── main.tsx
│   └── index.css
├── amplify_outputs.json         # Generated — backend connection info (gitignore in teams, or commit for solo projects)
├── package.json
└── tsconfig.json
The convention is simple: one folder per backend category, one resource.ts file that exports a defined resource, and a top-level backend.ts that imports and composes them.
amplify_outputs.json
This file is generated (not hand-written). It contains your deployed backend's endpoint URLs, region, API keys or Cognito pool IDs, and other connection metadata that your frontend reads it once to configure the Amplify client:
// src/main.tsx
import { Amplify } from 'aws-amplify';
import outputs from '../amplify_outputs.json';

Amplify.configure(outputs);
NOTE
This file is incredibly important because without it, the frontend has no idea how to query the provisioned cloud resources.
It's regenerated automatically every time you deploy (sandbox or cloud), so treat it like a build artifact — don't hand-edit it.
Local development
There are two ways to begin local development:
- push first, then sandbox: Create a Github Repo and push it to amplify, which is connected to your AWS account and thus generates the credentials-based
amplify_outputs.jsonfor you. - sandbox first, then push: Run
npx ampx sandboxwith your AWS credentials to generate the credentials-basedamplify_outputs.json
push first, then sandbox
- In amplify studio, once you have deployed your app, click on a branch then go to deployments ➡️ deployed backend resources ➡️ download
amplify_outputs.json
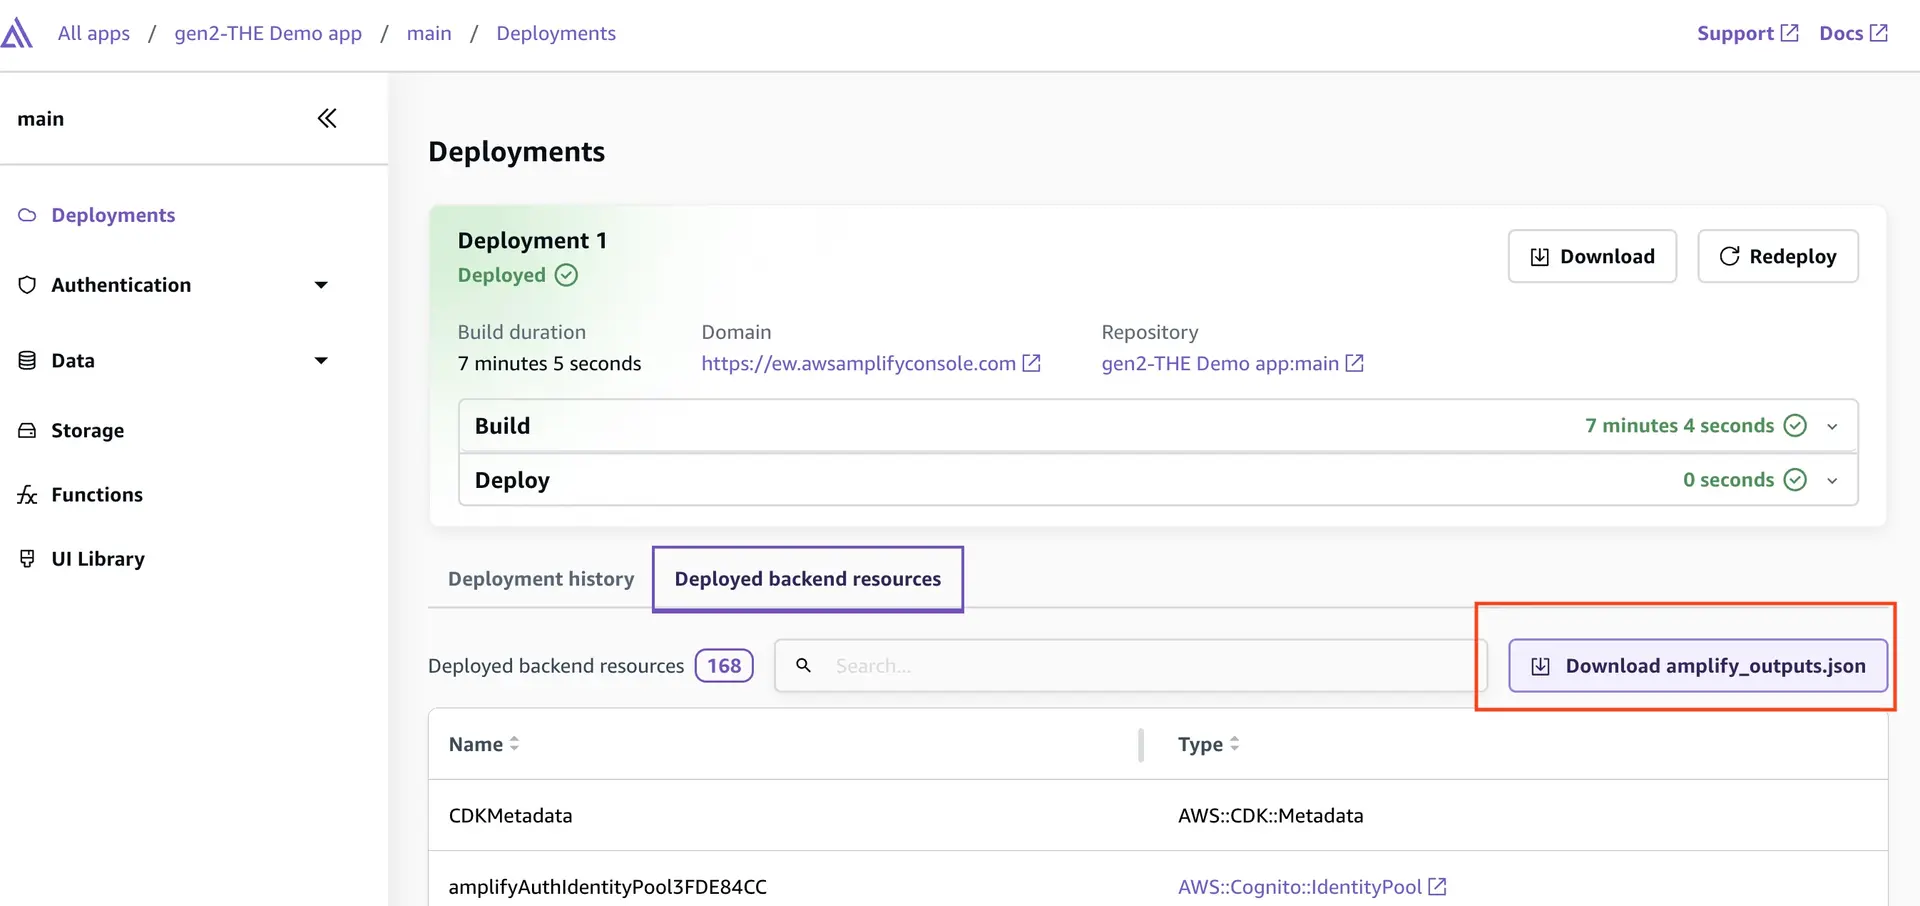
- Then store the
amplify_outputs.jsonin the root of the project.
NOTE
The amplify_outputs.json file contains backend endpoint information, publicly-viewable API keys, authentication flow information, and more.
- The Amplify client library uses this outputs file to connect to your Amplify Backend.
- You can review how the outputs file is imported within the
main.tsxfile and then passed into theAmplify.configure(...)function of the Amplify client library.
- Once you are done making changes, run the
npx ampx sandboxcommand, which provisions your cloud resources in a staging development environment and deploys a cloud sandbox.
NOTE
Once the cloud sandbox has been fully deployed (~5 min), you'll see the amplify_outputs.json file updated with connection information to a new isolated authentication and data backend.
sandbox first, then push
The npx ampx sandbox command should run concurrently to your npm run dev.
NOTE
You can think of the cloud sandbox as the "localhost-equivalent for your app backend".
npx ampx sandbox
This command:
- Watches your
amplify/folder for changes. - Deploys a real, isolated AWS backend scoped to you (named using your OS username + app name, so teammates never collide).
- Regenerates
amplify_outputs.jsonautomatically whenever your backend code changes, so your running frontend picks up new resources on save.
Think of it as "hot reload for your backend." You edit amplify/data/resource.ts, save, and within seconds the sandbox redeploys the changed CloudFormation resources and your React app is instantly wired to the new schema.
npx ampx sandbox
To tear down a sandbox when you're done (it does incur minor AWS costs while running):
npx ampx sandbox delete
Useful flags:
# named sandbox, useful for feature branches
npx ampx sandbox --identifier my-feature

# deploy once and exit (good for CI)
npx ampx sandbox --once
Setting sandbox secrets
The secret() method pulls encrypted values you configure per-sandbox/branch with npx ampx sandbox secret CLI (locally) or via the Amplify Console (for deployed branches) — secrets are never committed to source.
Here's how to get started:
- Set secrets with the
npx ampx sandbox secretCLI:
npx ampx sandbox secret GOOGLE_CLIENT_ID
npx ampx sandbox secret GOOGLE_CLIENT_SECRET
- Use the
secret(secretName: str)method to read a secret you set
import { defineAuth, secret } from '@aws-amplify/backend';

export const auth = defineAuth({
  loginWith: {
    email: true,
    externalProviders: {
      google: {
        clientId: secret('GOOGLE_CLIENT_ID'),
        clientSecret: secret('GOOGLE_CLIENT_SECRET'),
        scopes: ['email', 'profile'],
      },
      callbackUrls: ['http://localhost:5173/', 'https://myapp.com/'],
      logoutUrls: ['http://localhost:5173/', 'https://myapp.com/'],
    },
  },
});
Amplify backend basics
Data
The @aws-amplify/backend library offers a TypeScript-first Data library for setting up fully typed real-time APIs (powered by AWS AppSync GraphQL APIs) and NoSQL databases (powered by Amazon DynamoDB tables).
The db model in Amplify has these three components
- model: represents a single object family in DynamoDB, with authorization rules to access each object.
- schema: A grouping of models to form the entire DynamoDB table
- data: defines global policies and authorization rules for the schema.
The data object is what Amplify looks at to provision infra and Cognito IAM policies for accessing DynamoDB data.
backend
After you generate an Amplify backend, you will have an amplify/data/resource.ts file, which will contain your app's data schema. The defineData function turns the schema into a fully functioning data backend with all the boilerplate handled automatically.
import { type ClientSchema, a, defineData } from "@aws-amplify/backend";

const schema = a.schema({
  Chat: a.model({
    name: a.string(),
    message: a.hasMany('Message', 'chatId'),
  }),
  Message: a.model({
    text: a.string(),
    chat: a.belongsTo('Chat', 'chatId'),
    chatId: a.id()
  }),
}).authorization((allow) => allow.owner());

export type Schema = ClientSchema<typeof schema>;

export const data = defineData({
  schema,
  authorizationModes: {
    defaultAuthorizationMode: "apiKey",
    // API Key is used for a.allow.public() rules
    apiKeyAuthorizationMode: {
      expiresInDays: 30,
    },
  },
});
frontend
On your app's frontend, you can use the generateClient function, which provides a typed client instance, making it easy to integrate CRUD (create, read, update, delete) operations for your models in your application code.
// generate your data client using the Schema from your backend
const client = generateClient<Schema>();

// list all messages
const { data } = await client.models.Message.list();

// create a new message
const { errors, data: newMessage } = await client.models.Message.create({
  text: 'My message text'
});
frontend virtuals
If your backend deploys a schema like this:
import { type ClientSchema, a, defineData } from "@aws-amplify/backend";

const schema = a.schema({
  Todo: a
    .model({
      content: a.string(),
      isDone: a.boolean(),
    })
    .authorization((allow) => [allow.publicApiKey()]),
});

export type Schema = ClientSchema<typeof schema>;
Then the frontend object also has id, createdAt, and updatedAt fields populated on it.
(parameter) todo: {
 content?: Nullable<string> | undefined;
 isDone?: Nullable<boolean> | undefined;
 readonly id: string;
 readonly createdAt: string;
 readonly updatedAt: string;
}
And you can type it accordingly like so:
export type Todo = Schema["Todo"]["type"];
complete flow
So in general, these are the steps to connect your data schema to the backend for provisioning and then using it in a frontend example:
- Create the data object
import { type ClientSchema, a, defineData } from "@aws-amplify/backend";

/*== STEP 1 ===============================================================
The section below creates a Todo database table with a "content" field. Try
adding a new "isDone" field as a boolean. The authorization rule below
specifies that any user authenticated via an API key can "create", "read",
"update", and "delete" any "Todo" records.
=========================================================================*/
const schema = a.schema({
  Todo: a
    .model({
      content: a.string(),
    })
    .authorization((allow) => [allow.publicApiKey()]),
});

export type Schema = ClientSchema<typeof schema>;

export const data = defineData({
  schema,
  authorizationModes: {
    defaultAuthorizationMode: "apiKey",
    // API Key is used for a.allow.public() rules
    apiKeyAuthorizationMode: {
      expiresInDays: 30,
    },
  },
});
- Import the schema into the backend
import { defineBackend } from '@aws-amplify/backend';
import { data } from './data/resource';

defineBackend({
  data,
});
- Run your sandbox to provision the new infra
npx ampx sandbox
- Generate the DB client in the frontend
import type { Schema } from "../../amplify/data/resource";
import { generateClient } from "aws-amplify/data";

export const client = generateClient<Schema>();
- Use it like so:
import { useEffect, useState } from "react";
import {client} from "db/client"

function App() {
  const [todos, setTodos] = useState<Array<Schema["Todo"]["type"]>>([]);

  useEffect(() => {
    client.models.Todo.observeQuery().subscribe({
      next: (data) => setTodos([...data.items]),
    });
  }, []);

  function createTodo() {
    client.models.Todo.create({ content: window.prompt("Todo content") });
  }

  return (
    <main>
      <h1>My todos</h1>
      <button onClick={createTodo}>+ new</button>
      <ul>
        {todos.map((todo) => (
          <li key={todo.id}>{todo.content}</li>
        ))}
      </ul>
      <div>
        🥳 App successfully hosted. Try creating a new todo.
      </div>
    </main>
  );
}

export default App;
Auth
Auth works similarly to data. You can configure the authentication settings you want for your app in amplify/auth/resource.ts, and then import that auth configuration into the amplify/backend.ts file to provision the Cognito infra.
You can customize your authentication flow with customized sign-in and registration flows, multi-factor authentication (MFA), and third-party social providers.
NOTE
Amplify deploys an Amazon Cognito instance in your AWS account when you add auth to your app.
Backend
This is simple email verification auth
frontend
Then, you could use the Amplify Authenticator component or the client libraries to add user flows.
Here is an example with the withAuthenticator HOC:
import { withAuthenticator } from '@aws-amplify/ui-react';

function App({ signOut, user }) {
  return (
    <>
      <h1>Hello {user.username}</h1>
      <button onClick={signOut}>Sign out</button>
    </>
  );
}

export default withAuthenticator(App);
Or you can just use the context provider:
- Setup the
<Authenticator />context provider
import React from 'react';
import ReactDOM from 'react-dom/client';
import { Amplify } from 'aws-amplify';
import App from './App.tsx';
import outputs from '../amplify_outputs.json';
import './index.css';

// 1. import authenticator and auth component styles
import { Authenticator } from '@aws-amplify/ui-react';
import '@aws-amplify/ui-react/styles.css';

// 2. configure amplify output
Amplify.configure(outputs);

ReactDOM.createRoot(document.getElementById('root')!).render(
  <React.StrictMode>
    <Authenticator>
      <App />
    </Authenticator>
  </React.StrictMode>
);
- Use the
useAuthenticator()hook within children components of the provider to access auth data.
import type { Schema } from '../amplify/data/resource';
import { useAuthenticator } from '@aws-amplify/ui-react';
import { useEffect, useState } from 'react';
import { generateClient } from 'aws-amplify/data';

const client = generateClient<Schema>();

function App() {
  const { user, signOut } = useAuthenticator();

  // ...

  return (
    <main>
      {/* ... */}
      <h1>{user?.signInDetails?.loginId}'s todos</h1>
      <button onClick={signOut}>Sign out</button>
    </main>
  );
}

export default App;
Storage
You can provision S3 buckets for use and authenticated CRUD operations with Cognito users using the storage resource:
- Define S3 bucket policies in a
amplify/storage/resource.ts
import { defineStorage } from "@aws-amplify/backend";

export const storage = defineStorage({
  name: "amplifyNotesDrive",
  access: (allow) => ({
    "media/{entity_id}/*": [
      allow.entity("identity").to(["read", "write", "delete"]),
    ],
  }),
});
- Import the
storageobject into the backend:
import { defineBackend } from '@aws-amplify/backend';
import { auth } from './auth/resource';
import { data } from './data/resource';
import { storage } from './storage/resource';
/**
 * @see https://docs.amplify.aws/react/build-a-backend/ to add storage, functions, and more
 */
defineBackend({
  auth,
  data,
  storage
});
- Query the S3 object from the frontend:
Functions
defineFunction provisions a Lambda function from TypeScript source, with automatic bundling:
- Create a function with a name, entrypoint, and other configuration options, using
defineFunction
// amplify/functions/say-hello/resource.ts
import { defineFunction } from '@aws-amplify/backend';

export const sayHello = defineFunction({
  name: 'say-hello',
  entry: './handler.ts',
});
// amplify/functions/say-hello/handler.ts
import type { Handler } from 'aws-lambda';

export const handler: Handler = async (event) => {
  return {
    statusCode: 200,
    body: JSON.stringify({ message: 'Hello from Lambda!' }),
  };
};
- Register it in the
amplify/backend.ts
// amplify/backend.ts
import { sayHello } from './functions/say-hello/resource';

defineBackend({ auth, data, storage, sayHello });
All together
You can use define* functions to define your resources and then import them all into the backend.ts
For example, you can define authentication:
import { defineAuth } from '@aws-amplify/backend';

export const auth = defineAuth({
  loginWith: {
    email: true
  }
});
Or define your data resource:
import { a, defineData, type ClientSchema } from '@aws-amplify/backend';

const schema = a.schema({
  Todo: a.model({
      content: a.string(),
      isDone: a.boolean()
    })
    .authorization(allow => [allow.publicApiKey()])
});

export type Schema = ClientSchema<typeof schema>;
export const data = defineData({
  schema
});
Each of these newly defined resources are then imported and set in the backend definition:
import { defineBackend } from '@aws-amplify/backend';
import { auth } from './auth/resource';
import { data } from './data/resource';

defineBackend({
  auth,
  data
});
Deployment
- Push your repo to GitHub (or GitLab/Bitbucket/CodeCommit).
- In the AWS Amplify Console, choose Deploy an app → connect your repository and branch.
- Amplify auto-detects the framework, builds your frontend, deploys your backend from
amplify/, and hosts the result on a global CDN — all from the same commit. - Every subsequent
git pushto that branch triggers a new full-stack deployment automatically, including PR previews if enabled (a temporary, isolated backend + frontend per pull request).
Testing
Because backend resources are plain TypeScript objects/functions, you can unit test Lambda handlers directly with your normal test runner (Vitest, Jest):
import { handler } from '../amplify/functions/say-hello/handler';

test('returns a greeting', async () => {
  const result = await handler({} as any, {} as any, {} as any);
  expect(JSON.parse(result.body).message).toBe('Hello from Lambda!');
});
For integration-level testing of your data/auth layer, run your test suite against a live sandbox (npx ampx sandbox --once in CI, then point tests at the generated amplify_outputs.json), which gives you a real (if disposable) AWS backend rather than a mock.
Connecting to existing AWS resources
Amplify client libraries can be used independently without the Amplify backend workflow. If you have AWS resources provisioned with CDK, Terraform, CloudFormation, or the AWS Console, you can connect Amplify libraries directly to those resources.
This gives you the full power of Amplify's client APIs — authentication flows, data queries, file management, and more — while keeping complete control over your infrastructure.
You can configure the libraries in two ways:
- Manual
amplify_outputs.json— Create the configuration file with your resource details - Programmatic configuration — Build the configuration in code (ideal for testing and environment switching)
Both approaches support all Amplify services: Auth, Data, Storage, Analytics, Geo, and Notifications.
Amplify with CDK
Gen 2 is layered on top of AWS Cloud Development Kit (CDK)—the Data and Auth capabilities in @aws-amplify/backend wrap L3 AWS CDK constructs. As a result, extending the resources generated by Amplify does not require any special configuration. The following example adds Amazon Location Services by adding a file: amplify/custom/maps/resource.ts.
import { CfnOutput, Stack, StackProps } from 'aws-cdk-lib';
import * as locations from 'aws-cdk-lib/aws-location';
import { Construct } from 'constructs';

export class LocationMapStack extends Stack {
  constructor(scope: Construct, id: string, props?: StackProps) {
    super(scope, id, props);

    // Create the map resource
    const map = new locations.CfnMap(this, 'LocationMap', {
      configuration: {
        style: 'VectorEsriStreets' // map style
      },
      description: 'My Location Map',
      mapName: 'MyMap'
    });

    new CfnOutput(this, 'mapArn', {
      value: map.attrArn,
      exportName: 'mapArn'
    });
  }
}
This is then included in the amplify/backend.ts file so it gets deployed as part of your Amplify app.
import { Backend } from '@aws-amplify/backend';
import { auth } from './auth/resource';
import { data } from './data/resource';
import { LocationMapStack } from './locationMapStack/resource';

const backend = new Backend({
  auth,
  data
});

new LocationMapStack(
  backend.getStack('LocationMapStack'),
  'myLocationResource',
  {}
);
Connecting to custom auth infra
Custom auth with user pools and identity pools requires these three values from your infra:
- user pool id
- user pool client id
- identity pool id
Then you can use those values to connect to auth infra instead of the local cloud resources from the amplify_outputs.json:
const userPoolId = import.meta.env.VITE_USER_POOL_ID;
const userPoolClientId = import.meta.env.VITE_USER_POOL_CLIENT_ID;
const identityPoolId = import.meta.env.VITE_IDENTITY_POOL_ID;
Authentication
Amplify's defineAuth wraps Amazon Cognito, and can either provision all auth infra for you or attach to existing auth infra you created and then controls that.
Managed Amplify auth
Email/password setup
A minimal email/password setup:
// amplify/auth/resource.ts
import { defineAuth } from '@aws-amplify/backend';

export const auth = defineAuth({
  loginWith: {
    email: true,
  },
});
With verification enabled:
export const auth = defineAuth({
  loginWith: {
    email: {
      verificationEmailSubject: 'Welcome 👋 Verify your email!'
    }
  }
});
Google setup
import { defineAuth, secret } from '@aws-amplify/backend';

export const auth = defineAuth({
  loginWith: {
    email: true,
    externalProviders: {
      google: {
        clientId: secret('GOOGLE_CLIENT_ID'),
        clientSecret: secret('GOOGLE_CLIENT_SECRET'),
        scopes: ['email', 'profile'],
      },
      callbackUrls: ['http://localhost:5173/', 'https://myapp.com/'],
      logoutUrls: ['http://localhost:5173/', 'https://myapp.com/'],
    },
  },
});
Auth triggers
Functions become genuinely powerful when wired into your data layer as a custom query/mutation handler, or as an auth trigger (pre sign-up, post confirmation, etc.):
- Create a lambda function via
defineFunction(), with the intent of running this lambda as being triggered by a certain event of the user authentication lifecycle. - When defining the auth, add a
triggersobject and add atriggers.postConfirmationkey for example and pass in the lambda you want to be triggered on thepostConfirmationlifecycle event in the user auth cycle.
// amplify/auth/resource.ts
import { defineAuth } from '@aws-amplify/backend';
import { postConfirmation } from '../functions/post-confirmation/resource';

export const auth = defineAuth({
  loginWith: { email: true },
  triggers: {
    postConfirmation,
  },
});
Data
Schema in depth
defineData() combines a GraphQL-style schema builder (a.schema(...)) with automatic API + database provisioning (AppSync + DynamoDB by default).
Data types
// amplify/data/resource.ts
import { type ClientSchema, a, defineData } from '@aws-amplify/backend';

const schema = a.schema({
  Todo: a
    .model({
      content: a.string(),
      isDone: a.boolean().default(false),
      priority: a.enum(['LOW', 'MEDIUM', 'HIGH']),
    })
    .authorization((allow) => [allow.owner()]),
});

export type Schema = ClientSchema<typeof schema>;

export const data = defineData({
  schema,
  authorizationModes: {
    defaultAuthorizationMode: 'userPool',
  },
});
Field types available on a.* include string, integer, float, boolean, date, datetime, email, phone, url, json, enum([...]), and more, each chainable with .required(), .default(...), or .array().
Model relationships
const schema = a.schema({
  Team: a.model({
    name: a.string().required(),
    members: a.hasMany('Member', 'teamId'),
  }).authorization((allow) => [allow.authenticated()]),

  Member: a.model({
    name: a.string().required(),
    teamId: a.id(),
    team: a.belongsTo('Team', 'teamId'),
  }).authorization((allow) => [allow.authenticated()]),
});
Amplify supports hasOne, hasMany, belongsTo, and manyToMany (which generates the join table for you automatically).
Authorization
Authorization is declared per model (and can be layered per-field) using the .authorization(allow => [...]) callback. The most common rules:
| Rule | Meaning |
|---|---|
allow.owner() | Only the record's creator (via Cognito identity) can read/write it |
allow.authenticated() | Any signed-in user can read/write |
allow.publicApiKey() | Anyone with the project's API key can read/write (good for public/demo data) |
allow.group('Admin') | Only members of the Admin Cognito group |
allow.owner().to(['read']) | Restrict which operations a rule grants (create, read, update, delete) |
allow.guest() | Unauthenticated (Cognito Identity Pool guest) access |
Multiple rules combine additively:
Post: a
  .model({
    title: a.string().required(),
    body: a.string(),
  })
  .authorization((allow) => [
    allow.owner(),                 // owners get full CRUD
    allow.group('Admin'),          // admins get full CRUD too
    allow.authenticated().to(['read']), // everyone signed in can read
  ]),
Because there can be more than one authorization mode active in a project (e.g., API key for public data and Cognito user pool for owner-based data), set defaultAuthorizationMode in defineData and list any secondary modes:
export const data = defineData({
  schema,
  authorizationModes: {
    defaultAuthorizationMode: 'userPool',
    apiKeyAuthorizationMode: { expiresInDays: 30 },
  },
});
Adding custom GraphQL queries
Beyond the CRUD operations Amplify generates automatically per model, you can define fully custom GraphQL operations backed by your own Lambda logic — useful for things like calling a third-party API, running aggregate calculations, or sending an email.
You can define a property on the schema to be a graphQL query or mutation with the a.query() method, and then chain on these methods to fill out the resolver for that query:
query.arguments(schema): specifies the arguments to pass inquery.returns(schema): specifies the return type of the queryquery.authorization(): you should also specify authorization rules for this query.query.handler(): pass in the lambda function handler to specify as a resolver for this query.
// amplify/data/resource.ts
import { a, defineData, type ClientSchema } from '@aws-amplify/backend';
import { generateReport } from '../functions/generate-report/resource';

const schema = a.schema({
  Todo: a.model({ content: a.string() }).authorization((allow) => [allow.owner()]),

  generateReport: a
    .query()
    .arguments({ month: a.string().required() })
    .returns(a.string())
    .authorization((allow) => [allow.authenticated()])
    .handler(a.handler.function(generateReport)),
});

export type Schema = ClientSchema<typeof schema>;
export const data = defineData({ schema });
Call it from React exactly like a generated operation:
const { data: report } = await client.queries.generateReport({ month: '2026-08' });
Frontend
On the frontend, this is basic CRUD and how you create a data client:
// src/App.tsx
import { useEffect, useState } from 'react';
import { generateClient } from 'aws-amplify/data';
import type { Schema } from '../amplify/data/resource';

// 1. generate client
const client = generateClient<Schema>();

// 2. get table type
type Todo = Schema['Todo']['type']

function App() {
  const [todos, setTodos] = useState<Todo[]>([]);

  useEffect(() => {
    // Real-time subscription — fires on create/update/delete
    const sub = client.models.Todo.observeQuery().subscribe({
      next: ({ items }) => setTodos([...items]),
    });
    return () => sub.unsubscribe();
  }, []);

  function createTodo() {
    client.models.Todo.create({
      content: window.prompt('Todo content') ?? '',
    });
  }

  function deleteTodo(id: string) {
    client.models.Todo.delete({ id });
  }

  return (
    <main>
      <h1>My todos</h1>
      <button onClick={createTodo}>+ new</button>
      <ul>
        {todos.map((todo) => (
          <li onClick={() => deleteTodo(todo.id)} key={todo.id}>
            {todo.content}
          </li>
        ))}
      </ul>
    </main>
  );
}

export default App;
A few things worth calling out:
Schema['Todo']['type']gives you the exact TypeScript shape of aTodorecord, generated straight from your backend schema — no manual type duplication.observeQuery()gives you a live, auto-updating list (it reconciles an initial fetch with a real-time subscription under the hood) — ideal for list views.- For one-off fetches instead of live subscriptions, use
client.models.Todo.list()orclient.models.Todo.get({ id }), both of which return promises. - Mutations (
create,update,delete) automatically respect the authorization rules you defined — an unauthorized call fails client-side with a clear error rather than silently succeeding.
Subscriptions
Fetching with pagination and filters
const { data: todos, nextToken } = await client.models.Todo.list({
  filter: { isDone: { eq: false } },
  limit: 20,
});
Storage
Basics
defineStorage provisions an S3 bucket with path-based access rules:
// amplify/storage/resource.ts
import { defineStorage } from '@aws-amplify/backend';

export const storage = defineStorage({
  name: 'myAppFiles',
  access: (allow) => ({
    'profile-pictures/{entity_id}/*': [
      allow.entity('identity').to(['read', 'write', 'delete']),
    ],
    'public/*': [
      allow.authenticated.to(['read']),
      allow.guest.to(['read']),
    ],
  }),
});
Frontend
To use in the frontend, do like so.
NOTE
The {entity_id} token in the access map automatically resolves to the current user's Cognito identity ID, giving you per-user private storage paths without writing any custom authorization logic.
import { uploadData, getUrl, remove, list } from 'aws-amplify/storage';

async function upload(file: File) {
	// Upload
	return await uploadData({
	  path: ({ identityId }) => `profile-pictures/${identityId}/avatar.jpg`,
	  data: file, // a File or Blob from an <input type="file">
	}).result;
}

async function getPresignedURL(objectKey: string) {
	// Get a signed URL to display/download
	const { url } = await getUrl({ path: objectKey });
	return url
}

async function listObjects(prefix: string) {
	// List files under a prefix
	const { items } = await list({ path: objectKey });
	return items
}

async function getPresignedURL(objectKey: string) {
	// Delete
	await remove({ path: objectKey });
}
Here is a straight up example
import { uploadData, getUrl, remove, list } from 'aws-amplify/storage';

// Upload
await uploadData({
  path: ({ identityId }) => `profile-pictures/${identityId}/avatar.jpg`,
  data: file, // a File or Blob from an <input type="file">
}).result;

// Get a signed URL to display/download
const { url } = await getUrl({ path: 'public/logo.png' });

// List files under a prefix
const { items } = await list({ path: 'public/' });

// Delete
await remove({ path: 'public/logo.png' });
Functions
Passing in environment variables
When wanting to pass in environment variables into the lambda execution environment, you have two options to choose dependending on the type of env var you want to bake into the execution environment:
- Insensitive environment variables: can be passed in as plaintext
- sensitive environment variables: Should use the
secret()method to inject the secret into the environment.
  export const myFunction = defineFunction({
    entry: './handler.ts',
    environment: {
      STAGE: 'production',
    },
  });
Amplify with React
Setup
The prerequisites are the following:
-
define the backend: Define the backend resources in the
amplifyfolder -
bootstrap the sandbox: Run
npx ampx sandboxto provision the infra and create anamplify_outputs.json -
Install client-side libraries:
npm install aws-amplify

# optional, for the <Authenticator> component
npm install @aws-amplify/ui-react
- Configure the frontend to connect to the cloud resources provisioned by Amplify through the
amplify_outputs.json, making sure that amplify gets registered before the frontend ever renders.
import React from "react";
import ReactDOM from "react-dom/client";
import "./index.css";
import { Amplify } from "aws-amplify";
import outputs from "../amplify_outputs.json";

async function main() {
  Amplify.configure(outputs);
  const { default: App } = await import("./App");

  ReactDOM.createRoot(document.getElementById("root")!).render(
    <React.StrictMode>
      <App />
    </React.StrictMode>,
  );
}

main().catch((error) => {
  console.error("Error loading the app:", error);
});
- Start the frontend and sandbox simultaneously
npx ampx sandbox
npm run dev
Auth Setup
You have two different ways of implementing auth in react:
- vanilla way: Use the amplify backend SDK client to write your own methods encapsulating the auth logic and wire it up to your own authentication UI.
- provider way: wraps all components that need auth info in the
<Authenticator />provider, which lets you use theuseAuthenticator()hook to dynamically fetch auth info.
Vanilla way
If you'd rather build a fully custom UI, use the underlying aws-amplify/auth functions directly (signUp, signIn, confirmSignUp, signOut, getCurrentUser, fetchAuthSession), which work identically regardless of which UI you build on top.
Provider method: <Authenticator /> and useAuthenticator()
The provider approach wraps all components that need auth info in the <Authenticator /> provider, which lets you use the useAuthenticator() hook to dynamically fetch auth info.
The <Authenticator /> provider component does two things:
- Render auth blocking modal to force user to sign in if unauthenticated.

- Allows children components to use the
useAuthenticator()hook to dynamically fetch authentication info.
Here are the steps to implement this approach:
- Setup the
<Authenticator />context provider
import React from 'react';
import ReactDOM from 'react-dom/client';
import { Amplify } from 'aws-amplify';
import App from './App.tsx';
import outputs from '../amplify_outputs.json';
import './index.css';

// 1. import authenticator and auth component styles
import { Authenticator } from '@aws-amplify/ui-react';
import '@aws-amplify/ui-react/styles.css';

// 2. configure amplify output
Amplify.configure(outputs);

ReactDOM.createRoot(document.getElementById('root')!).render(
  <React.StrictMode>
    <Authenticator>
      <App />
    </Authenticator>
  </React.StrictMode>
);
- Use the
useAuthenticator()hook within children components of the provider to access auth data.
import type { Schema } from '../amplify/data/resource';
import { useAuthenticator } from '@aws-amplify/ui-react';
import { useEffect, useState } from 'react';
import { generateClient } from 'aws-amplify/data';

const client = generateClient<Schema>();

function App() {
  const { user, signOut } = useAuthenticator();

  // ...

  return (
    <main>
      {/* ... */}
      <h1>{user?.signInDetails?.loginId}'s todos</h1>
      <button onClick={signOut}>Sign out</button>
    </main>
  );
}

export default App;
Data setup
- Generate the DB client in the frontend, importing the exported schema type so you have end-to-end typing
import type { Schema } from "../../amplify/data/resource";
import { generateClient } from "aws-amplify/data";

export const client = generateClient<Schema>();

export type Todo = Schema["Todo"]["type"];
- Use it like so:
import { useEffect, useState } from "react";
import {client} from "db/client"

function App() {
  const [todos, setTodos] = useState<Array<Schema["Todo"]["type"]>>([]);

  useEffect(() => {
    client.models.Todo.observeQuery().subscribe({
      next: (data) => setTodos([...data.items]),
    });
  }, []);

  function createTodo() {
    client.models.Todo.create({ content: window.prompt("Todo content") });
  }

  return (
    <main>
      <h1>My todos</h1>
      <button onClick={createTodo}>+ new</button>
      <ul>
        {todos.map((todo) => (
          <li key={todo.id}>{todo.content}</li>
        ))}
      </ul>
      <div>
        🥳 App successfully hosted. Try creating a new todo.
      </div>
    </main>
  );
}

export default App;
Auth
useAuthenticator() hook in depth
import { useAuthenticator } from "@aws-amplify/ui-react";
import { useTodo } from "./db/useTodo";

const Main = () => {
  const { user, signOut } = useAuthenticator();

  return (
    <div className="App">
      <h1>Hello {user?.username}</h1>
      <button onClick={signOut}>Sign out</button>
    </div>
  );
};
Here are the methods available for use:
signOut(): when invoked, logs the currently logged in user out.
Here are the properties on the user object:
user.username: the username of the user, which can be a real username or just their email. Either way, it's a unique natural language identifier for the user.
Creating a protected route
import { useAuthenticator } from '@aws-amplify/ui-react';
import { Navigate } from 'react-router-dom';

function ProtectedRoute({ children }: { children: React.ReactNode }) {
  const { authStatus } = useAuthenticator((ctx) => [ctx.authStatus]);
  if (authStatus !== 'authenticated') return <Navigate to="/login" />;
  return <>{children}</>;
}
Data
Custom hook
- Create the client
import type { Schema } from "../../amplify/data/resource";
import { generateClient } from "aws-amplify/data";

export const client = generateClient<Schema>();

export type Todo = Schema["Todo"]["type"];
- Create the hook
import { useAuthenticator } from "@aws-amplify/ui-react";
import { client, type Todo } from "./client";
import { useState } from "react";

export const useTodo = () => {
  const { user } = useAuthenticator();
  const [todos, setTodos] = useState<Todo[]>([]);
  const [loading, setLoading] = useState(false);
  const [error, setError] = useState<string | null>(null);

  const fetchTodos = async () => {
    if (!user) return;
    setLoading(true);
    setError(null);
    try {
      const fetchedTodos = await client.models.Todo.list();
      if (fetchedTodos.errors) {
        throw new Error(fetchedTodos.errors[0].message);
      }
      setTodos(fetchedTodos.data);
    } catch (error) {
      setError("Error fetching todos");
      console.error("Error fetching todos:", error);
    } finally {
      setLoading(false);
    }
  };

  const addTodo = async (newTodoContent: string) => {
    if (!user || !newTodoContent.trim()) return;
    setLoading(true);
    setError(null);
    try {
      const newTodo = await client.models.Todo.create({
        content: newTodoContent,
        isDone: false,
      });
      if (newTodo.errors) {
        throw new Error(newTodo.errors[0].message);
      }
      // @ts-ignore
      setTodos((prevTodos) => [...prevTodos, newTodo.data]);
    } catch (error) {
      setError("Error adding todo");
      console.error("Error adding todo:", error);
    } finally {
      setLoading(false);
    }
  };

  const updateTodo = async (
    todoId: string,
    updatedContent: string,
    isDone: boolean,
  ) => {
    if (!user || !updatedContent.trim()) return;
    setLoading(true);
    setError(null);
    try {
      const updatedTodo = await client.models.Todo.update({
        content: updatedContent,
        isDone: isDone,
        id: todoId,
      });
      if (updatedTodo.errors) {
        throw new Error(updatedTodo.errors[0].message);
      }
      setTodos((prevTodos) =>
        prevTodos
          .map((todo) => (todo.id === todoId ? updatedTodo.data : todo))
          .filter((todo): todo is Todo => todo !== null),
      );
    } catch (error) {
      setError("Error updating todo");
      console.error("Error updating todo:", error);
    } finally {
      setLoading(false);
    }
  };

  const deleteTodo = async (todoId: string) => {
    if (!user) return;
    setLoading(true);
    setError(null);
    try {
      const deletedTodo = await client.models.Todo.delete({
        id: todoId,
      });
      if (deletedTodo.errors) {
        throw new Error(deletedTodo.errors[0].message);
      }
      setTodos((prevTodos) => prevTodos.filter((todo) => todo.id !== todoId));
    } catch (error) {
      setError("Error deleting todo");
      console.error("Error deleting todo:", error);
    } finally {
      setLoading(false);
    }
  };

  return { todos, loading, error, fetchTodos, addTodo, updateTodo, deleteTodo };
};