advanced-ai-engineering
MCP
MCP is a layer between tools available to the LLM and the LLM itself, making it very simple for the LLM to know what tools are available and when to use them.
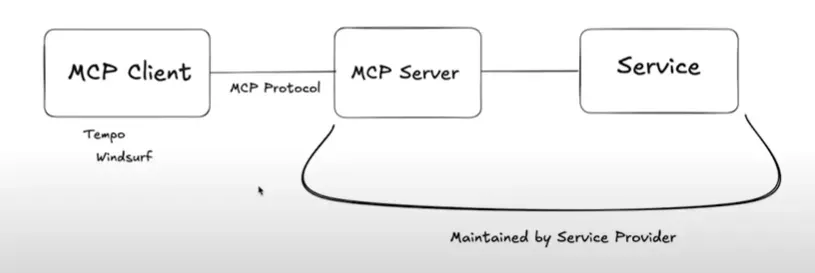

Here is the terminology:
- MCP Hosts: Programs like Claude Desktop, IDEs, or AI tools that want to access data through MCP
- MCP Clients: Protocol clients that maintain 1:1 connections with servers, like Cursor, Claude Desktop.
- MCP Servers: Lightweight programs that each expose specific capabilities through the standardized Model Context Protocol
- Local Data Sources: Your computer’s files, databases, and services that MCP servers can securely access
- Remote Services: External systems available over the internet (e.g., through APIs) that MCP servers can connect to
There are two types of MCP servers you can set up:
- stdio server: A server that bases the MCP protocol off of reading from stdin and stdout
- sse server: A server that bases MCP protocol off of server sent events (SSE).

MCP under the hood
Under the hood, MCP is really just a fancy way of sending specially formatted messages that describe tool usage info, the parameters a tool accepts, and how to call a tool. This is how the transfer of info via MCP changes for both transports:
- SSE transport: sends MCP-formatted messages using server sent events
- stdio transport: sends MCP-formatted messages by console logging it.
If using a stdio transport, using console.log() breaks the server. This is because stdio transport servers will crash if anything in stdout is not of the special format that MCP accepts.
Creating MCP Servers
There are three basic steps when creating MCP servers using the SDK:
- Create an MCP server that either runs on stdio or sse
- Register tools and optional resources
- Start the server
You can create a server like so:
import { McpServer} from "@modelcontextprotocol/sdk/server/mcp.js";
import { StdioServerTransport } from "@modelcontextprotocol/sdk/server/stdio.js";

// 1. create the server
const server = new McpServer({
	name: "my-mcp-server",
	version: "1.0.0",
	description: "My MCP Server",
})

// in between here register resources and tool calls ...

// 2. create the transport (stdio in this case)
const transport = new StdioServerTransport();

// 3. start the server
await server.connect(transport);
I created a class wrapper around this:
import { McpServer } from "npm:@modelcontextprotocol/sdk/server/mcp.js";
import { StdioServerTransport } from "npm:@modelcontextprotocol/sdk/server/stdio.js";

export class MCPServerHandler {
  constructor(public server: McpServer) {}

  async startStdioServer() {
    const transport = new StdioServerTransport();
    await this.server.connect(transport);
  }
}
For a more in depth abstraction on how to use MCP, use my repo:
Resources
Resources are collections of data that provide tools easy access to them, if configured. Think of them as GET endpoints.
You declare a resource with the server.resource() method, which takes in these arguments:
- the resource name
- the URI identifier of the resource
- a callback where you perform some data fetching and then return an object with a
contentsproperty, which is an array of text or blob contents.
export type TextResourceReturn = {
  uri: string;
  text: string;
  mimeType: string;
  [key: string]: any;
};
export type BlobResourceReturn = {
  uri: string;
  blob: string; // base64 encoded
  mimeType: string;
  [key: string]: any;
};
export type ResourceReturn = {
  contents: (TextResourceReturn | BlobResourceReturn)[];
};

const path = "http://localhost:3000/dogs"
const resource = server.resource("resource-name", path, async (uri: URL) => {
	let path = uri.href // uri is URL instance

	return {
		contents: [
			{mimeType: "text/plain", data: "Aadil Mallick" }
		]
	} as ResourceReturn
})

// 2. enable the resource
resource.enable()
And then when the MCP server with the resource starts working, you can add it to claude desktop and then access it like so:

Tools
Tools are by far the most useful aspect of mcp.
You create a tool with the server.tool() method, which takes in a name, description, an object of parameters to pass (which can be a zod schema), and then a callback where you return an object with a content property.
Here is an example of the type you need to return in a tool call:
type ToolReturn = {
    content: ({
        [x: string]: unknown;
        type: "text";
        text: string;
    } | {
        [x: string]: unknown;
        type: "image";
        data: string;
        mimeType: string;
    } | {
        [x: string]: unknown;
        type: "audio";
        data: string;
        mimeType: string;
    }
}
And here's the tool call syntax:
const tool = server.tool("tool-name", "tool description", {
		dogName: z.string()
	},
	async ({dogName}) => {
		return {
			content: [{type: "text", text: `dog name is ${dogName}`}]
		}
	}
)
tool.enable()
Prompts
import { McpServer } from "@modelcontextprotocol/sdk/server/mcp.js";
import { StdioServerTransport } from "@modelcontextprotocol/sdk/server/stdio.js";
import { z } from "zod";
import { readFileSync } from "fs";

const airbnbMarkdownPath = "/Users/brianholt/personal/hello-mcp/airbnb.md";
const airbnbMarkdown = readFileSync(airbnbMarkdownPath, "utf-8");

const server = new McpServer({
  name: "code-review-server",
  version: "1.0.0",
});

server.registerPrompt(
  "review-code",
  {
    title: "Code Review",
    description: "Review code for best practices and potential issues",
    argsSchema: { code: z.string() },
  },
  ({ code }) => ({
    messages: [
      {
        role: "user",
        content: {
          type: "text",
          text: `Please review this code to see if it follows our best practices. Use this Airbnb style guide as a reference:\n\n=============\n\n${airbnbMarkdown}\n\n=============\n\n${code}`,
        },
      },
    ],
  })
);

const transport = new StdioServerTransport();
await server.connect(transport);
SSE transport
Here is example code showing how you can create MCP servers using the SSE transport and run it as an online server, which then lets you integrate it with other agent automation systems like N8N.
import express from "express";
import { SSEServerTransport } from "@modelcontextprotocol/sdk/server/sse.js";
import { McpServer } from "@modelcontextprotocol/sdk/server/mcp.js";
import { z } from "zod";

// 1. crete mcp server
const server = new McpServer({
  name: "Weather Service",
  version: "1.0.0",
});

// 2. create tool
server.tool(
  "getWeather",
  {
    city: z.string(),
  },
  async ({ city }) => {
    return {
      content: [
        {
          type: "text",
          text: `The weather in ${city} is sunny!`,
        },
      ],
    };
  },
);

const app = express();

let transport: SSEServerTransport | undefined =
  undefined;

// 3. create sse route that sets transport and exposes it
app.get("/sse", async (req, res) => {
  // point to POST /messages to handle all the logic
  transport = new SSEServerTransport("/messages", res);
  await server.connect(transport);
});

// 4. handle app logic.
app.post("/messages", async (req, res) => {
  if (!transport) {
    res.status(400);
    res.json({ error: "No transport" });
    return;
  }
  await transport.handlePostMessage(req, res);
});
Troubleshooting and caveats
This is a very new API, and maybe the python version will be a lot better, but for typescript, keep these tips in mind:
- no console logging: Side effects are not allowed in this server - only when registering a tool - so you are not allowed to invoke
console.log() - resource for tools not available : Returning a
type: "resource"object does not work in tool calls. Just stick to text, image, audio.
Streamable HTTP
Streamable HTTP is a much better option for creating an MCP server that is hosted on the web.
Here's an example of a streamable HTTP server:
MCP inspector
RUn the npx @modelcontextprotocol/inspector package to run a local mcp inspector dashboard which lets you debug online streamable http MCPs.
Rag and Cag
RAG stands for retrieval augmented generation while CAG stands for cache-augmented generation.
- RAG: search documents related to query, and then inject most similar documents into query.
- More complex and prone to error, but allows for smaller context window.
- CAG: fetch all possibly relevant documents and then inject into prompt.
- Needs a large context window but less complex
Upstash
The most basic way to get started with using usptash vector stores is to first create an index online, and then access that indes programmatically through the upstash API:
const index = new Index({
  url: "https://allowing-gazelle-54329-us1-vector.upstash.io",
  token: apiKey,
});
You can then use these methods on the index:
index.upsert(options): takes in an object of options that represents the embedding and its metadata and pushes it to the cloud vector store. here are the options:vector: the embedding. This must match the dimension you set on the index previously. required.data: the plain text representation of the embedding.metadata: an object of metadata used for filtering via in-app logic.id: a unique identifier for the embedding.
index.query(options): performs similarity search of a query embedding against a vector database. Here are the options:includeVector: a boolean of whether to return the entire embedding or not in the object of returned infoincludeData: a boolean of whether to return the initial text data or not in the object of returned infoincludeMetadata: a boolean of whether to return the metadata or not in the object of returned infovector: the embedding version of the querytopK: the number of documents to return
import { Index } from "npm:@upstash/vector";
import { parse } from "npm:csv-parse/sync";
import {
  embeddingModels,
  VercelAIEmbedding,
  models,
  VercelAI,
} from "./VercelAI.ts";
import { z } from "npm:zod";

export class UpstashVectorStore {
  private index: Index;

  constructor(
    url: string,
    apiKey: string,
    private embeddingModel: VercelAIEmbedding
  ) {
    this.index = new Index({
      url,
      token: apiKey,
    });
  }

  async upsert({
    id,
    metadata,
    text,
  }: {
    id: string;
    text: string;
    metadata: Record<string, unknown>;
  }) {
    const embedding = await this.embeddingModel.embedOne(text);
    await this.index.upsert({
      id,
      vector: embedding,
      data: text,
      metadata,
    });
  }

  async similaritySearch(query: string, k: number) {
    const embedding = await this.embeddingModel.embedOne(query);
    const results = await this.index.query({
      vector: embedding,
      topK: k,
      includeData: true,
      includeMetadata: true,
      // includeVectors: true,
    });
    return results;
  }
}
Then here is how you can use it to parse a CSV and add each row as a document:
const { model: embeddingModel, modelOptions: embeddingModelOptions } =
  embeddingModels.get_lmstudio("text-embedding-nomic-embed-text-v1.5", 1536);
const lmStudioEmbeddings = new VercelAIEmbedding(embeddingModel, {
  ...embeddingModelOptions,
});

const apiKey = Deno.env.get("UPSTASH_API_KEY");
if (!apiKey) {
  throw new Error("UPSTASH_API_KEY is not set");
}

const vectorStore = new UpstashVectorStore(
  "https://allowing-gazelle-54329-us1-vector.upstash.io",
  apiKey,
  lmStudioEmbeddings
);
Then you would parse some text source, split the source into text chunks, and invidually add each chunk to the vector store:
import { parse } from "npm:csv-parse/sync";
async function addMoviesToVectorStore() {
  const records = parse(await Deno.readTextFile("imdb_movie_dataset.csv"), {
    columns: true,
  });
  console.log(records.length);
  for (const movie of records) {
    const text = `${movie.Title}. ${movie.Genre}. ${movie.Description}`;
    await vectorStore.upsert({
      id: movie.Title,
      text,
      metadata: {
        title: movie.Title,
        year: movie.Year,
        genre: movie.Genre,
        director: movie.Director,
        actors: movie.Actors,
        rating: movie.Rating,
        votes: movie.Votes,
        revenue: movie.Revenue,
        metascore: movie.Metascore,
      },
    });
    console.log(`Added ${movie.Title}`);
  }
  console.log("Done");
}
Evals
If you don't use evals (tests and finidng metrics for your LLM service), you will have a terrible LLM wrapper app. Here are some metrics to test for:
- Is the model calling the correct tool we expected?
Finetuning
Finetuning is the act of doing training on the last layer of the LLM with all the other layers being frozen, thus modifying the weights for your use case.