claude-code
Claude code basics
CLI options
claude -p <prompt>: runs a one-off promptclaude --model=<model>: runs claude with a specific model. Here are the different values you can pass for the--modelparameter:sonnetopushaiku
claude --continue: continue off from the last sessionclaude --resume: resume a specific session.
Keyboard shortcuts

Switching modes
- auto accept mode: TO enter auto accept mode for edits, press
shift + tabkeyboard shortcut - plan mode: TO enter plan mode, press
shift + tabtwice
Output
- tasks: to view the tasks and todos claude has set, press the
ctrl + tshortcut - verbose output: to set verbose output for claude, press the
ctrl + oshortcut
Slash options
When inside a conversation with claude code, you have access to these special slash commands:
/model <model>: change the model mid convo to one ofhaiku,sonnet, oropus/compact: compacts previous conversation history into a summary. Useful when you've now moved on to a different task./clear: clears the conversation history/init: reads the current codebase and based off that, creates aCLAUDE.mdfile/context: visualize the current context and how much of it is taken up./status: shows current token and session info/review: performs a code review/security-review: performs a code review that searches for security flaws./install-github-app: allows you to add claude as a collaborator to a github repoi so you can assign it issues and to pull requests/insights: shows you how well you used claude code in a session
Chat techniques
Managing context
Hit the esc key twice to stop a response while Claude is generating. Then you can start a user query by prefixing with a # to start a memory which claude code will remember during the conversation.
Also use these slash commands to manage memory:
/clear: clears the conversation history/compact: compacts previous conversation history into a summary. Useful when you've now moved on to a different task.
Forcing thinking
To force thinking, you can use these keywords in your prompt:
- "think": reasoning up to 4000 tokens
- "think harder": reasoning up to 10000 tokens
switch models smartly
Use opus for planning, sonnet for execution.
Use plan mode
You can tell claude to "make the plan multi-phase" which makes the plan, well, multi-phase.
Redo messages and have side questions
To interrupt claude's process at any time, press the esc key and then you can send it a message.
To ask claude a quick side question it processes before continuing on its agent loop, use the /btw slash command.
Claude context management
CLAUDE.md
The CLAUDE.md file is based on three facts about LLM agents:
- Coding agents know absolutely nothing about your codebase at the beginning of each session.
- The agent must be told anything that's important to know about your codebase each time you start a session.
CLAUDE.mdis the preferred way of doing this.
This file should clarify three questions:
- WHAT: tell Claude about the tech, your stack, the project structure. Give Claude a map of the codebase. This is especially important in monorepos! Tell Claude what the apps are, what the shared packages are, and what everything is for so that it knows where to look for things
- WHY: tell Claude the purpose of the project and what everything is doing in the repository. What are the purpose and function of the different parts of the project?
- HOW: tell Claude how it should work on the project. For example, do you use
buninstead ofnode? You want to include all the information it needs to actually do meaningful work on the project. How can Claude verify Claude's changes? How can it run tests, typechecks, and compilation steps?
To write a good CLAUDE.md file, we should follow these core principles:
CLAUDE.mdis for onboarding Claude into your codebase. It should define your project's WHY, WHAT, and HOW.- Less (instructions) is more. While you shouldn't omit necessary instructions, you should include as few instructions as reasonably possible in the file.
- Keep the contents of your
CLAUDE.mdconcise and universally applicable. - Use Progressive Disclosure - don't tell Claude all the information you could possibly want it to know. Rather, tell it how to find important information so that it can find and use it, but only when it needs to to avoid bloating your context window or instruction count. Also, don't embed files directly with
@, as that bloats the context. Just reference the file. - Claude is not a linter. Use linters and code formatters, and use other features like Hooks and Slash Commands as necessary.
CLAUDE.mdis the highest leverage point of the harness, so avoid auto-generating it. You should carefully craft its contents for best results.
ANother 4 principles:
-
Start with Guardrails, Not a Manual. Your
CLAUDE.mdshould start small, documenting based on what Claude is getting wrong. -
Don’t
@-File Docs. If you have extensive documentation elsewhere, it’s tempting to@-mention those files in yourCLAUDE.md. This bloats the context window by embedding the entire file on every run. But if you just mention the path, Claude will often ignore it. You have to pitch the agent on why and when to read the file. “For complex … usage or if you encounter aFooBarError, seepath/to/docs.mdfor advanced troubleshooting steps.” -
Don’t Just Say “Never.” Avoid negative-only constraints like “Never use the
--foo-barflag.” The agent will get stuck when it thinks it must use that flag. Always provide an alternative. -
Use
CLAUDE.mdas a Forcing Function. If your CLI commands are complex and verbose, don’t write paragraphs of documentation to explain them. That’s patching a human problem. Instead, write a simple bash wrapper with a clear, intuitive API and document that. Keeping yourCLAUDE.mdas short as possible is a fantastic forcing function for simplifying your codebase and internal tooling.
principle 1 - Keep your claude md small
As instruction count increases, instruction-following quality decreases uniformly. This means that as you give the LLM more instructions, it doesn't simply ignore the newer ("further down in the file") instructions - it begins to ignore all of them uniformly
This implies that your CLAUDE.md file should contain as few instructions as possible - ideally only ones which are universally applicable to your task.
TIP
Aim for a CLAUDE.md less than 60 lines long
principle 2 - use progressive disclosure
The term Progressive disclosure is just a fancy way of saying to reference different markdown files inside your CLAUDE.md file and then give brief descriptions of those files so that Claude can decide whether or not to read those markdown files.
However, referencing files directly with the @ prefix is NOT progressive disclosure, as that just completely embeds the file content into the context.
Rather, in the CLAUDE.md, to implement progressive disclosure, just reference the filepath and describe what that file does, and claude will decide whether or not to look at that md file.
Principle 3 - use /init as a starting point
The /init slash command is used to make up a lot first, gain context of your codebase, and use that context to then craft an appropriate CLAUDE.md.
This is a good starting point, but you eventually want to make it lean so that Claude isn't overloaded with context on each conversation turn.
Principle 4 - maintain living documents
You should maintain these four documents as important context and constantly update them with the latest information from your code base. Claude will use this to gain the most context about the code base instead of reading every single.
context/project-overview.md: An overview of the project and the architecture involved.context/coding-standards.md: An overview of the desired coding style, what abstractions to use, and what libraries to use.context/project-overview.md: An overview of the project and the architecture involved.context/project-overview.md: An overview of the project and the architecture involved
Manage context with claude rules
The .claude/rules/ directory is a modular alternative to monolithic CLAUDE.md files. Instead of cramming everything into one file, you organize instructions into multiple markdown files that Claude loads as project memory.
NOTE
Critical detail from Anthropic: Rules files load with the same high priority as CLAUDE.md. This matters because Claude's context window has a priority hierarchy - not all tokens are weighted equally.
Every .md file in .claude/rules/ automatically becomes part of your project context. No configuration needed.
.claude/rules/
├── code-style.md      # Formatting and conventions
├── testing.md         # Test requirements
├── security.md        # Security checklist
└── frontend/
    ├── react.md       # React-specific patterns
    └── styles.md      # CSS conventions
This structure gives you separation of concerns at the instruction level. Update your security rules without touching your styling guidelines.
If your CLAUDE.md file ever becomes too unwieldy, you can always break it up into modular rules and then use something like path-specific loading to load rules only when needed.
mkdir -p .claude/rules
echo "# Testing Rules
- Run tests before committing
- Mock external services in unit tests" > .claude/rules/testing.md
The modularity of claude rules arises from only applying the rules to specific glob patterns, just like cursor rules. You accomplish this via passing these arguments into the frontmatter:
paths: a list of glob patterns of filepaths to apply the rule to.- Basically claude will load the rule if it concerns a file that is matched by one of the glob patterns in the
pathsproperty.
- Basically claude will load the rule if it concerns a file that is matched by one of the glob patterns in the
---
paths: src/api/**/*.ts
---

# API Development Rules

- All endpoints must validate input with Zod
- Return consistent error shapes: { error: string, code: number }
- Log all requests with correlation IDs
Here is an example targeting multiple glob patterns:
---
paths:
  - src/components/**/*.tsx
  - src/hooks/**/*.ts
---

# React Development Rules

- Use functional components exclusively
- Extract logic into custom hooks
- Memoize expensive computations
When a rule has paths frontmatter, it only loads (and receives high priority) when Claude is working on matching files:
---
paths: src/api/**/*.ts
---

# These instructions get high priority ONLY during API work
This is the key insight: you're not just organizing files, you're scoping when instructions receive elevated attention.
Rule examples
security rules for sensitive directories
---
paths:
  - src/auth/**/*
  - src/payments/**/*
---

# Security-Critical Code Rules

- Never log sensitive data (passwords, tokens, card numbers)
- Validate all inputs at function boundaries
- Use parameterized queries exclusively
- Require explicit authorization checks before data access
rules for test files
---
paths: **/*.test.ts
---

# Test Writing Standards

- Use descriptive test names: "should [action] when [condition]"
- One assertion per test when possible
- Mock external dependencies, never real APIs
- Include edge cases: empty inputs, null values, boundaries
database migration rules
---
paths: prisma/migrations/**/*
---

# Migration Safety Rules

- Always include rollback instructions
- Test migrations on a copy of production data first
- Never delete columns in the same migration that removes code using them
- Add columns as nullable first, populate, then add constraints
rules for content management
Match by folder, by file type, or both:
Files inside my emails folder → wake up the email tone rule Any file ending in
.md→ wake up the writing voice rule Files inside my meeting-notes → wake up the summary rule
Here's what a rule file actually looks like. The top part (between the two lines of dashes) is the wake-up note. The bottom part is the rule itself.
---
paths:
  - "content/**"
  - "**/*.md"
---

Warm and direct. No jargon.
Short paragraphs. Concrete examples over abstract claims.
Migrating from monolith CLAUDE.md to modular rules
If your CLAUDE.md has grown large, you're likely experiencing the priority saturation problem: too much high-priority content competing for attention. Extract domain sections into path-targeted rules:
Before (single 400-line CLAUDE.md):
# Project Context

...

## API Guidelines

- Validate inputs with Zod
- Return consistent errors
  ...

## React Patterns

- Use functional components
- Extract hooks
  ...

## Testing Rules

- Mock external services
  ...
After (lean CLAUDE.md + modular rules):
# CLAUDE.md - Operational Core Only

## Routing Logic

- Simple tasks: execute directly
- Complex tasks: delegate to sub-agents

## Quality Standards

- Correctness > Maintainability > Performance
.claude/rules/
├── api-guidelines.md      # API section with paths: src/api/**/*
├── react-patterns.md      # React section with paths: src/components/**/*
└── testing-rules.md       # Testing section with paths: **/*.test.*
Your CLAUDE.md stays focused on universal behavior. Domain knowledge lives in targeted rules that only receive high priority when relevant.
The result: cleaner priority distribution. Your core operational instructions always get attention. Domain-specific rules get attention only when Claude is working in their target areas. Building this rule structure from scratch takes significant iteration. The ClaudeFast Code Kit ships a battle-tested .claude/rules/ directory with path-targeted rules for React, API development, database operations, and security, so you start with a working foundation instead of an empty folder.
Best practices
- Keep rules focused: One concern per file. Security rules separate from styling rules.
- Use descriptive filenames:
api-validation.mdbeatsrules1.md. - Leverage path targeting: Rules without paths load everywhere. Add paths to reduce noise.
- Version control everything: Rules are code. Review changes, track history, roll back mistakes.
- Document rule purpose: Start each file with a brief comment explaining when it applies.
Context management in depth
Claude context loading priority
Claude's context window isn't flat. Different sources of information receive different priority levels in how the model weighs them during generation. Anthropic confirms that CLAUDE.md and rules files receive high priority - Claude treats these instructions as authoritative.
This created a problem with the old approach: stuffing everything into one massive CLAUDE.md meant all of that content received high priority. Your React patterns competed for attention with your API guidelines, even when you were working on database migrations.
High priority everywhere = priority nowhere.
When everything is marked important, Claude struggles to determine what's actually relevant to the current task. The result: instructions get ignored, context becomes noisy, and Claude's behavior becomes unpredictable.
Understanding how Claude weighs different context sources:
| Source | Priority Level | Implication |
|---|---|---|
| CLAUDE.md | High | Treated as authoritative instructions |
| Rules Directory | High | Same weight as CLAUDE.md |
| Skills | Medium (on-demand) | Loaded only when triggered |
| Conversation history | Variable | Decays over long sessions |
| File contents (Read tool) | Standard | Normal context, no special weight |
The rules directory solves the monolithic problem by letting you distribute high-priority instructions across targeted files. Your API rules still get high priority - but only when you're working on API files.
Rules vs CLAUDE.md vs Skills
When do you use each?
| Feature | Priority | Best For | Loads When |
|---|---|---|---|
| CLAUDE.md | High | Universal operational workflows | Every session |
| Rules Directory | High | Domain-specific instructions | Every session (filtered by path) |
| Skills | Medium | Reusable cross-project expertise | On-demand when triggered |
-
Use CLAUDE.md for what applies everywhere: routing logic, quality standards, coordination protocols. Keep it lean - everything here competes for high-priority attention.
-
Use rules for what applies to specific areas: API patterns for API files, test requirements for test files. Path targeting ensures high priority only when relevant.
-
Use skills for what applies across projects: deployment procedures, code review checklists, brand guidelines. Lower priority until explicitly triggered.
| Container | Who writes it | When it loads |
|---|---|---|
CLAUDE.md | You | Every session, always. Hence: keep it short. |
rules/*.md | You | When you touch a file matching its paths: |
memory/*.md | Claude | When Claude judges it relevant |
skills/*/SKILL.md | You | When your request matches its description: |
Creating a garden-check skill
Having a garden check skill is important to ensure that your user-scoped Claude code setup doesn’t grow weeds and become useless over time. This maintains it and provides an auto report of what’s not working.
~/.claude/skills/
└── garden-check/          ← this name becomes /garden-check
    └── SKILL.md           ← the whole skill lives here
Here is a basic version of the garden check skill, which is supposed to accomplish 6 things:
- weight: Flags any
CLAUDE.mdpast 50 lines. The test that decides: delete the line, and if nothing changes it was not earning its place. - dead paths: Every file and folder named in your instructions, checked against disk. Claude follows a dead path anyway.
- broken front matter: Malformed, and the rule is invisible. No error, no warning.
- rules that don't fire correctly: The highest-value check. A
paths:pattern matching nothing has never loaded once. Nopaths:field means it loads every session forever. - orphaned memory: Both directions: entries pointing at files that are gone, and memory files
MEMORY.mdnever indexes, which makes them unreachable.
Use the skill creator skill to tell Claude to create this garden check skill:
> use skill-creator to build me a skill called garden-check.
  It audits my Claude setup and reports what has rotted:
  dead file paths, rules whose paths match nothing, orphaned
  memory, duplicated instructions. Read-only, it never edits.
---
name: garden-check
description: Audits a Claude Code setup read-only and reports what has rotted, including dead file references, rules whose paths match nothing, orphaned memory entries, and duplicated instructions. Use for "garden check", "weed the garden", "audit my claude setup", or when a rule or skill never seems to fire.
---

<objective>
Walk the user's Claude Code setup and report what is dead, stale, or too heavy. Report only. Never edit, never delete.
</objective>

<boundaries>
READ-ONLY. MUST NOT create, edit, move, or delete any file in the setup being audited.
Finding and fixing are separate jobs. A tool that fixes what it finds cannot be trusted to report honestly, and a user who cannot see the diff cannot learn their own setup.
When the user asks for fixes, show the change and let them apply it, or ask before touching anything.
</boundaries>

<scope>
Ask the user which garden to check if it is ambiguous. Default to both:

Global setup:
- `~/.claude/CLAUDE.md`
- `~/.claude/rules/` (all files, including subfolders)
- `~/.claude/skills/` (folder names and frontmatter only)

Project setup, for the current working directory and any nested folder that has one:
- `CLAUDE.md` at every level
- `.claude/rules/`
- `.claude/skills/`

Memory:
- `~/.claude/projects/<project-hash>/memory/MEMORY.md` and the memory files it indexes

Follow symlinks. A setup symlinked into a private git repo is normal, not a finding.
</scope>

<checks>
Run all eight. Each finding names the file, the line, and one concrete fix.

1. WEIGHT — Count the lines in each CLAUDE.md. Flag anything past 50. There is no official limit and nothing truncates; 50 is a working target that keeps the file honest, so report it as "past target", never as "over the limit". This file is re-read every session, so every line is rent. For each flagged file, name the two or three sections most worth moving into a rule.

   For SKILL.md files the documented guidance is different and real: keep them under 500 lines, and move detail into linked supporting files past that.

2. DEAD PATHS — Extract every file path, folder path, and command name mentioned in CLAUDE.md and in the rules. Check each one exists. A path that no longer resolves is an instruction pointing at nothing, and Claude will follow it anyway.

3. BROKEN FRONT MATTER — Every file in `rules/` and every SKILL.md must open with valid front matter: three dashes, the fields, three dashes. Flag any file missing it or with malformed YAML. A rule with broken front matter is invisible.

   Parse the YAML, do not eyeball it. The common break is a colon followed by a space inside an unquoted value, as in `description: Reports what rotted: dead paths`. YAML reads the second colon as a new key and the file fails to parse. Fix by rewording to drop the inner colon, or by quoting the whole value.

4. RULES THAT NEVER FIRE — For each rule carrying a `paths:` field, check the pattern matches at least one file that actually exists. A pattern matching nothing is a rule the user believes is active and which has never once loaded. This is the highest-value check: it fails silently.

5. RULES THAT ALWAYS FIRE — List every rule with no `paths:` field. These load on every single session. For each one ask: is this genuinely universal, or is it a rule that wants a `paths:` field? Report them with their line counts so the user sees the standing cost.

6. ORPHANED MEMORY — Every line in MEMORY.md points to a memory file. Check each file exists. Then check the reverse: memory files on disk that MEMORY.md does not index are invisible to recall. Flag both directions.

7. UNLINKED SKILL FILES — Inside each skill folder, list every file other than SKILL.md. Check the SKILL.md body links to it. A supporting file nothing links to never loads: Claude does not discover skill files on its own. Flag it as invisible, not as unused.

8. DUPLICATES — The same instruction stated in two places: global CLAUDE.md and project CLAUDE.md, or CLAUDE.md and a rule, or two rules. Report each pair and say which copy should survive. This is the most common finding and the most expensive, because contradictory duplicates make behavior unpredictable.
</checks>

<output>
Report grouped into three sections, in this order. Skip any section with no findings and say so.

DEAD — points at something that does not exist. Fix or delete.
STALE — real, but describes finished work or a setup that has moved on.
TOO HEAVY — real and current, but costs more than it returns.

One line per finding:

`<file>:<line>` — what is wrong → the fix

End with a two-line summary: total findings by group, and the single change that would improve the setup most. Name that one change explicitly. A list of thirty findings with no priority is a list nobody acts on.

If the setup is clean, say so plainly and name the one thing worth watching as it grows. Do not invent findings to fill the report.
</output>

<delegation>
Optional. Skip this on a small setup, where one pass costs almost nothing. It earns its keep once the scan spans many projects, a large rules folder, or dozens of skills, because reading all those files is where the tokens go.

Split the work by what it demands, following the `efficient-delegation` skill:

DELEGATE the scanning to cheaper sub-agents, one per area (global CLAUDE.md and rules, project CLAUDE.md files, memory, skill folders). Checks 1, 2, 3, 4, 6 and 7 are mechanical: does this path exist, does this glob match anything, does this YAML parse, is this file linked. Each sub-agent returns its findings as structured data, nothing more.

KEEP for the main model: check 5, which is a judgment call about whether a rule deserves to load every session; check 8, which needs every area in one head at once to spot the same instruction written twice; and the final priority ranking. The ranking is what makes the report actionable rather than a list, so never hand it off.

Verify before reporting. A sub-agent claiming a path is dead is a lead, not a fact. Re-check any finding before it reaches the user.
</delegation>

<success_criteria>
- Every finding names a real file and a real line the user can open
- No file was modified
- Findings are grouped dead / stale / too heavy, never one flat list
- The report ends with one prioritized change, not a backlog
- A non-coder can read any line of the report and know what to do next
</success_criteria>
Claude memory
Claude also keeps track of your memory through a mini memory management system, maintaining its own user‑based folder in your home directory that is scoped to each project and contains a MEMORY.md inside each one.
This is what memory stored for a project looks like:
~/.claude/projects/<this-project>/memory/
├── MEMORY.md              the list, opens every session
├── how-i-work.md          opens on demand
├── current-launch.md      opens on demand
└── where-things-live.md   opens on demand
You don't organize the MEMORY.md side. Claude picks the topics, writes the notes, decides what goes on the list and what sits in a topic file.
NOTE
Your job is to review: read what Claude has saved, edit anything wrong, delete anything you don't want kept. Nothing more.
Context engineering guide
Here are the 5 layers of how Claude loads context:
- loaded at the start of every session: project-scoped and user-scoped
CLAUDE.mdandMEMORY.mdfiles will always be loaded.- use case: important context about user preferences and what the project is about
- token use: Uses a lot of tokens (5000-7000)
- loaded on navigation: You can have nested CLAUDE.md files that, upon navigation into a directory, it reads instead of just having the root-level CLAUDE.md at the product group. You can also have CLAUDE rules that are only loaded into context concerning certain files that match glob patterns that you defined.
- loaded on demand: Skills, MCP, and subagents use progressive disclosure so that Claude can orchestrate between them and delegate tasks to them, so they're only loaded on demand while their descriptions are the only things that live in context.
- loaded on trigger: The only things that are loaded on trigger are hooks, which you manually set, and commands, which you manually invoke.
- ephemeral: includes conversation history.

Here are the best practices for context engineering:
- keep the
CLAUDE.mdat 16 lines, not 160: Since CLAUDE.md is loaded on every single request, you want to keep this file extremely small. At most 16 lines.- Your root CLAUDE.md should be a badge, not a textbook. Project identity, tech stack, one or two critical rules. Everything else belongs in rules or skills.
Claude agent loop in depth
Claude Skills
Intro
Claude skills are like MCP but just markdown files, whcih based off of that, claude creates some code attached to the skill.
Skills are flexible, project-agnostic, and all around great.
Here are 4 built in skills that claude already uses:
| Skill | ID | Description |
|---|---|---|
| Excel | xlsx | Create and manipulate Excel workbooks with formulas, charts, and formatting |
| PowerPoint | pptx | Generate professional presentations with slides, charts, and transitions |
pdf | Create formatted PDF documents with text, tables, and images | |
| Word | docx | Generate Word documents with rich formatting and structure |
A claude skill is a zip fiel of a directory with one SKILL.md file. This file should:
- Have yaml frontmatter
- Markdown instructions describing the skill
So a claude skill looks like this:
my-skill/
├── SKILL.md          # Required: instructions + metadata
├── scripts/          # Optional: executable code
├── references/       # Optional: documentation
└── assets/           # Optional: templates, resources
Claude chooses to activate a skill in three steps:
- Preload skill: claude loads the name and description of all skills it has available
- Choose relevant skill: Claude chooses a skill that is relevant to the task based off of its metadata. It then loads the entire
SKILL.mdinto its context - Executes skill: Claude executes the skill based on the contents of the
SKILL.md, running any tools or python scripts as appropriate.
Or
- Discovery: At startup, agents load only the name and description of each available skill, just enough to know when it might be relevant.
- Activation: When a task matches a skill’s description, the agent reads the full
SKILL.mdinstructions into context. - Execution: The agent follows the instructions, optionally loading referenced files or executing bundled code as needed.
SKill metadata
Here is an example SKILL.md:
---
name: pdf-processing
description: Extract text and tables from PDF files, fill forms, merge documents. Use when working with PDF files.
allowed-tools: Bash(git:*) Bash(jq:*) Read
---

# PDF Processing

## Quick Start
Use pdfplumber to extract text from PDFs...

## Advanced Usage
For form filling, see [FORMS.md](FORMS.md).
In the yaml frontmatter, describing the metadata of the skill is really important. Here are required properties you have:
name: skill name, < 64 characters, lowercase, numbers, and hyphens only.description: text description of skill, which claude uses to determine the relevance of the skill to a task.
NOTE
A skill body is read only when the skill fires. But once it fires, the body stays in the conversation for the rest of the session. It is not unloaded when the task ends.
Even with progressive disclosure, if you have a lot of skills that still bloats up your context window by wasting 10k tokens to load all the skill front matter.
NOTE
One skill costs nothing. Sixty skills rot your context the same way a bloated CLAUDE.md does, before you have typed a word. And skills that fire on their own are wrong for anything you want to time yourself, like deploying, publishing, or sending an invoice.
Here's a three-step process to add these properties to your front matter, so that you can scope and control when a scope gets loaded.
Here are the optional properties in the frontmatter you have:
allowedTools: a list of claude code tools the skill has approved access for.paths: a list of glob patterns of filepaths that if referenced in the conversation or Claude needs to do some work with files matched by those patterns, then it will activate the skill, as long as the description of the skill also matches the query in similarity.disable-model-invocation: true: ensures that a skill should only run when you deliberately invoke it as a slash command: deploy, publish, invoice, anything outward-facing. You can still run it as a slash command, and other skills can still call it, but Claude will never launch it on its own.user-invocable: falsefor the mirror case: background knowledge Claude should load when relevant, but that is not an action you would ever launch yourself.
NOTE
Skills can use paths: too
description:fires on what you asked.paths:fires on what you are touching. A second door.
Optional Folders and Entire Skills process
Skills should be structured for efficient use of context:
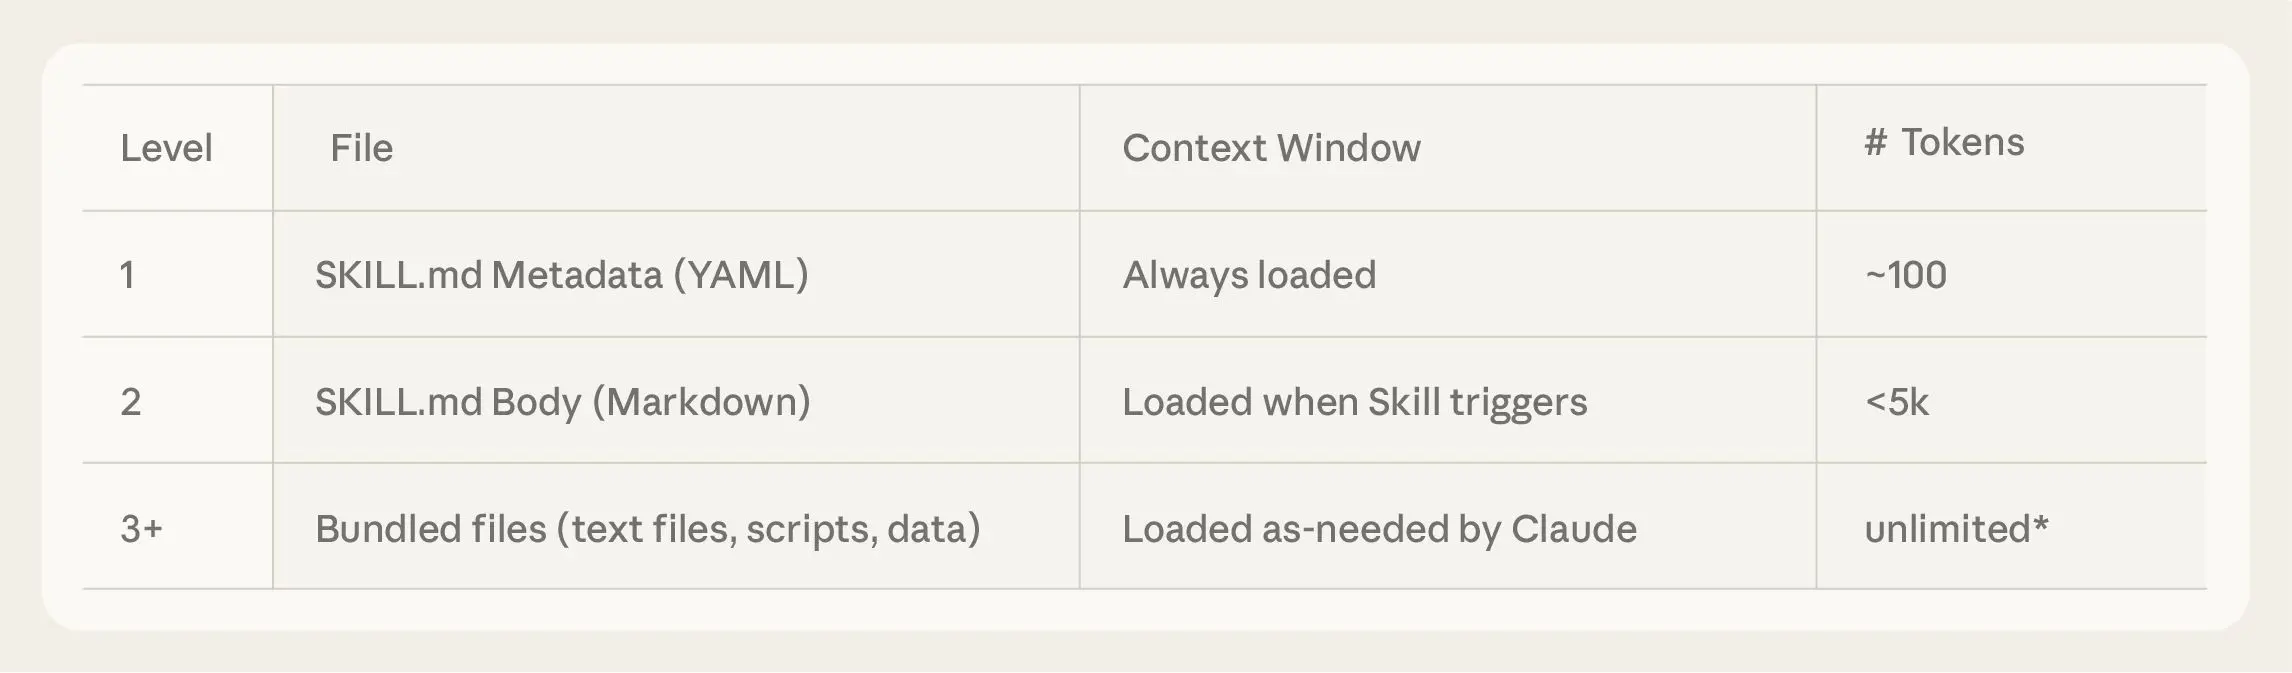
- Metadata (~100 tokens): The
nameanddescriptionfields are loaded at startup for all skills - Instructions (< 5000 tokens recommended): The full
SKILL.mdbody is loaded when the skill is activated - Resources (as needed): Files (e.g. those in
scripts/,references/, orassets/) are loaded only when required
Keep your main SKILL.md under 500 lines. Move detailed reference material to separate files.
Here are the optional subfolders you can have in your skill:
scripts/: folder of coding scripts liek python or bash that act as tools the skill can execute.references/: folder of more detailed markdown files going more into depth on what the skill has, maybe like documentation or something inREFERENCES.md
When referencing other files in your skill, use relative paths from the skill root:
See [the reference guide](references/REFERENCE.md) for details.

Run the extraction script:
scripts/extract.py
Keep file references one level deep from SKILL.md. Avoid deeply nested reference chains.
In summary, this is how progressive disclosure works comapring CLAUDE.md and skills:
CLAUDE.md and rules | skills | |
|---|---|---|
| How the split is declared | A paths: field in the front matter | A markdown link in the body, plus when to follow it |
| Who decides | Claude Code, by matching file paths | Claude, by reading your instruction |
| Unlinked files | Still load if the pattern matches | Never load. Invisible. |
| When to split | As soon as it is bigger than it has to be. No official number | Docs say under 500 lines |
Skill troubleshooting
| What you see | What is actually wrong | Fix |
|---|---|---|
| The skill never fires | Your description lacks the words you use | Rewrite it with your sentences |
| "It is not working" | Wrong folder, or wrong place on disk | /skills to see what is loaded |
| You edited it, nothing changed | Nothing. Reload is immediate | Run it again. If still nothing, it is the description |
| The report is enormous | Nothing. That is a used setup | Fix the top three, re-run |
Skill best practices
- keep description small: Keep the description under 1500 characters. Anything longer than that will be truncated by Claude.
- keep
SKILL.mdfiles below 500 lines of code: keep yourSKILL.mdfiles small and focused. - audit community skills with claude: Do not read every skill in a repo by hand. Give Claude the repository link and ask what is worth taking for your setup. Once it knows your work and the skills you already have, it will tell you that you do not need most of it and point at the one or two pieces that fit. Remember that a skill can be excellent and still be useless to you. Someone else's setup, knowledge, and problems are not yours. That is not a bad skill, it is just not your skill.
Add skills to claude code
The easiest way to add simple SKILL.md files to claude code is to just include them in your system prompt and give the filepaths to the SKILL.md files:
<available_skills>
  <skill>
    <name>pdf-processing</name>
    <description>Extracts text and tables from PDF files, fills forms, merges documents.</description>
    <location>/path/to/skills/pdf-processing/SKILL.md</location>
  </skill>
  <skill>
    <name>data-analysis</name>
    <description>Analyzes datasets, generates charts, and creates summary reports.</description>
    <location>/path/to/skills/data-analysis/SKILL.md</location>
  </skill>
</available_skills>
This was the old way. Now Claude can generate actual skill .md files for you if you just ask it to. It will be registered in the session, and you can even invoke skills via slash commands.
NOTE
Skills are a nice happy medium between commands and normal prompting. Skills allow you to indirectly refer to the skill to be used and also invoke them as a slash command.
Here's an example of prompting Claude to create skill that creates a git commit message from the diff.
Create a project-scoped skill called commit-msg. The workflow:

1. Check that there are staged changes with git diff --staged. If nothing is staged, stop and tell me to stage first.
2. Read the staged diff.
3. Generate a commit message in this format:

   type(scope): short subject

   - bullet of what changed
   - bullet of why

4. Run git commit with that message.

Types: feat, fix, refactor, chore, docs, style, test. Subject under 60 characters. Body bullets optional but encouraged. Never include a Co-Authored-By trailer.

Trigger when I say "write a commit message", "generate a commit", "commit my changes", or run /commit-msg.
A SKILL.md should roughly follow this template:
---
name: my-skill
description: |
  What this skill does. Include specific use cases.
  Use when: (1) first scenario, (2) second scenario
---

# My Skill

Brief description.

## Quick Reference

- **Main workflow**: See instructions below
- **Advanced**: See [ADVANCED.md](references/ADVANCED.md)

## Workflow

1. Parse the request
2. Execute the appropriate action
3. Validate results
4. Return output

## Reference Files

- [API Documentation](references/api.md)
- [Examples](references/examples.md)
CLI vs MCP vs Skills
CLIs are great for simple, stateless operations. MCP is better when you need persistent connections, OAuth flows, or Claude to use the tool autonomously during a conversation.
Converting CLIs to skills
Stripe, Notion, Slack, your internal tools. Any REST API with documentation can become a CLI in minutes. The pattern is universal.
- Point Claude Code at any API's documentation URL and tell it to build a CLI from that. In one prompt, you get argument parsing, authentication, error handling, and formatted output.
Build A CLI called Calendly that wraps the Calendly REST API. API docs are here.

<Enter URL>

 My Calendly API key is stored in the .env file, you can export it into the current shell session. Here are the commands I want.

<Enter commands here>
- Once the CLI is created, ask claude to spin up subagents to smoke test the CLI in the background so that the bias form the current conversation doesn't leak into the its verification of how the script works.

- Create a skill that wraps the CLI
Skill marketplaces
Some repos offer Entire collections of skills rather than just a single one. For this, you can go to CLAUDE code plugin marketplaces.
/plugin marketplace add <owner/repo>
Then you can install specific plugins from that marketplace like so:
/plugin install name
Skill examples
learn-ingest skill
The overall setup process:
- Dump a youtube transcript, text content, URL, etc. and invoke the
/learn-ingestskill manually - Setup google drive and a
RAW/folder in your Obsidian vault and tell the AI to store raw transcripts and URL content you provide it.
To setup gog correctly for your agent, refer to [[10-3rd-party-linux-tools#gog manage google ecosystem]].
Here is how a conversation with the /learn-ingest skill works:
- Invoke the skill and point the agent towards the raw resources available, either from a google drive folder or raw markdown or txt files.

- Select 1 out of 8 actions to do for processing the raw document.

- Run insights to see what actionable tips should get synced to google tasks and flagged for review

- Ensure an organizational structure

Planning skill
A poor boy's version of the grill-me skill by Matt Pocock
Use AskUserQuestion here too if there are genuine decision points in the implementation.

### Phase 5: The Plan

Only now write the actual plan. Structure it based on the domain:

**For coding tasks:**
- Files to create/modify (with specific paths)
- Implementation sequence (what depends on what)
- Testing strategy
- Risks and mitigations

**For content/creative tasks:**
- Core concept and angle
- Structure/outline with key beats
- What makes this different from the obvious version
- Production steps and dependencies

**For business/admin tasks:**
- Decision framework and criteria
- Action items with owners and deadlines
- Dependencies and blockers
- Success metrics and review points

**For any task:**
- What we decided and why
- What we explicitly chose NOT to do
- Open questions that remain
- First concrete next step

## Tone Calibration

**Default: Sparring partner.** Direct, opinionated, treats ideas as drafts.

Phrases to use:
- "I'd push back on that because..."
- "There's a version of this that's simpler..."
- "You're optimizing for X, but I think the real constraint is Y."
- "What if we flipped this — instead of [A], what about [B]?"
- "I notice you haven't mentioned [C]. Is that intentional, or a blind spot?"
- "Before I agree with this direction, convince me that [D] won't be a problem."

Phrases to avoid:
- "Sure, I can help with that!"
- "That's a great approach!"
- "Whatever you prefer."
- "Both options are valid." (take a side)

## Handling $ARGUMENTS

If Mark provides context with the command (e.g., `/marks-plan redesign the auth flow`), use that as the starting input for Phase 1. If no arguments, ask what he wants to plan.

# Question Frameworks by Domain

Reference patterns for AskUserQuestion. Each framework shows the **type of question**, example options with descriptions, and when to use it. Adapt these to the specific context — don't use them verbatim.

## Universal Questions (Use for Any Domain)

### Round 1: Problem Definition

**"What's actually driving this?"** (Root cause vs symptom)
- Options should distinguish between the surface request and deeper motivations
- Example: "Build a dashboard" might really be "I need visibility into X" or "stakeholders keep asking me for Y"

**"What does done look like?"** (Success criteria)
- Options should be concrete and measurable, not vague
- Bad option: "It works well" / Good option: "Users complete the flow in under 30 seconds"

**"What have you already tried or ruled out?"** (Prior art)
- Prevents re-exploring dead ends
- Options: tried nothing yet / tried X and it failed / considered X but dismissed it / inherited someone else's approach

### Round 2: Constraints

**"What's the real constraint here?"** (Time, quality, scope, cost)
- Most people say "all of them" — force a ranking
- Options should make tradeoffs explicit: "Ship in 2 days with rough edges" vs "Take 2 weeks and do it right"

**"Who else does this affect?"** (Blast radius)
- Options: just me / my team / users / external stakeholders
- Changes the approach significantly

---

## Coding & Architecture Questions

### Scope & Approach
- "Should this be a quick fix or a proper refactor?" — Options: patch it (fastest, debt later) / refactor the immediate area / redesign the subsystem / full rewrite of the module
- "How confident are we in the current architecture?" — Options: it's solid, just extend it / it works but has known issues / it's fragile, changes are risky / it needs to be replaced
- "What's the testing situation?" — Options: well-tested, just add cases / some tests, gaps in coverage / no tests, need to add them / tests exist but they're unreliable

### Technical Decisions
- "Where should this logic live?" — Options vary by codebase (frontend/backend/shared/new service)
- "How should we handle the migration?" — Options: big bang / incremental with feature flag / parallel run / backward-compatible addition
- "What's the error handling strategy?" — Options: fail fast and surface / retry with backoff / graceful degradation / queue for manual review

### Scale & Performance
- "What's the expected load?" — Options with specific ranges that change the architecture
- "Do we need this to be real-time?" — Options: real-time / near-real-time (seconds) / eventually consistent (minutes) / batch is fine (hours)

---

## Content & Creative Questions

### Concept & Angle
- "What's the one thing a viewer should walk away with?" — Options should be competing takeaways, not variations of the same one
- "Who is NOT the audience for this?" — Exclusion often clarifies better than inclusion
- "What's the emotional arc?" — Options: curiosity → revelation / frustration → solution / skepticism → proof / confusion → clarity

### Format & Structure
- "How much does the viewer already know?" — Options: complete beginner / knows the basics / intermediate wanting depth / advanced wanting edge cases
- "What's the hook strategy?" — Options tied to specific hook patterns (contrarian, confession, challenge, golden age)
- "Long-form deep dive or punchy highlights?" — Options with specific time ranges and what gets cut

### Differentiation
- "What has everyone else already said about this?" — Forces awareness of the existing content landscape
- "What's the contrarian take you could defend?" — Options should each be a genuinely surprising angle
- "Is this a 'how' video or a 'why' video?" — Options: step-by-step tutorial / conceptual framework / opinion piece / case study

---

## Business & Admin Questions

### Decision Framework
- "What are we optimizing for?" — Options: speed to market / cost reduction / quality improvement / risk mitigation / team capability
- "Who has veto power on this decision?" — Options: just me / my manager / the team / a committee / the client
- "What's the cost of being wrong?" — Options: easily reversible / annoying but fixable / expensive to undo / catastrophic

### Process Design
- "Is this a one-time thing or recurring?" — Changes whether you build a process or just do the thing
- "Where does this break first?" — Options should identify different failure modes
- "What's the manual version of this look like?" — Forces clarity before automating

### Evaluation & Prioritization
- "If you could only do one part of this, which part?" — Forces ruthless prioritization
- "What's the minimum viable version?" — Options should be genuinely different scopes, not just "less features"
- "How will you know this was worth doing?" — Options should be specific metrics or outcomes

---

## Question Sequencing Strategy

**Round 1** (always): Problem definition + success criteria + constraints
**Round 2** (domain-specific): Technical decisions OR creative angle OR business framework
**Round 3** (if needed): Stress-testing the emerging direction, edge cases, risks
**Round 4** (rare): Only if a fundamental assumption shifted and we need to re-evaluate

Between rounds, always share what you've synthesized so far. Don't just ask more questions — show that the previous answers changed your thinking.
Advanced claude tools
Commands
Commands are special markdown files that must live within the .claude/commands folder, and can be used as custom slash commands.
- For example, a
.claude/commands/goal.mdcan be invoked via the/goalslash command, and it acts like a really big prompt to claude, giving it all the markdown content.
NOTE
The main use case of commands is to prompt for repetitive tasks like linting, testing, or adding documentation. You can also do neat stuff like dynamically add arguments and interpolate bash commands in these markdown files.
Skills / Plugins
You can install MCP servers and skills as "plugins" in claude code.
- List all skills claude has access to with
/skillscommand. - Manage plugins (install and delete) by using the
/pluginscommand
To add custom skills to claude code, they should be SKILL.md files within the .claude/skills folder

Tools
Read, Write, Edit, Glob, Grep, Bash, and Agent are the seven core tools. Each gives Claude a specific capability. Knowing which tool it will reach for helps you write better prompts.
Permissions
You can manage permissions for claude using different tools using the /permissions slash command and then choose from three different levels of permissions to set for claude code
- allow: Globs of permissions to always allow.
- ask: Globs of permissions to always ask permission for
- deny: Globs of permissions to always block
For example, a good use case is to always have claude ask before doing a destructive action like git push or rm, so you can add these rules into the "ask" category:
Bash(git push *)
Bash(rm *)
Subagents
Subagents in claude are just several different agents each with their own system prompt and context window that you can tell Claude to invoke, and then delegate prompt work to that subagent.
Claude spins up and delegates three different types of subagents that is has built-in depending on certain use cases:
- explore: subagents that use the
Read,Glob, orGreptools in order to gain context - general purpose: subagents that run off with their own context and process to act on a prompt that the main agent initializes them with.
- bash: delegating thr process of running shell commands to a subagent and having the subagent report back when done.

In each case, the subagent reports back when done.
NOTE
Why subagents? Because having one agent complete one clear focused task is a lot better than context rot and bloat, where we constantly ask our main agent to context switch across different tasks.
IMPORTANT
Focus on giving each agent one clear task
To recap, here are the two main benefits to using subagents:
- to prevent context rot and context switching: Delegating tasks that are not tightly coupled with the main task, like searching up docs and reporting back findings can be delegated to a subagent.
- To realize parallel work: You can spin up multiple subagents with dumb models like claude haiku to do research in parallel or find bugs, etc. faster than you could do with one single agent.
However, there are also two main drawbacks to using subagents, where if you don't follow the best practices, you will fall into them:
- visibility tradeoff: By default, you won't see logs from a subagent, so it's hard to debug them and see if they're handling a task well or not.
- mitigation: add subagent hooks that provide functionality to print out their logs to a console.
- context tradeoff: Subagents don’t have access to the rich context of your conversation with Quad.
- mitigation: use sub‑agents for what they were intended for. Quick one‑off tasks, which do not have tight coupling with the main conversation.
Creating subagents
You can create subagents with the /agents command, and the agent specification is like so:
- storage: agents are stored as markdown files in the
.claude/agentsfolder in your project - tools: You can specify which tools the agent has access to.
- model: You can specify which model the agent should run as.
You can also set agents on the global level:
| Type | Location | Scope | Priority |
|---|---|---|---|
| Project | .claude/agents/ | Available only in the current project | Highest |
| User | ~/.claude/agents/ | Available across all your projects | Lower |
| You can also tell Claude to create subagents for you: |
Create a project-scoped subagent called code-reviewer. It should review the current uncommitted changes in this project and check for:

- Dead code or unused imports
- console.log statements left in
- Missing key props on lists in React
- Accessibility misses (missing alt text, missing aria labels on icon buttons)
- Hardcoded values that should be env vars or constants
- Anything that breaks the patterns in CLAUDE.md

It should produce a markdown report with findings, grouped by severity. It should NOT make any edits — just report.

Trigger it when I say "review my code", "run the reviewer", or /code-reviewer.
Built-in subagents
Claude has these Built-in sub-agents are available; you can refer to them by name, and Claude will invoke them
- explore agent: explores a codebase, can discover app flow. Use this to understand the application flow of a codebase.
Use the Explore agent to map the data flow in this project. Where does the coin data come from? What components consume it? How does state move through the app after our recent refactor? Report back with a summary.
Custom subagents
Here is the basic template of how to create a subagent md file:
---
description: One-line description
model: haiku|sonnet|opus
allowed-tools: [tool list]
hooks:
  post_tool_use:
    - matcher: ToolName
      command: validation command
---

# Agent Name

## Purpose
Detailed explanation.

## Input
$ARGUMENTS - Expected input

## Instructions
1. Step one
2. Step two
3. Step three

## Output Format
How results should look.

## Notes
Edge cases, tips.
You can specify also skills that a subagent can access, as they don't inherit skills from the parent.
---
name: code-reviewer
description: Review code for quality and best practices
skills: pr-review, security-check
---
| Field | Required | Description |
|---|---|---|
name | Yes | A unique identifier for the agent, using lowercase letters and hyphens. |
description | Yes | A natural language description of the agent’s purpose, used by Claude for automatic delegation. |
tools | No | A comma-separated list of specific tools the agent can use. If omitted, it inherits all tools from the main agent, including any connected via MCP servers. |
skills | No | A command-separated list of skill names the agent can have access to. |
hooks | No | Custom hooks to attach to the agent and the bash commands to run on those lifecycle hook triggers. |
Here is the basic flow for creating a subagent and using them optimally:
- Create a subagent
- Create a hook that listens to the
SubAgentStophook and logs out the info so you have complete observability of what a subagent is doing.
Subagent ideas

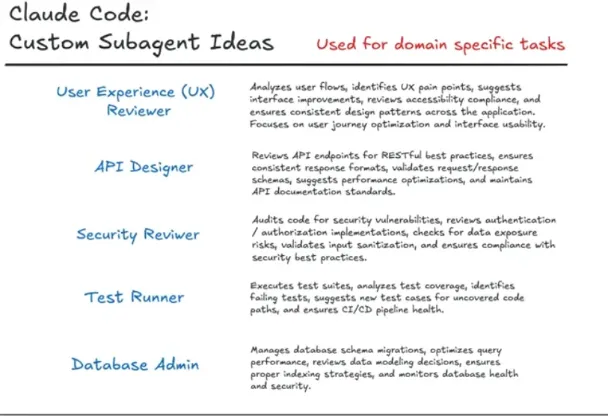
Here are other subagent use cases:
- research agent: Start with research, not code. Ask for a subagent to go and find the best way to do the thing you are about to build, and to write what it finds into a file, for example
docs/research.md. - refactoring, other work: Ask for parallel subagents when the work splits cleanly into pieces that do not depend on each other. On the call: four pages, four subagents, all at once, off one shared design system so they matched.
- security agent: handles security and finds vulnerabilities in the app
- test creator or runner: creates unit tests and runs them
Subagent best practices
- have a clearly defined single purpose: Subagents must follow the single responsibility principle else there is no point to them.
Good: "Reviews code for bugs"
Bad:  "Reviews, tests, and documents"
- specify output: tell the subagent exactly how to format results.
Subagent cookbook
Linting agent
---
description: Runs linting, summarizes issues
model: haiku
allowed-tools: Bash, Read
---

# Lint Runner

## Purpose
Run linter, provide actionable summary.

## Instructions
1. Detect linter (eslint, ruff, etc.)
2. Run on project or specified file
3. Summarize errors vs warnings
4. List top issues

## Output
## Lint Results
**Tool**: [linter]
### Summary
- Errors: [n]
- Warnings: [n]
### Top Issues
1. [rule]: [count] - [explanation]
test runner subagent
---
name: test-runner
description: Runs tests and provides clear summary of results
model: haiku
allowed-tools: Bash, Read, Glob
---

# Test Runner Agent

## Purpose
Detect project's test framework, run tests, summarize results.

## Input
$ARGUMENTS - Optional: specific test file, pattern, or "all"

## Instructions

1. **Detect framework**
   - `package.json` → npm test, jest, vitest
   - `pytest.ini` / `pyproject.toml` → pytest
   - `Cargo.toml` → cargo test
   - `go.mod` → go test

2. **Run tests**
   - Target specific file if given
   - Capture output and exit code

3. **Summarize**
   - Count passed/failed/skipped
   - Extract failure messages
   - Identify failed tests

## Output Format

## Test Results

**Framework**: [name]
**Command**: [command run]
**Status**: PASSED | FAILED | ERROR

### Results
- Passed: [n]
- Failed: [n]
- Skipped: [n]

### Failed Tests
1. **[test name]**
   Error: [message]
   File: [location]

### Next Steps
[Suggestions if failures]
code reviewer subagent
---
name: code-reviewer
description: Reviews code with clear, beginner-friendly feedback
model: sonnet
allowed-tools: Read, Glob, Grep
---

# Code Reviewer Agent

## Purpose
Review code and provide constructive feedback. Explain issues clearly without jargon.

## Input
$ARGUMENTS - File path, recent changes, or specific concern

## Instructions

1. **Identify target**
   - File path → read that file
   - "recent changes" → use `git diff`
   - No target → ask what to review

2. **Review for**
   - Readability: Easy to understand?
   - Bugs: Obvious errors or edge cases?
   - Best Practices: Common patterns followed?
   - Naming: Clear variable/function names?

3. **Provide feedback**
   - Simple language, no jargon
   - Explain WHY, not just WHAT
   - Suggest specific fixes
   - Note what's done well

## Output Format

## Code Review Summary

### What's Working Well
- [Positive points]

### Suggestions

#### 1. [Category]
**Where**: [file:line]
**Issue**: [Clear explanation]
**Why it matters**: [Impact]
**Suggestion**: [Specific fix]

### Quick Wins
- [Easy improvements]
document generator subagent
---
name: doc-generator
description: Generates clear documentation from code
model: sonnet
allowed-tools: Read, Glob, Write
---

# Documentation Generator Agent

## Purpose
Generate clear documentation for code files or modules.

## Input
$ARGUMENTS - File path, function name, or "module" for overview

## Instructions

1. **Understand scope**
   - Single file: Document purpose + key functions
   - Function: Find and document that function
   - Module: Create structure overview

2. **Analyze code**
   - Understand purpose and flow
   - Identify public API vs helpers
   - Note dependencies
   - Check existing docs

3. **Generate docs**

   **For functions:**
   - Purpose (one sentence)
   - Parameters (name, type, description)
   - Return value
   - Example usage

   **For files/modules:**
   - Overview
   - Key exports
   - Usage examples
   - Dependencies

4. **Write documentation**
   - Clear, simple language
   - Include code examples
   - Match existing doc style

## Output Format

```
## Documentation Generated

**Scope**: [what documented]
**Output**: [where written]

### Summary
[What was documented]

### Files Created/Modified
- [list]
```
Hooks
Claude hooks are bash commands that run at different lifecycle moments such as session start, pre compact, and on stop. Key moments include startup, resume, clear, and various tool use stages like pre tool use and post tool use.
NOTE
You can check all registered hooks with the /hooks command.
If you want to create a claude command that can easily create hooks for you, use this command:
Here is a typescript SDK for creating claude commands:
You can specify the events to listen to and a file to run on those events, and you do all this from a json file. These are the lifecycle hooks you can listen for:
- PreToolUse: This hook runs before a tool (like
edit_fileorBash) is executed.- It is the most powerful point of control for preventative measures and is the only event that can proactively block a tool’s execution.
- PostToolUse: This hook runs after a tool has successfully completed. It’s ideal for reactive tasks like automatic formatting, running tests, or logging.
- It cannot block execution but can provide feedback to Claude.
- Notification: This hook triggers whenever Claude Code sends a notification to the user, for example, when it’s waiting for input or has completed a long task.
- It is purely informational and cannot block execution.
- Stop: This hook runs when the main Claude Code agent finishes responding.
- It can be configured to prevent the agent from terminating, forcing it to continue working until a specific condition is met.
- SubagentStop: This hook runs when a sub-agent task completes its work. Like the
Stophook, it can block the sub-agent from stopping.

You specify hooks in JSON in the .claude/settings.local.json under the "hooks" key:
"matcher": the tools to match on"hooks": the files to run when matched
{
  "hooks": {
    "PreToolUse": [
      {
        "matcher": "Bash",
        "hooks": [
          {
            "type": "command",
            "command": "jq -r '\\(.tool_input.command) - \\(.tool_input.description // \"No description\")' >> ~/.claude/bash-command-log.txt"
          }
        ]
      }
    ]
  }
}
Hooks receive JSON data via standard input (stdin) that provides session information and event-specific data, such as session_id, transcript_path, and tool_name.
They communicate status back to Claude Code primarily through shell exit codes and, for more advanced control, structured JSON output to stdout.
- Exit Code 0: Indicates success. Any output to stdout is shown to the user in the transcript, but not to the model.
- Exit Code 2: Signals a blocking error. This tells Claude Code to halt the current action (for
PreToolUsehooks) and processes the feedback fromstderras new input for Claude to understand the error and adjust its plan. It is crucial that error messages for blocking errors are sent tostderr. - Other Non-Zero Exit Codes: Indicate a non-blocking error. The hook failed, but execution continues. The error message from
stderris shown to the user, but not to Claude.
NOTE
This means since hooks provide parameters in a deterministic format, we can programatically do stuff with those inputs in another program, like a python or bash script.
For more examples on how to use hooks, look here:
custom hook: deny dangerous commands
This hook is used to deny dangerous commands like rm -rf or curling to a non HTTPS string.
"hooks": {
    "PreToolUse": [
      {
        "matcher": "Bash",
        "hooks": [
          {
            "type": "command",
            "command": ".claude/hooks/pre-bash-firewall.sh"
          }
        ]
      }
    ]
  }
#!/usr/bin/env bash
set -euo pipefail

# stdin: JSON with .tool_input.command
cmd=$(jq -r '.tool_input.command // ""')

# Block list (add as needed)
deny_patterns=(
  'rm\s+-rf\s+/'
  'git\s+reset\s+--hard'
  'curl\s+http'
)

for pat in "${deny_patterns[@]}"; do
  if echo "$cmd" | grep -Eiq "$pat"; then
    echo "Blocked command: matches denied pattern '$pat'. Use a safer alternative or explain why it's necessary." 1>&2
    exit 2
  fi
done

exit 0
custom hook: write bash commands to a log
#!/usr/bin/env bash
set -euo pipefail
cmd=$(jq -r '.tool_input.command // ""')
printf '%s %s\n' "$(date -Is)" "$cmd" >> .claude/bash-commands.log
exit 0
custom hook: write subagent logs to a log
- Set up the
.claude/settings.jsonand target thehooks.SubagentStophook, running a Python file on that hook trigger.
{
  "hooks": {
    "SubagentStop": [
      {
        "matcher": "",
        "hooks": [
          {
            "type": "command",
            "command": "python .claude/hooks/subagent-logger.py"
          }
        ]
      }
    ]
  }
}
- In the Python file run this code to create a log file and append logs to it
#!/usr/bin/env python3
"""
SubagentStop Hook - Logs subagent activity to JSON file.
Triggered when any subagent completes.
Logs to: logs/subagent-activity.json
"""

import sys
import json
from pathlib import Path
from datetime import datetime

LOG_FILE = Path("logs/subagent-activity.json")


def ensure_log_file():
    """Create log file and directory if needed."""
    LOG_FILE.parent.mkdir(parents=True, exist_ok=True)
    if not LOG_FILE.exists():
        LOG_FILE.write_text("[]")


def append_log_entry(entry: dict):
    """Append entry to log, keeping last 100."""
    ensure_log_file()
    try:
        logs = json.loads(LOG_FILE.read_text())
    except (json.JSONDecodeError, FileNotFoundError):
        logs = []
    logs.append(entry)
    if len(logs) > 100:
        logs = logs[-100:]
    LOG_FILE.write_text(json.dumps(logs, indent=2))


def main():
    try:
        hook_input = json.loads(sys.stdin.read())
        session_id = hook_input.get("session_id", "unknown")
        task = hook_input.get("task_description", hook_input.get("description", "Subagent task"))
        result = hook_input.get("result", "")
        if isinstance(result, dict):
            result = result.get("summary", str(result)[:200])
        elif isinstance(result, str) and len(result) > 200:
            result = result[:200] + "..."
        duration_ms = hook_input.get("duration_ms")
        duration_sec = round(duration_ms / 1000, 1) if duration_ms else None
        error = hook_input.get("error")
        status = "error" if error else "completed"

        entry = {
            "timestamp": datetime.now().isoformat(),
            "session_id": session_id,
            "task": task[:100] if task else "Unknown",
            "status": status,
            "duration_seconds": duration_sec,
            "result_preview": result[:150] if result else None
        }
        if error:
            entry["error"] = str(error)[:200]

        append_log_entry(entry)
    except Exception as e:
        print(f"Subagent logger warning: {e}", file=sys.stderr)
    sys.exit(0)


if __name__ == "__main__":
    main()
Full fledged hook library
We can create our own CLAUDE code hooks library by first defining all the file paths we want to protect from reading and writing, and we can do that in YAML.
Then we create a Python enforcer file that basically enforces that the current path is a secure one to read from and not in the block list.
- Define the protected filepaths for reading and writing with YAML syntax and then point to an "enforcer" code script that uses code to actually apply logic and side effects to the hooks

# =============================================================================
# Security Patterns Configuration
# =============================================================================
# Used by damage-control hooks to block dangerous operations
# =============================================================================
#
# PROTECTION LEVELS:
# ------------------
# Each pattern can have one of two behaviors:
#
#   1. BLOCK (default) - Stops execution immediately
#      - pattern: '\brm\s+-rf\b'
#        reason: Recursive force delete
#        # No "ask" field = BLOCKED
#
#   2. ASK - Prompts user for confirmation
#      - pattern: '\bgit\s+checkout\s+\.'
#        reason: Discards changes
#        ask: true  # ← User can approve or deny
#
# To customize:
#   - Add "ask: true" to any pattern to get confirmation prompts
#   - Remove "ask: true" (or set to false) to enforce blocking
#
# See guides/protection-levels.md for full documentation.
# =============================================================================

# === BASH TOOL PATTERNS (~30 patterns) ===
# Patterns that trigger blocking or confirmation for bash commands
# Default behavior: BLOCK (unless "ask: true" is specified)
bashToolPatterns:
  # --- FILE DESTRUCTION (10 patterns) ---
  - pattern: '\brm\s+(-[^\s]*)*-[rRf]'
    reason: rm with recursive or force flags - could delete entire directories

  - pattern: '\brm\s+-rf\s+/'
    reason: rm -rf on root paths - extremely dangerous

  - pattern: '\bfind\b.*-delete\b'
    reason: find with -delete can remove many files silently

  - pattern: '\bfind\b.*-exec\s+rm\b'
    reason: find with rm execution - bulk deletion

  - pattern: '\bshred\b'
    reason: shred permanently destroys file contents

  - pattern: '\bdocker\s+system\s+prune\b.*-a'
    reason: removes all unused Docker resources
    ask: true

# === ZERO ACCESS PATHS ===
# Never read, write, or execute - complete lockout
zeroAccessPaths:
  - ".env"
  - ".env.*"
  - "*.env"
  - "~/.ssh/"
  - "~/.aws/"
  - "~/.gnupg/"
  - "*.pem"
  - "*.key"
  - "*-adminsdk*.json"
  - "firebase-adminsdk*.json"
  - "service-account*.json"
  - "credentials.json"
  - "secrets.yaml"
  - "secrets.json"
  - ".npmrc"
  - ".pypirc"

# === READ ONLY PATHS ===
# Can read, cannot modify
readOnlyPaths:
  - "/etc/"
  - "~/.bashrc"
  - "~/.zshrc"
  - "~/.bash_profile"
  - "~/.profile"
  - "package-lock.json"
  - "yarn.lock"
  - "pnpm-lock.yaml"
  - "Gemfile.lock"
  - "poetry.lock"
  - "Cargo.lock"
  - "composer.lock"
  - "*.lock"

# === NO DELETE PATHS ===
# Can read and modify, cannot delete
noDeletePaths:
  - ".claude/"
  - ".git/"
  - "README.md"
  - "LICENSE"
  - "CHANGELOG.md"
  - ".gitignore"
- Then you can create a hook that prevents writing to any of the
zeroAccessPathsorreadOnlyPaths:
#!/usr/bin/env python3
# /// script
# requires-python = ">=3.8"
# dependencies = ["pyyaml"]
# ///
"""
Write Tool Guard - PreToolUse Hook

Blocks writes to protected files (zeroAccess and readOnly paths).

Exit codes:
  0 = Allow
  2 = Block
"""

import json
import sys
import re
import os
from pathlib import Path

try:
    import yaml
except ImportError:
    sys.exit(0)


def load_patterns():
    script_dir = Path(__file__).parent
    patterns_file = script_dir / "patterns.yaml"

    if not patterns_file.exists():
        return {}

    with open(patterns_file, "r", encoding="utf-8") as f:
        return yaml.safe_load(f) or {}


def expand_path(path: str) -> str:
    return os.path.expanduser(os.path.expandvars(path))


def matches_protected_path(file_path: str, patterns: list) -> tuple:
    file_path = expand_path(file_path)

    for pattern in patterns:
        expanded = expand_path(pattern)

        if "*" in pattern:
            regex_pattern = pattern.replace(".", r"\.").replace("*", ".*")
            if re.search(regex_pattern, file_path, re.IGNORECASE):
                return True, pattern
        else:
            if expanded in file_path or pattern in file_path:
                return True, pattern
            if file_path.endswith(pattern) or file_path.endswith(pattern.rstrip("/")):
                return True, pattern

    return False, None


def main():
    try:
        input_data = json.load(sys.stdin)
    except json.JSONDecodeError:
        sys.exit(0)

    tool_name = input_data.get("tool_name", "")

    if tool_name != "Write":
        sys.exit(0)

    tool_input = input_data.get("tool_input", {})
    file_path = tool_input.get("file_path", "")

    if not file_path:
        sys.exit(0)

    config = load_patterns()

    # Check zero access paths
    matched, pattern = matches_protected_path(file_path, config.get("zeroAccessPaths", []))
    if matched:
        print(f"BLOCKED: Cannot write to protected file matching: {pattern}", file=sys.stderr)
        sys.exit(2)

    # Check read-only paths
    matched, pattern = matches_protected_path(file_path, config.get("readOnlyPaths", []))
    if matched:
        print(f"BLOCKED: Cannot write to read-only file matching: {pattern}", file=sys.stderr)
        sys.exit(2)

    sys.exit(0)


if __name__ == "__main__":
    main()
- And this one that protects from reading any of the.
#!/usr/bin/env python3
# /// script
# requires-python = ">=3.8"
# dependencies = ["pyyaml"]
# ///
"""
Edit Tool Guard - PreToolUse Hook

Blocks edits to protected files (zeroAccess and readOnly paths).

Exit codes:
  0 = Allow
  2 = Block
"""

import json
import sys
import re
import os
from pathlib import Path

try:
    import yaml
except ImportError:
    sys.exit(0)


def load_patterns():
    script_dir = Path(__file__).parent
    patterns_file = script_dir / "patterns.yaml"

    if not patterns_file.exists():
        return {}

    with open(patterns_file, "r", encoding="utf-8") as f:
        return yaml.safe_load(f) or {}


def expand_path(path: str) -> str:
    return os.path.expanduser(os.path.expandvars(path))


def matches_protected_path(file_path: str, patterns: list) -> tuple:
    """Check if file matches any protected pattern."""
    file_path = expand_path(file_path)

    for pattern in patterns:
        expanded = expand_path(pattern)

        if "*" in pattern:
            regex_pattern = pattern.replace(".", r"\.").replace("*", ".*")
            if re.search(regex_pattern, file_path, re.IGNORECASE):
                return True, pattern
        else:
            if expanded in file_path or pattern in file_path:
                return True, pattern
            if file_path.endswith(pattern) or file_path.endswith(pattern.rstrip("/")):
                return True, pattern

    return False, None


def main():
    try:
        input_data = json.load(sys.stdin)
    except json.JSONDecodeError:
        sys.exit(0)

    tool_name = input_data.get("tool_name", "")

    if tool_name != "Edit":
        sys.exit(0)

    tool_input = input_data.get("tool_input", {})
    file_path = tool_input.get("file_path", "")

    if not file_path:
        sys.exit(0)

    config = load_patterns()

    # Check zero access paths
    matched, pattern = matches_protected_path(file_path, config.get("zeroAccessPaths", []))
    if matched:
        print(f"BLOCKED: Cannot edit protected file matching: {pattern}", file=sys.stderr)
        sys.exit(2)

    # Check read-only paths
    matched, pattern = matches_protected_path(file_path, config.get("readOnlyPaths", []))
    if matched:
        print(f"BLOCKED: Cannot edit read-only file matching: {pattern}", file=sys.stderr)
        sys.exit(2)

    sys.exit(0)


if __name__ == "__main__":
    main()
- And this one that prevents from running any of the bash commands listed in the.
#!/usr/bin/env python3
# /// script
# requires-python = ">=3.8"
# dependencies = ["pyyaml"]
# ///
"""
Bash Tool Guard - PreToolUse Hook

Blocks dangerous bash commands before execution.
Checks: bashToolPatterns, zeroAccessPaths, readOnlyPaths, noDeletePaths

Exit codes:
  0 = Allow
  0 + JSON {"decision": "ask"} = Request confirmation
  2 = Block (stderr sent to Claude)
"""

import json
import sys
import re
import os
from pathlib import Path

try:
    import yaml
except ImportError:
    print("PyYAML not installed. Run: pip install pyyaml", file=sys.stderr)
    sys.exit(0)


def load_patterns():
    """Load patterns from patterns.yaml in same directory as script."""
    script_dir = Path(__file__).parent
    patterns_file = script_dir / "patterns.yaml"

    if not patterns_file.exists():
        return {}

    with open(patterns_file, "r", encoding="utf-8") as f:
        return yaml.safe_load(f) or {}


def expand_path(path: str) -> str:
    """Expand ~ and environment variables in path."""
    return os.path.expanduser(os.path.expandvars(path))


def matches_path_pattern(command: str, patterns: list) -> tuple:
    """Check if command accesses any protected path. Returns (matched, pattern)."""
    for pattern in patterns:
        expanded = expand_path(pattern)

        # Handle glob patterns
        if "*" in pattern:
            # Convert glob to regex
            regex_pattern = pattern.replace(".", r"\.").replace("*", ".*")
            if re.search(regex_pattern, command, re.IGNORECASE):
                return True, pattern
        else:
            # Direct path match
            if expanded in command or pattern in command:
                return True, pattern

    return False, None


def check_command(command: str, config: dict) -> dict:
    """
    Check command against all patterns.
    Returns: {"allow": True/False, "ask": True/False, "reason": str}
    """
    # Check bash tool patterns
    for item in config.get("bashToolPatterns", []):
        pattern = item.get("pattern", "")
        reason = item.get("reason", "Matched blocked pattern")
        ask = item.get("ask", False)

        try:
            if re.search(pattern, command, re.IGNORECASE):
                if ask:
                    return {"allow": False, "ask": True, "reason": reason}
                else:
                    return {"allow": False, "ask": False, "reason": reason}
        except re.error:
            continue

    # Check zero access paths (block completely)
    matched, pattern = matches_path_pattern(command, config.get("zeroAccessPaths", []))
    if matched:
        return {
            "allow": False,
            "ask": False,
            "reason": f"Access to protected path blocked: {pattern}"
        }

    # Check read-only paths (block modifications)
    modification_indicators = ["rm ", "mv ", ">", ">>", "tee ", "sed -i", "chmod ", "chown "]
    for indicator in modification_indicators:
        if indicator in command:
            matched, pattern = matches_path_pattern(command, config.get("readOnlyPaths", []))
            if matched:
                return {
                    "allow": False,
                    "ask": False,
                    "reason": f"Modification of read-only path blocked: {pattern}"
                }

    # Check no-delete paths
    deletion_indicators = ["rm ", "rmdir ", "unlink ", "del "]
    for indicator in deletion_indicators:
        if indicator in command:
            matched, pattern = matches_path_pattern(command, config.get("noDeletePaths", []))
            if matched:
                return {
                    "allow": False,
                    "ask": False,
                    "reason": f"Deletion of protected path blocked: {pattern}"
                }

    return {"allow": True, "ask": False, "reason": ""}


def main():
    try:
        input_data = json.load(sys.stdin)
    except json.JSONDecodeError:
        sys.exit(0)  # Allow on parse error

    tool_name = input_data.get("tool_name", "")

    if tool_name != "Bash":
        sys.exit(0)  # Only check Bash tool

    tool_input = input_data.get("tool_input", {})
    command = tool_input.get("command", "")

    if not command:
        sys.exit(0)

    config = load_patterns()
    result = check_command(command, config)

    if result["allow"]:
        sys.exit(0)
    elif result["ask"]:
        # Request user confirmation
        output = {
            "decision": "ask",
            "reason": result["reason"]
        }
        print(json.dumps(output))
        sys.exit(0)
    else:
        # Block the command
        print(f"BLOCKED: {result['reason']}", file=sys.stderr)
        sys.exit(2)


if __name__ == "__main__":
    main()
- This is a post‑tool‑use hook that verifies the output of a Bash command does not perform sensitive actions, such as leaking an API key.
#!/usr/bin/env python3
# /// script
# requires-python = ">=3.8"
# ///
"""
Bash Output Validator - PostToolUse Hook

Scans command output for accidentally exposed secrets/credentials.
Provides rotation guidance when secrets are detected.

Exit codes:
  0 = Always (PostToolUse hooks observe, don't block)

Output: Warning message to stderr when secrets detected
"""

import json
import sys
import re


# Secret detection patterns with provider info
SECRET_PATTERNS = [
    {
        "pattern": r"sk-ant-[A-Za-z0-9\-_]{20,}",
        "name": "Anthropic API Key",
        "rotate_url": "console.anthropic.com/settings/keys"
    },
    {
        "pattern": r"sk-[A-Za-z0-9]{48,}",
        "name": "OpenAI API Key",
        "rotate_url": "platform.openai.com/api-keys"
    },
    {
        "pattern": r"ghp_[A-Za-z0-9]{36}",
        "name": "GitHub Personal Access Token",
        "rotate_url": "github.com/settings/tokens"
    },
    {
        "pattern": r"gho_[A-Za-z0-9]{36}",
        "name": "GitHub OAuth Token",
        "rotate_url": "github.com/settings/tokens"
    },
    {
        "pattern": r"AKIA[A-Z0-9]{16}",
        "name": "AWS Access Key ID",
        "rotate_url": "console.aws.amazon.com/iam"
    },
    {
        "pattern": r"-----BEGIN (RSA |EC |DSA |OPENSSH )?PRIVATE KEY-----",
        "name": "Private Key",
        "rotate_url": "Generate new key pair and update all services"
    },
    {
        "pattern": r"Bearer\s+[A-Za-z0-9\-_\.]{20,}",
        "name": "Bearer Token",
        "rotate_url": "Rotate at the issuing service"
    },
    {
        "pattern": r"xox[baprs]-[A-Za-z0-9\-]{10,}",
        "name": "Slack Token",
        "rotate_url": "api.slack.com/apps"
    },
    {
        "pattern": r"sq0[a-z]{3}-[A-Za-z0-9\-_]{22,}",
        "name": "Square Access Token",
        "rotate_url": "developer.squareup.com/apps"
    },
    {
        "pattern": r"stripe[_-]?[a-z]*[_-]?key['\"]?\s*[:=]\s*['\"]?[a-zA-Z0-9_\-]{20,}",
        "name": "Stripe API Key",
        "rotate_url": "dashboard.stripe.com/apikeys"
    },
]

# Generic patterns (lower confidence)
GENERIC_PATTERNS = [
    {
        "pattern": r"['\"]?password['\"]?\s*[:=]\s*['\"][^'\"]{8,}['\"]",
        "name": "Hardcoded Password",
        "rotate_url": "Change the password immediately"
    },
    {
        "pattern": r"['\"]?api[_-]?key['\"]?\s*[:=]\s*['\"][A-Za-z0-9\-_]{20,}['\"]",
        "name": "Generic API Key",
        "rotate_url": "Identify the service and rotate the key"
    },
]


def scan_for_secrets(content: str) -> list:
    """Scan content for secret patterns. Returns list of findings."""
    findings = []

    # High confidence patterns first
    for item in SECRET_PATTERNS:
        try:
            if re.search(item["pattern"], content, re.IGNORECASE):
                findings.append({
                    "name": item["name"],
                    "rotate_url": item["rotate_url"],
                    "confidence": "high"
                })
        except re.error:
            continue

    # Generic patterns (only if no high-confidence matches)
    if not findings:
        for item in GENERIC_PATTERNS:
            try:
                if re.search(item["pattern"], content, re.IGNORECASE):
                    findings.append({
                        "name": item["name"],
                        "rotate_url": item["rotate_url"],
                        "confidence": "medium"
                    })
            except re.error:
                continue

    return findings


def format_warning(findings: list) -> str:
    """Format warning message with rotation guidance."""
    lines = [
        "",
        "=" * 60,
        "  SECURITY ALERT: Possible credentials exposed in output!",
        "=" * 60,
        "",
        "Detected:",
    ]

    for f in findings:
        lines.append(f"  - {f['name']} (confidence: {f['confidence']})")

    lines.extend([
        "",
        "IMMEDIATE ACTIONS:",
        "  1. Rotate this credential immediately",
        "  2. Check if this was committed to git (git log -p | grep <key>)",
        "  3. Review who has access to this terminal/logs",
        "",
        "ROTATION LINKS:",
    ])

    for f in findings:
        lines.append(f"  - {f['name']}: {f['rotate_url']}")

    lines.extend([
        "",
        "BEST PRACTICES:",
        "  - Store secrets in .env files (add .env to .gitignore)",
        "  - Use environment variables, not hardcoded values",
        "  - Never commit secrets to version control",
        "  - Use secret managers for production (AWS Secrets Manager, etc.)",
        "",
        "=" * 60,
        ""
    ])

    return "\n".join(lines)


def main():
    try:
        input_data = json.load(sys.stdin)
    except json.JSONDecodeError:
        sys.exit(0)

    tool_name = input_data.get("tool_name", "")

    # Extract content based on tool type
    if tool_name == "Bash":
        tool_output = input_data.get("tool_output", {})
        stdout = str(tool_output.get("stdout", ""))
        stderr = str(tool_output.get("stderr", ""))
        content = stdout + "\n" + stderr
    elif tool_name == "Read":
        tool_output = input_data.get("tool_output", {})
        # Read tool output is typically a string (file content) or has a content field
        if isinstance(tool_output, str):
            content = tool_output
        else:
            content = str(tool_output.get("content", tool_output.get("output", "")))
    else:
        sys.exit(0)

    if not content.strip():
        sys.exit(0)

    findings = scan_for_secrets(content)

    if findings:
        warning = format_warning(findings)
        print(warning, file=sys.stderr)

    # PostToolUse hooks always exit 0 (observe, don't block)
    sys.exit(0)


if __name__ == "__main__":
    main()
And of course, this is what the overall hooks configuration settings looks like:
{
  "hooks": {
    "PreToolUse": [
      {
        "matcher": "Bash",
        "hooks": [
          {
            "type": "command",
            "command": "uv run .claude/hooks/damage-control/bash-tool-guard.py",
            "timeout": 5000
          }
        ]
      },
      {
        "matcher": "Edit",
        "hooks": [
          {
            "type": "command",
            "command": "uv run .claude/hooks/damage-control/edit-tool-guard.py",
            "timeout": 5000
          }
        ]
      },
      {
        "matcher": "Write",
        "hooks": [
          {
            "type": "command",
            "command": "uv run .claude/hooks/damage-control/write-tool-guard.py",
            "timeout": 5000
          }
        ]
      }
    ],
    "PostToolUse": [
      {
        "matcher": "Bash",
        "hooks": [
          {
            "type": "command",
            "command": "uv run .claude/hooks/damage-control/bash-output-validator.py",
            "timeout": 5000
          }
        ]
      }
    ]
  }
}
Claude with MCP
Playwright MCP
- Install playwright MCP like so:
claude mcp add -s user playwright -- npx @playwright/mcp@latest
- Ask claude to open your project at a specific port using playwright and test it, like so:
Use Playwright to open the project and then click the star icon on the first coin in the list. Then click the favorites filter. Tell me if the starred coin is the only one showing, and take a screenshot.
Claude config
The claude config file lives here:
- global:
~/.claude/settings.json - local:
.claude/settings.local.json
Permissions for tools
At the project or global level, you can set which tools claude does and doesn't need permission for:
{
  "permissions": {
    "allow": [
      "WebSearch",
      "WebFetch"
      "Bash(git add:*)"
    ],
    "deny": [],
    "ask": []
  }
}
MCP
You can add MCP config in a .mcp.json in the current directory, which claude can access and load the MCP servers from.
It should be in this format:
{
  "mcpServers": {
    "github": {
      "type": "http",
      "url": "https://api.githubcopilot.com/mcp/",
      "headers": {
        "Authorization": "Bearer <ACCESS_TOKEN_HERE>"
      }
    }
  }
}
Here are some important things to keep in mind:
- The
typeproperty is required in MCP configuration with claude, and should be one of these three types:"http": HTTP transport server"stdio": locally running STDIO transport server"sse": SSE transport server
The access token must be valid and scoped correctly, having at least the repo permissions.
Here's an example of my favoriute MCP setuo:
"mcpServers": {
"playwright": {
  "type": "stdio",
  "command": "npx",
  "args": [
	"@playwright/mcp@latest"
  ],
  "env": {}
},
"context7": {
  "type": "http",
  "url": "https://mcp.context7.com/mcp",
  "headers": {
	"CONTEXT7_API_KEY": "apikeyhere"
  }
}
},
Claude code for coding
Process - Claude code planning workflow
Feature by feature
-
Start each task with a plan file
-
Create or designate a
plans/folder in your repo (e.g.plans/feature-query-builder.md). -
Ask the AI to write a plan into that file, not to write code yet.
-
-
Prompt the AI to draft the plan
Use a prompt along the lines of- “Here is the feature I want. Create a detailed implementation plan and write it into
plans/feature-X.md. Include: restated requirements, architecture, file-level changes, pseudo-code, and test/lint/type-check commands.”
- “Here is the feature I want. Create a detailed implementation plan and write it into
-
Review and edit the plan with the AI
-
Read the plan and comment like you would on a junior engineer’s design doc (e.g. “route naming is off”, “missing auth checks”, “doesn’t match existing patterns”).
-
Ask the AI to revise the plan until it matches how you actually want to build the feature.
-
-
Implement strictly from the plan
-
Once happy, say: “Now follow the plan in
plans/feature-X.mdand implement the changes step by step.” -
When things change, first update the plan file, then implement according to the updated plan.
-
-
Keep the plan as a living document
-
Whenever tests fail or requirements shift, tell the AI: “Update
plans/feature-X.mdto reflect what we’ve learned, then adjust the implementation.” -
For new related features, point the AI at existing plan files so it keeps architecture consistent.
-
After finishing this process, clear your context with /clear to then start on a new feature, and then refer to the living document for Claude to load up its context on the project on the next conversation
Creating living documents
A living document refers to a way you can store the context of a session and summarize it so that you can load it later into Claude to retrieve that context.
Here are some ideas you can use to create living documents:
- ask Claude to summarize the session: Prompt cloud with a prompt like this. In order for it to summarize the current session and save it to a markdown file:
Can you summarize what we've done and put it into a `context/sessions.md`?
- summarize the plan, not the action: Ask Claude to save the current plan state to a GitHub Issue before clearing the context. This lets you save the context of the plan rather than the implementation, which is mostly what you wnat.
- use memcrate: Use a third party library like memcrate to save your messages and sessions to a vault that you can then load on the fly with claude code commands the library installs for you.
Living document: save to github issue.
Ask Claude to save the current plan state to a GitHub Issue before clearing the context.
Step A: Save State
"Make a GitHub issue containing the current plan, checking off the items we have already completed."
Claude runs gh issue create automatically.
Step B: Reset & Resume
/clear "Get GitHub issue #24 and enact Phase 4 of that plan."
Claude reads the issue from GitHub, sees where it left off, and resumes work with a fresh context window.
Living document: save to memcrate
First install memcrate like so:
curl -fsSL https://memcrate.dev/install.sh | sh
memcrate init ~/vaults
memcrate setup
memcrate install claude-code
You can now use these two commands to save and load session context:
/save: saves the session context to the vault/load <project-name>: loads the context associated with a specific project from a vault
Refactoring code
Use these prompts to refactor code:
Module refactoring
refactor this for Readability and maintainability. Split it into focused ES modules. Keep the output identical and don’t add any dependencies.
Refactor to use zustand or context
Spec-driven development with Claude
Spec-driven development refers to having Claude make implementation plans, saving them to Markdown files, and then asking Claude to build a solution or feature from those implementation plans and verify wiith unit testing via vitest and E2E testing via playwright.
This is basically what the creator of Claude Code, Boris Cherny does.

But roughly this is how it works:
- plan: Use the
/EA-plancommand to create a spec file, and save that spec file in the project - build: Tell claude to build out the plan with
/EA-build - validator: Create test runner subagents - one for unit tests and one for E2E tests - that get triggered on the agent's
PostToolUsehook and then runs the test suite, returning the results to the main agent and then the main agent fixes the problems, and the loop keeps triggering the subagent until all tests pass and the main agent thinks it's good to go.
Agent does work
      ↓
Hook automatically validates
      ↓
Issues caught immediately
      ↓
Agent fixes problems
      ↓
You get quality output
- review: spin up a subagent to review the code or run
/EA-review - commit: commit the code with
/EA-commit
To this end, we create custom commands, hooks, and sub‑agents to help us complete the spec‑driven development in this opinionated format.
/EA-plan "Add search functionality to product list"
/EA-build specs/todo/add-search.md
/EA-validate
/EA-review specs/done/add-search.md
/EA-commit "feat: add product search functionality"
Step 1: planning and building
Here's an example spec template:
# [Feature Name]

## Problem Statement

[What problem does this feature solve? Why are we building it?]

## Objectives

1. [Primary objective]
2. [Secondary objective]
3. [Additional objectives if any]

## Technical Approach

### Overview

[High-level description of how we'll solve this]

### Architecture

[Any architectural decisions or patterns we'll use]

### Key Components

1. **[Component 1]**: [Description]
2. **[Component 2]**: [Description]
3. **[Component 3]**: [Description]

## Implementation Phases

### Phase 1: [Phase Name]

**Goal**: [What this phase accomplishes]

**Steps**:
1. [Step 1]
2. [Step 2]
3. [Step 3]

**Files to modify/create**:
- `path/to/file1.ts` - [what changes]
- `path/to/file2.ts` - [what changes]

### Phase 2: [Phase Name]

**Goal**: [What this phase accomplishes]

**Steps**:
1. [Step 1]
2. [Step 2]
3. [Step 3]

**Files to modify/create**:
- `path/to/file.ts` - [what changes]

## Testing Strategy

### Manual Testing

- [ ] [Test case 1]
- [ ] [Test case 2]
- [ ] [Test case 3]

### Automated Tests

- [ ] Unit tests for [component]
- [ ] Integration tests for [flow]

## Success Criteria

- [ ] [Criterion 1 - specific and measurable]
- [ ] [Criterion 2 - specific and measurable]
- [ ] [Criterion 3 - specific and measurable]

## Potential Challenges

1. **[Challenge]**: [How we'll address it]
2. **[Challenge]**: [How we'll address it]

## Notes

[Any additional context, references, or considerations]

---

*Created: [YYYY-MM-DD]*
*Status: todo | in-progress | done*
Here you can find all the slash commands
Step 2a: Validation - unit testing
This is the key pattern that makes agents trustworthy:
Agent does work
      ↓
Hook validates output
      ↓
BLOCKED with feedback ←─────┐
      ↓                      │
Agent receives error message │
      ↓                      │
Agent fixes the issue        │
      ↓                      │
Hook validates again ────────┘
      ↓
PASS → Work complete
The agent cannot finish until validation passes. This creates self-correcting behavior.
This is the basic workflow to follow when creating a validation loop:
- Add test validation (this module's
test-validator.py) - Add build validation (this module's
build-validator.py) - Check logs (validators write to
validators/*.log)
Step 2b: Validation - E2E testing
Step 4: clear and reprime
At the end of a conversation, when most of your contacts are filled up, here is the process to begin a new one:
- store living documents: Tell Claude to save memory, update living documents, etc. Save session memory and session content.
- clear the context: Clear the context with the
/clearcommand. - reprime: A custom
/primecommand, which is essentially a Claude command you create, tells Quad to read a bunch of files to re‑prime itself on the project's context and what it should know.
Claude on your PRs and issues
Here is how to install claude as a github app that can be invoked upon PRs and issues:
- Run the
/install-github-appto install a claude code github action. - Choose how to authorize Claude and which repos to give it access to and install Claude in.
- Claude asks which workflows to install:
Which workflows would you like to install?
> [x] Claude Code (works on issues when @claude is mentioned)
> [x] Claude Code Review (auto-reviews PRs)
- Recommendation: Select both for the full experience.
- create authentication token: create a GHP token with Claude that Claude uses to authenticate with gh CLI and be installed as a Github app.
Once you have installed Claude into a repo, you have these three powerful ways you can use it:
- tag claude with
@claude: By default, the Claude Code GitHub Action listens for comments or issues mentioning@claude. - add Claude as a PR reviewer: You can add Claude as a PR reviewer so it reviews your PRs
- use claude in github actions: You can use claude and run it in headless mode via github action workflows.
NOTE
This actions makes claude become a collaborator on your PRs for the current repo. You can now tag claude on issues, make it an assignee, etc.
Claude with issues workflow
Here's the high-level overview of how to use Claude in issues:
- Go to your repo's Issues tab
- Click New issue
- Title: "Test: Add a hello world function"
- Description: "Create a simple hello world function in any language"
- Click Submit new issue
- Add a comment:
@claude please implement this - Watch the issue comments for Claude's response
And here's the in depth guide:
- Create a github issue and tag
@claudeasking it to make a plan to implement the feature
@claude please implement this

Notes:
- We're using Tailwind CSS for styling
- The settings page is at src/pages/Settings.tsx
- Use the existing Toggle component from src/components/ui/Toggle.tsx
- Claude will post a plan in the comments. Review it, then reply:
@claude looks good, please proceed
- Claude will continuously update his to‑do list of tasks that it made in the plan, and then will submit a PR once completed.
There are three follow-up actions you can take once a PR has been posted by Claude:
- request changes
@claude the toggle should be bigger. Can you increase the size?
- ask questions
@claude why did you use CSS variables instead of a class toggle?
- ask for a review
@claude can you review the changes you made and make sure there are no bugs?
Here are the best practices you should follow when creating an issue in Github for claude to tackle:
- be specific: provide context with filepaths and spec files on what exactly you want Claude to do.
Add a logout button in the top-right corner of the header that
calls the /api/auth/logout endpoint and redirects to /login, read CLAUDE.md to learn more.
@claude please implement this

Context:
- Using Next.js 14 with App Router
- Auth state managed by AuthContext in src/context/AuthContext.tsx
- API calls should use the fetchWithAuth helper
- set clear acceptance criteria: Acceptance criteria is necessary. Otherwise, the agent will run into an infinite loop because it does not have the entire context for a code base.
Acceptance Criteria:
- [ ] Button visible on all authenticated pages
- [ ] Clicking button clears session
- [ ] Redirects to login page
- [ ] Shows loading state during logout
Here are examples of issues using best practices:
bug fix
Title: Fix: Login button unresponsive on mobile

Description:
The login button on the homepage doesn't respond to taps on
mobile devices (iOS Safari, Chrome Android).

Steps to Reproduce:
1. Open site on mobile browser
2. Tap the login button
3. Nothing happens

Expected: Should navigate to /login
feature request
Title: Add email notifications for new comments

Description:
Users should receive email notifications when someone comments
on their posts.

Requirements:
- Configurable in user settings (on/off)
- Maximum 1 email per hour (digest mode)
- Include unsubscribe link
refactoring
Title: Refactor: Extract form validation into reusable hook

Description:
Currently form validation is duplicated across LoginForm,
SignupForm, and ContactForm.

Goal:
- Create useFormValidation hook
- Migrate existing forms to use it
- No functionality changes (just code organization)
Claude on PRs
Claude reviews automatically when:
- A new PR is opened
- New commits are pushed to an existing PR
- PR is re-opened after being closed
Here's what claude can see
- All changed files in the PR
- Diff between base and head branch
- PR title and description
- Previous comments in the PR
Here's what claude can't see
- Files not changed in the PR (limited context)
- External dependencies or runtime behavior
- Private package implementations
- Database state or API responses
Here's a high-level overview of how you use Claude in PRs and what the process is.:
- Create a simple change on a new branch
- Open a Pull Request
- Claude automatically reviews within a few minutes
- Check the PR comments for the review
Here are the best practices to follow:
- write good PR descriptions: CLAUDE has limited context, so you want to write the best PR description possible so it knows what to review and what to prioritize.
## What
Adds email verification for new user signups

## Why
Prevent spam accounts and ensure valid contact info

## How
- Added verification token generation
- Created email sending service
- Added /verify endpoint
- Updated signup flow to require verification

## Testing
- Manually tested signup → email → verify flow
- Added unit tests for token generation
- ask Claude to fix PR comments: If Claude leaves comments on your PR, then ask Claude to fix them.
- ask for a specific review focus: You can ask Quad to leave either a security- or performance-focused review, which helps Prime to find those bugs.
Claude Github Actions
These are standard GitHub Actions that trigger Claude when needed.
.github/
└── workflows/
    ├── claude-code.yml         # Handles @claude in issues
    └── claude-code-review.yml  # Auto-reviews PRs
claude-code.yml: This workflow file triggers when an issue is opened or a comment mentions @CLAUDE. It checks out the code, runs CLAUDE code with the issue context, pushes commits, comments with progress, and submits a PR for the issue.claude-code-review.yml: This workflow file triggers when a new PR is opened or updated with new commits. It checks out the PR code, runs cloud code in review mode, and posts a review with code quality assessment, bug detection, notes, and security concerns.
Mobile workflow
On GitHub mobile, the workflow is basically the same, but since you're typing, you want to keep your issues concise.
- Follow this template for creating issues.
Title: Add dark mode toggle

What: Toggle switch in settings that switches between light/dark theme

Where: Settings page, Display section

Details:
- Save preference to localStorage
- Apply immediately (no refresh)
- Add labels from mobile to help Claude understand priority:
bug- Something brokenfeature- New functionalityurgent- High prioritygood-first-issue- Simple task
- Comment to
@claudeto implement the issue, or create a plan and implement the issue@claude please implement this@claude can you create a plan first?@claude please review and fix any issues@claude looks good, please proceed
Here are the best practices:
- keep issues single-responsibility focused: Each issue should have only one responsibility, one feature, or one bug to address.
- create issue templates: Create predefined issue templates on GitHub so that you have a structured, repeatable way of creating issues.
Example workflows
Go here to see more example workflows
bug fix workflow
- Issue Title: Fix: Button text color unreadable in dark mode
- Issue Body:
The "Submit" button on the contact form has dark text on a dark
background when dark mode is enabled.

Location: src/components/ContactForm.tsx

Expected: White text on dark button
Current: Dark gray text on dark button
- Comment:
@claude please fix this. The button uses Tailwind classes.
- Claude's Response:
I'll fix the button text color for dark mode.

Plan:
- [ ] Find the Submit button in ContactForm.tsx
- [ ] Add dark mode text color class
- [ ] Verify other buttons don't have same issue

Starting...
new feature workflow
-
Issue Title: Add "Remember me" checkbox to login form
-
Issue Body:
## Feature Request

Add a "Remember me" checkbox to the login form that:
- Keeps the user logged in for 30 days when checked
- Default: unchecked
- Stores preference in localStorage

## Location
src/pages/Login.tsx

## Acceptance Criteria
- [ ] Checkbox visible below password field
- [ ] Label: "Remember me for 30 days"
- [ ] Checked state extends session cookie duration
- [ ] Unchecked state uses default session (24 hours)
- Comment:
@claude please implement this. We're using NextAuth for authentication.
The session configuration is in src/lib/auth.ts
advanced multistep implementation
-
Issue Title: Add comment system to blog posts
-
Issue Body:
## Phase 1: Data Model
- Add Comment model to schema
- Create API endpoints: GET /comments, POST /comment

## Phase 2: UI Components
- CommentList component
- CommentForm component
- Single Comment component with reply button

## Phase 3: Integration
- Add comment section to BlogPost page
- Connect to API

Please implement phase by phase and check in after each.
- Comments:
@claude please start with Phase 1
After Phase 1:
@claude Phase 1 looks good. Please continue with Phase 2.
After Phase 2:
@claude before Phase 3, can you add loading skeletons to CommentList?
asking for implementation options
-
Issue Title: Improve search performance
-
Issue Body:
Search is slow on the products page when we have >1000 products.
Currently using filter() on the full array client-side.
- Comment:
@claude can you propose 2-3 different solutions with benefits and tradeoffs before implementing?
Consider: server-side search, debouncing, virtual list, etc.
- Claude's Response:
Here are three options:

**Option 1: Server-side Search (Recommended)**
- Move filtering to API
- Pros: Handles any data size, reduces client memory
- Cons: Requires API changes, adds latency

**Option 2: Debounced Client Search**
- Add 300ms debounce to search input
- Pros: Quick to implement, no API changes
- Cons: Still slow with very large datasets

**Option 3: Web Worker Search**
- Offload search to background thread
- Pros: Keeps UI responsive
- Cons: More complex, still loads all data

Which approach would you like me to implement?
Power user tricks
Planning phase
- ask for mermaid diagrams for flowcharts: Ask CLAUDE to use mermaid syntax to create flowchart diagrams.
Voice dump strategy
- One strategy you could do is use some AI voice dictation tool like Whisper Flow or Voquill to dump all your thoughts into a
voice-dump.md. - Then ask CLAUDE to organize your thoughts, then create a structured implementation plan from that.
- That way, it's faster, and you don't have to spend 2 hours typing something when Claude could organize your plan for you before creating an implementation plan from that.
Use first order, second order, and third order planning
For each feature, you should ask Quad to make a plan on what the sub-features are to implement. For example, for something like email verification, you would have first-order requirements: the UI and basic process. Then second-order requirements would be something like security, and third-order requirements would be things like observability and logging.
By having these 3 different tiers of requirements, you can see what to do for the feature in the future.
Use HTML for planning
HTML is a great and easy way of shifting your implementation plans to make it better for the human in the loop, rather than just rereading a dreary, boring Markdown file.
Here are the main things you would want to add in your prompt to create the HTML file plan:
- split into phases: To split a plan into different sections
Also split it into phases as well; I want to optimize this plan to be as modular as possible and have logical beginnings and ends for each phase.
- TLDR: To have a quick summary of each plan phase
Create a TL;DR for each section of a planned approach of attack in plain English.
- add bold text: To immediately notice important things
Bold the most pertinent parts to grab my attention, and your more opinionated parts of the approach.
- table of contents: to easily navigate between sections of the plan.
Create a table of contents to different parts of the HTML.
Best Human-in-the-loop tips
Mark sensitive or security-concerning code with comments
Identify and mark functions that have a high security risk, such as authentication, authorization, and data handling. These functions should be reviewed and tested with extra care and in such a way that a human has comprehended the logic of the function in all its dimensions and is confident about its correctness and safety.
Make this explicit with a comment like //HIGH-RISK-UNREVIEWED and //HIGH-RISK-REVIEWED to make sure that other developers are aware of the importance of these functions and will review them with extra care.
Make sure that the AI is instructed to change the review state of these functions as soon as it changes a single character in the function.
Developers must make sure that the status of these functions is always correct.
Video understanding
Gemini and its APIs have video‑understanding models. If you download any MP4 or WebM file and direct it toward Gemini, it can understand what you’re doing in the video and reverse‑engineer it.
Here's the process:
- record yourself: The simplest way to capture a visual process is to screen record it. Loom, OBS, or any recorder works. You are creating raw material for AI analysis
- feed the video to Gemini API: Gemini can watch a video and describe every frame. Upload your screen recording and ask it to extract the design, the workflow, or the data structure. It sees what you see.
- reverse engineer visual designs: See a landing page you like? Record a scroll-through. Feed it to Gemini. Get back a structured description of every section, color, layout choice, and interaction pattern.
- beyond design: This technique works for anything visual. Record a bug, feed the video to Gemini, and get a detailed reproduction report. Record a competitor's app and get a feature comparison.
Here are some example use cases:
- website design breakdown: Screen-record yourself scrolling through a website you admire (30 seconds is enough). If you have Gemini API access, feed the video and ask for a design breakdown.
- recoding bug reproduction: Record yourself reproducing a bug in your app. Feed the video to an AI model and ask it to write a structured bug report with reproduction steps.
- extracting color palette: Screenshot three websites you like. Ask Claude or Gemini to extract the exact hex codes used for primary, secondary, and accent colors. Build a palette file for your project
Ad workflow example
Here is an example of how to use this to reverse-engineer ads:
- Record a video of what you want to do. For example, if you're on LinkedIn browsing other people's ads.
- Give the video to Gemini and ask it to reverse engineer the process of how those ads are created.
- Ask Claude to create a skill from the reverse‑engineered process that Gemini gave you, and then create a code pipeline to use the Gemini API to generate images and videos, etc., with Claude dictating the plan in code.
Principles
Avoid hype and frameworks
There is always a tax to adopting a Claude Code framework around memory and context engineering, and you will save yourself a lot of overhead of trying to fit a framework to deprecations and new optimizations and improvements in the Claude Code harness.
"The best framework is the one you built yourself, one rule at a time, from patterns that actually worked in your codebase."
