teamcity-and-octopus
Teamcity basics
Teamcity is a flexible CI tool that can build artifacts from source code and run pipelines to test them.
Octopus deploy is an extremely flexible continuous deployment tool which deploys code artifacts to a wide variety of environments

How TeamCity works
TeamCity contains two main components:
- TeamCity server: the server that you can self-host on-prem that contains all the CI and config info that you use for your team.
- It is responsible for project configurations, managing user permissions, scheduling builds, and maintaining build data.
- TeamCity build agent: the agent that actually does the building and execution of pipelines.
- These are dedicated services that execute the actual build tasks. They compile code, run tests, and produce artifacts as part of the CI/CD process.
Each CI process is encapsulated into a project, where the basic flow is as follows:
- Choose VCS roots: choose the VCS roots that should trigger a new Teamcity build when new code is pushed up to those repos.
- Add build configurations: either manually create build configurations or write Kotlin DSL config-as-code to define individual jobs, and then the project defines the pipeline/build chain to run.

NOTE
It is possible for the server and an agent to coexist on the same computer, but for production purposes, we recommend installing them on different machines for a number of reasons, the server performance being the most important.
Teamcity server
The TeamCity server is a central management component that is usually installed on a single dedicated machine that manages all pipelines.
It does not perform any build or test actions directly; it orchestrates the process of using any amount of Build Agents to run these tasks.
NOTE
You can scale up TeamCity servers via a load balancer, to also assign more build agents in total by adding more servers.
Build agents
A Build Agent is a service that is installed on separate servers (Windows, Linux, or any Linux-based OS) to carry out various build-related tasks. TeamCity itself does not compile code but relies on Build Agents for this purpose.
The Build Agent service can be installed either on the same server as the TeamCity server or on different servers, and in any fashion. It basically just has to be a recognizable process running on an exposed port.

IMPORTANT
However, installing on a separate server is recommended to avoid limitations that can arise if the TeamCity server needs to be reset or if issues occur with the Build Agent.
- Installation: SSH into another VM and run the build agent as a docker container or install it directly on the VM and start it.
- Configuration: After installation, the Build Agent must be configured. This includes setting up the necessary tools and SDKs required for building your specific code, such as .NET SDK, JDK, PHP, etc. Essentially, the Build Agent acts as a local environment where all the build and compile processes occur.
- Execution: Once agents are set up, TeamCity can assign builds to them. The Build Agents check out the source code, compile it, and produce packages, thereby facilitating continuous integration and continuous delivery (CI/CD) workflows.
A very important thing to understand is that TeamCity automatically looks at which build agent to use for which task, depending on the type of software and packages that each build configuration needs.
For example, a build configuration that uses NPM heavily will only use a build agent that has NPM and Node installed.
TeamCity will understand how to choose that agent automatically by seeing if it has NPM installed via configuration management.

NOTE
On the free tier, you're only allowed to associate max 3 build agents per TeamCity server.
Why Teamcity
TeamCity is the most flexible CI provider ever because it works with any software and source code repository.
It also has these capabilities:
- build chains: ability to create dependencies between builds, able to create a graph so jobs/builds run in a predetermined order.
- configuration as code: offers a Kotlin DSL that is a configuration as code drop-in for manually creating pipelines.
- personal builds: from your local environment, you can create personal builds for a build configuration that only you can see, allowing you to test your builds locally. You can do this via an IntelliJ plugin.
Teamcity installation and setup
Local development to Teamcity server on Cloud
- Install from EXE
- Install TeamCity server, but not the build agent
- Connect to a remote TeamCity server, put in the one your company gave you

Creating cloud build agents
If you want to self-host build agents on the cloud by putting the build agents on EC2 instances so they don't interfere and hog RAM from the Teamcity server, you can do so by following these steps:
- Create EC2 instances, grab the key pairs
- In Teamcity, create a new cloud profile and fill out the AWS connection settings via your AWS access key

- Specify an EC2 image tempalte ot use for launching new EC2 isntances that will then be used as build agent VMs

TeamCity projects
A project is a container for templates, subprojects, build configurations, and version control connections.
- build configuration: a set of build steps or a Kotlin code-as-config file that defines the steps and instructions for building and packaging a project.
- template: A kotlin file or teamcity construct that is a used as a template to create build configuration files with DRY philosophy.
- subproject: a subfolder within a project that contains its own scoped build configurations and templates, mainly used for organization purposes.
- versioned settings: connects your Kotlin config as code from a remote git repo to be used to create all the build configs, templates, and subprojects of a project.
Project
│
├── VCS Root
│
├── Build Configuration
│   ├── Parameters
│   ├── VCS settings
│   ├── Build Steps
│   ├── Triggers
│   ├── Failure Conditions
│   ├── Build Features
│   └── Dependencies
│
├── Build Configuration
│
└── Template
Here are the important rules to understand about projects #tc-project-rules : ^a54b92
- All projects inherit from the root project.
- All build configurations, templates, and VCS settings within a project are available for use to any other component within that project or any subprojects of that project.
 In TeamCity, child projects inherit many settings and entities from their parent, such as connections and cloud agent profiles.
The Root project lets you take advantage of this concept and define server-wide resources.
For example, you can create AWS cloud profile that spawns cloud agents accessible to all projects on the server.
NOTE
Note that since user permissions are project-based, only Root project administrators can edit its settings.
VCS roots vs versioned settings
A VCS (Version Control System) root is a crucial component in a CI/CD pipeline, specifically in TeamCity. It essentially acts as a connection point between TeamCity and your source control system, allowing builds to access source code for various projects or build configurations.
NOTE
A VCS root defines where TeamCity should look for the source code. Each VCS root can point to a specific repository in systems like Git or SVN.
VCS roots can be set at different levels:
- Project level: This is the most common approach, where you can configure a VCS root for a specific project. All build configurations under that project will inherit this VCS root.
- Root project level: While you could define a VCS root at the root project level for global access, it’s less flexible. Different teams can have different repositories, so it’s often more effective to define them at the project level.
VCS roots store the following information:
-
Fetch and push URLs that TeamCity uses to pull and push remote files.
-
Branch information: the list of repository branches TeamCity should track and which branch is the default (main) one.
-
Authentication settings: credentials TeamCity uses to access a repo.
-
Checkout settings: specify how remote files should be stored and whether submodules should be checked out along with the main repository.
-
Custom changes polling settings that allow you to override the default 60-second interval.
There are three important VCS root properties:
- VCS provider: The type of version control system supported by TeamCity. For example, Git, Perforce, Subversion, and more.
- VCS root name: The unique human-facing name of VCS root across all VCS roots of the project. This is the public name shown in TeamCity UI
- VCS root ID: Unique ID of VCS root across all VCS roots in the system. By default, the root ID combines truncated names of its parent project and the root itself, divided with an underscore.
- For example,
MyProject_HttpsGitHubComJohndoeMyrepoRefsHeadsMain. - When changing the root name, you can click the Regenerate ID link to update this value.
- For example,
- VCS root URL + authentication: The URL of a VCS repository. Supports URLs in different formats, like:
http(s)://,svn://,ssh://git@,git://and others as well as URLs in Maven format.
Connecting to VCS roots
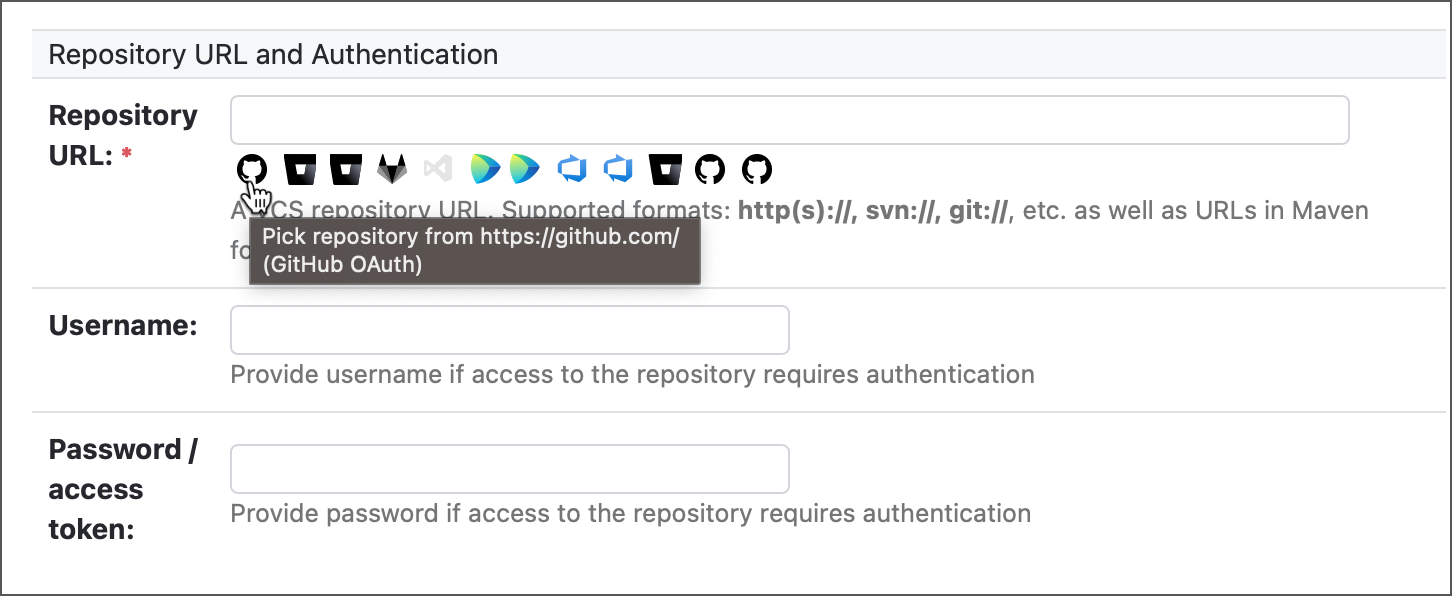
When setting up a VCS root, credentials are required for accessing the repository, and you have many different ways to authenticate:
- username and password: weakest form of auth, where you log in using the credentials of the Teamcity User on Gitlab that you created.
- SSH: use an SSH key pair, where you give the public key to Gitlab and the private key to Teamcity, then TeamCity takes care of the work of giving the build agents all those private keys.
- refreshable access token: short-lived tokens acquired by TeamCity from a required VCS provider via existing OAuth connection
Connecting via SSH
To connect via SSH, you need to upload a private key in the OpenSSH format to Teamcity.
IMPORTANT
It's advisable to use SSH keys for more secure access instead of username and password, as it is more reliable and doesn't break if credentials change.
If using an SSH URL, you need to provide a private key so that TeamCity could access a repo. See the SSH Keys Management article or watch our video tutorial to learn more.
Here are the available private key options:
-
Uploaded Key — select this option to utilize the key(s) uploaded to the project.
-
Default Private Key — select this option to utilize the keys available on the file system in the default locations used by common ssh tools: the mapping specified in
<USER_HOME>/.ssh/configif the file exists or the private key file<USER_HOME>/.ssh/id_rsa(the files are required to be present on the server and also on the agent if the agent-side checkout is used). -
Custom Private Key — supported only for server-side checkout. Fill the Private Key Path field with an absolute path to the private key file on the server machine. If the key is encrypted, specify the passphrase in the corresponding field.
Connecting via refreshable tokens
if a VCS root that fetches data from a GitHub, GitHub App, Bitbucket Server, Bitbucket Cloud, Azure DevOps, GitLab, or JetBrains Space was configured using a TeamCity connection, refreshable tokens are enabled by default.
Refreshable access tokens are short-lived tokens acquired by TeamCity from a required VCS provider via existing OAuth connections (as opposed to static PAT tokens issued manually by users on a VCS hosting side).
Additional VCS root properties
Here are two additional VCS root properties:
minimum polling interval
Specifies how often TeamCity polls the VCS repository for VCS changes. By default, the global predefined server setting is used that can be modified on the Administration | Global Settings page. The interval time starts as soon as the last poll is finished on the per-VCS root basis. Here you can specify a custom interval for the current VCS root.
Some public servers may block access if polled too frequently.
If TeamCity detects that a VCS commit hook is used to trigger checking for changes, this interval is automatically increased up to the predefined value (4 hours). If the periodical check finds changes undetected via the commit hook, the polling interval is reset to the specified minimum.
Which project the VCS root belongs to
Due the the rules of projects, a VCS root in a project is available to all sub-components of that project.
You can move a VCS root to a parent project so that it becomes available for all build configurations inside this new owner and its subprojects.
Project vs Build configuration VCS roots
Sections related to VCS roots are available in both project and configuration settings.
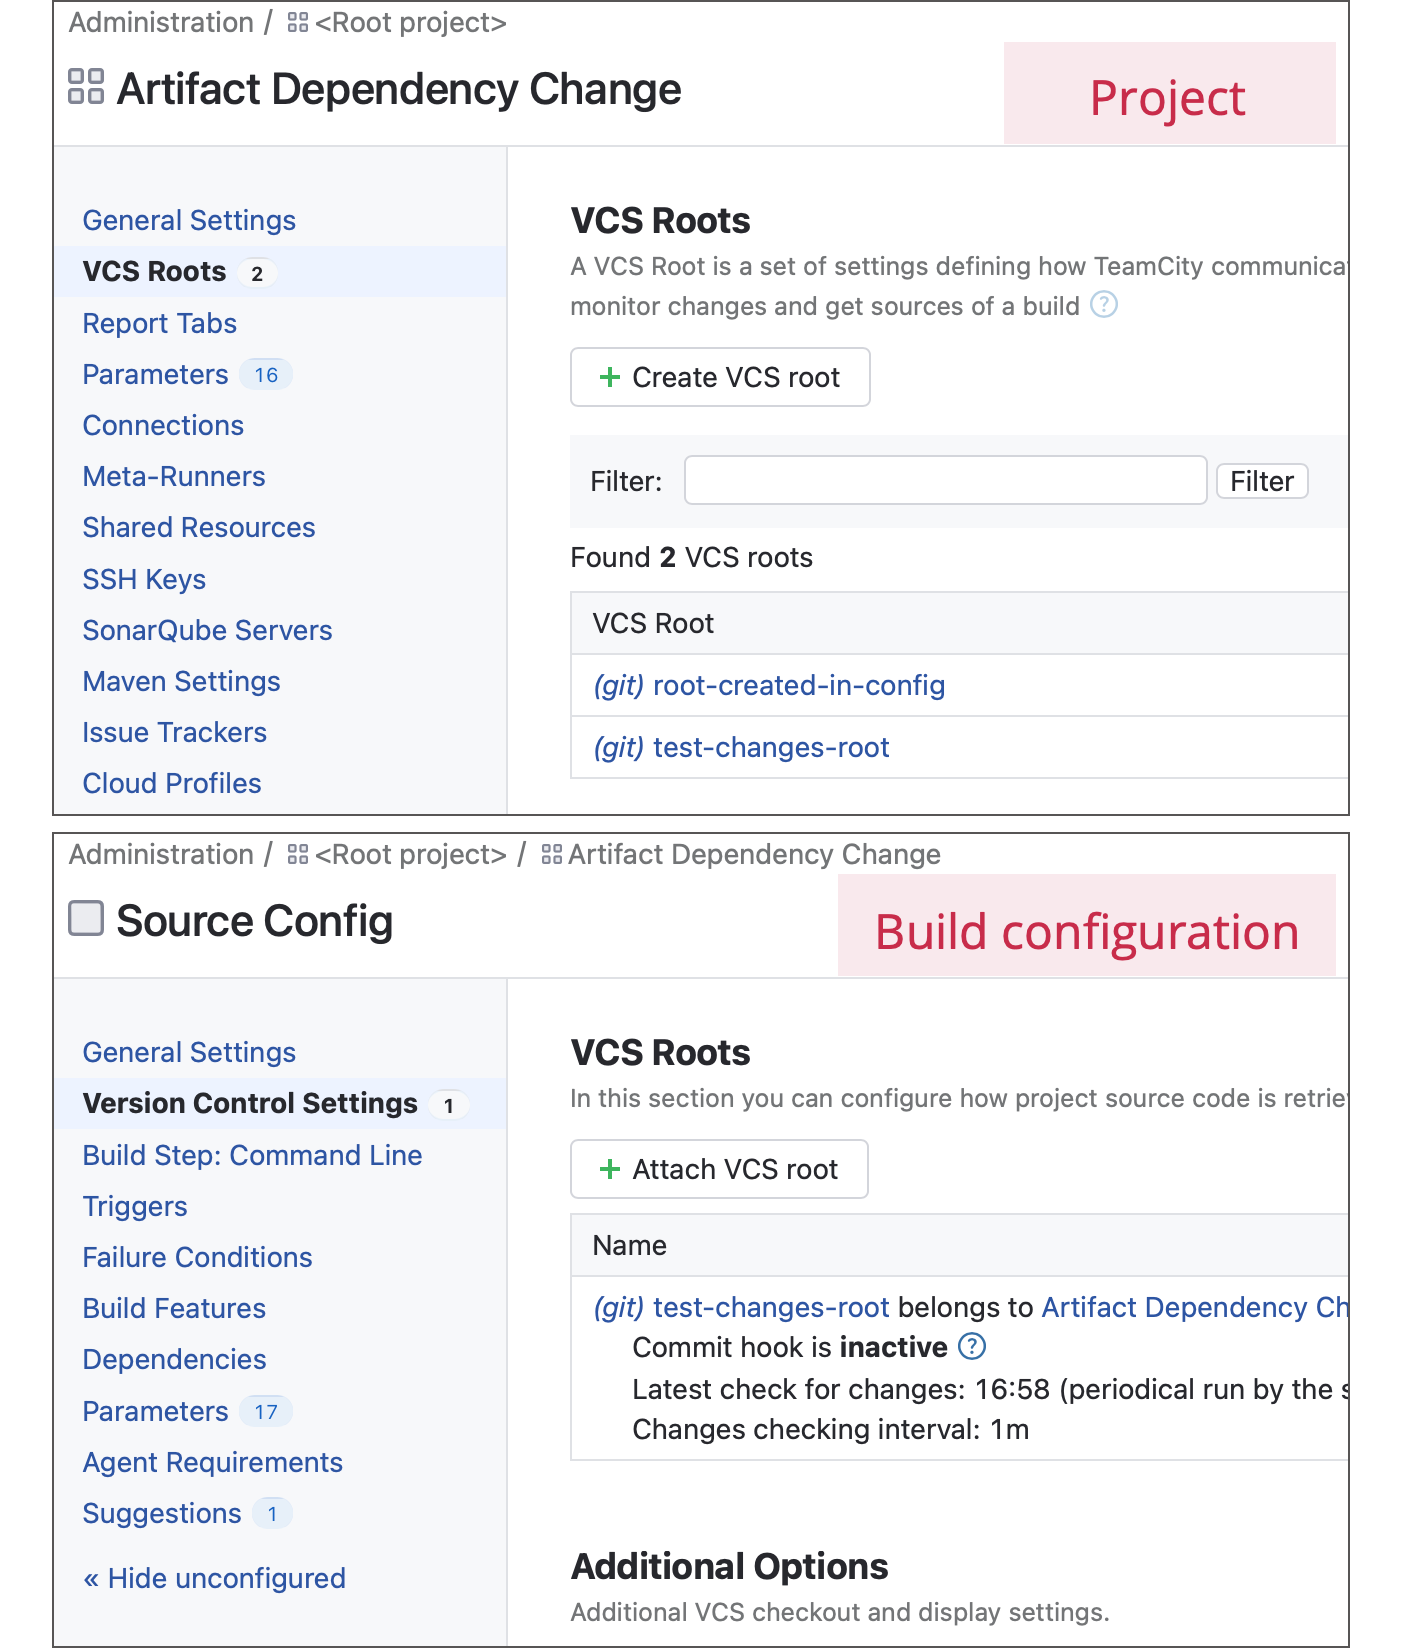
NOTE
However, configurations never own roots. You can "attach" a VCS root to a configuration, but roots are always stored in (owned by) projects.
Here are the rules of VCS roots and how they affect build configurations vs projects:
-
A VCS root can be attached to multiple configurations, meaning that multiple build configurations can access the same repository with the same auth and checkout settings.
-
A single configuration may have multiple VCS roots attached, which allows you to work with different repositories within one configuration.
-
Editing VCS roots affects all configurations that use it. When modifying VCS root settings, you have an option to duplicate this root and store updated settings in this new clone, keeping the original root unchanged.
- use case: This allows you to customize one build configuration but leave other configurations that share this root unaffected.
Adding a build configuration manually
Let's first do it manually:
- Create a VCS Root: Go to your project settings, then select "VCS Roots" and click "Create VCS Root."
- Select Type: Choose your VCS type, e.g., Git.
- Configure Repository URL: Enter the URL of your source code repository.
- Authentication: Set up authentication (e.g., SSH keys).
- Save: This links TeamCity with your source code repository.

- Add a Build Configuration: In the project settings, select "Build Configurations" and click "Create Build Configuration."
- Name it: Give your build configuration a descriptive name, e.g., "NodeApp_Build."
- Select VCS Root: Attach the previously created VCS root to this build configuration


- Add Build Steps: In your build configuration settings, create build steps to specify how to build and test your Node.js application, using Node.js commands like
npm installandnpm test.
NOTE
Whenever you create a build configuration, TeamCity creates a unique ID for that, which is used internally and which TeamCity recognizes as a job or run, and then you can use that in the teamcity API or teamcity CLI to programmatically fetch the info of those jobs.
Versioned settings
Versioned settings store all properties related to project and build configurations, fetching those properties and settings from a remote repo with version control.
If you're using Kotlin DSL to configure TeamCity, you might create a repository that defines your settings, including VCS roots, through code. This allows for version-controlled configuration, facilitating easier management and deployment of CI/CD settings.
Kotlin DSL works at the project level, fetching info from a .teamcity/settings.kts entrypoint from a repository, via configuration of versioned settings.
- Does the project with enabled versioned settings remain editable?: You can choose whether a project can be edited via TeamCity UI (in this case TeamCity synchronizes edits made in the UI with remotely stored settings) or only by modifying settings files on the VCS side.
- Can I apply different settings for separate project branches?: Yes, different repository branches can store different project settings.
TIP
A TeamCity configuration can use separate VCS roots for importing DSL settings and downloading sources.
If your build project and DSL settings are stored in the same repository (not recommended for public repos accepting external contributions), you can reuse the same root.
In TeamCity, the project administrator must ensure Project Settings → Versioned Settings has:
- Synchronization: enabled
- Settings format: Kotlin
- When build starts: use settings from VCS
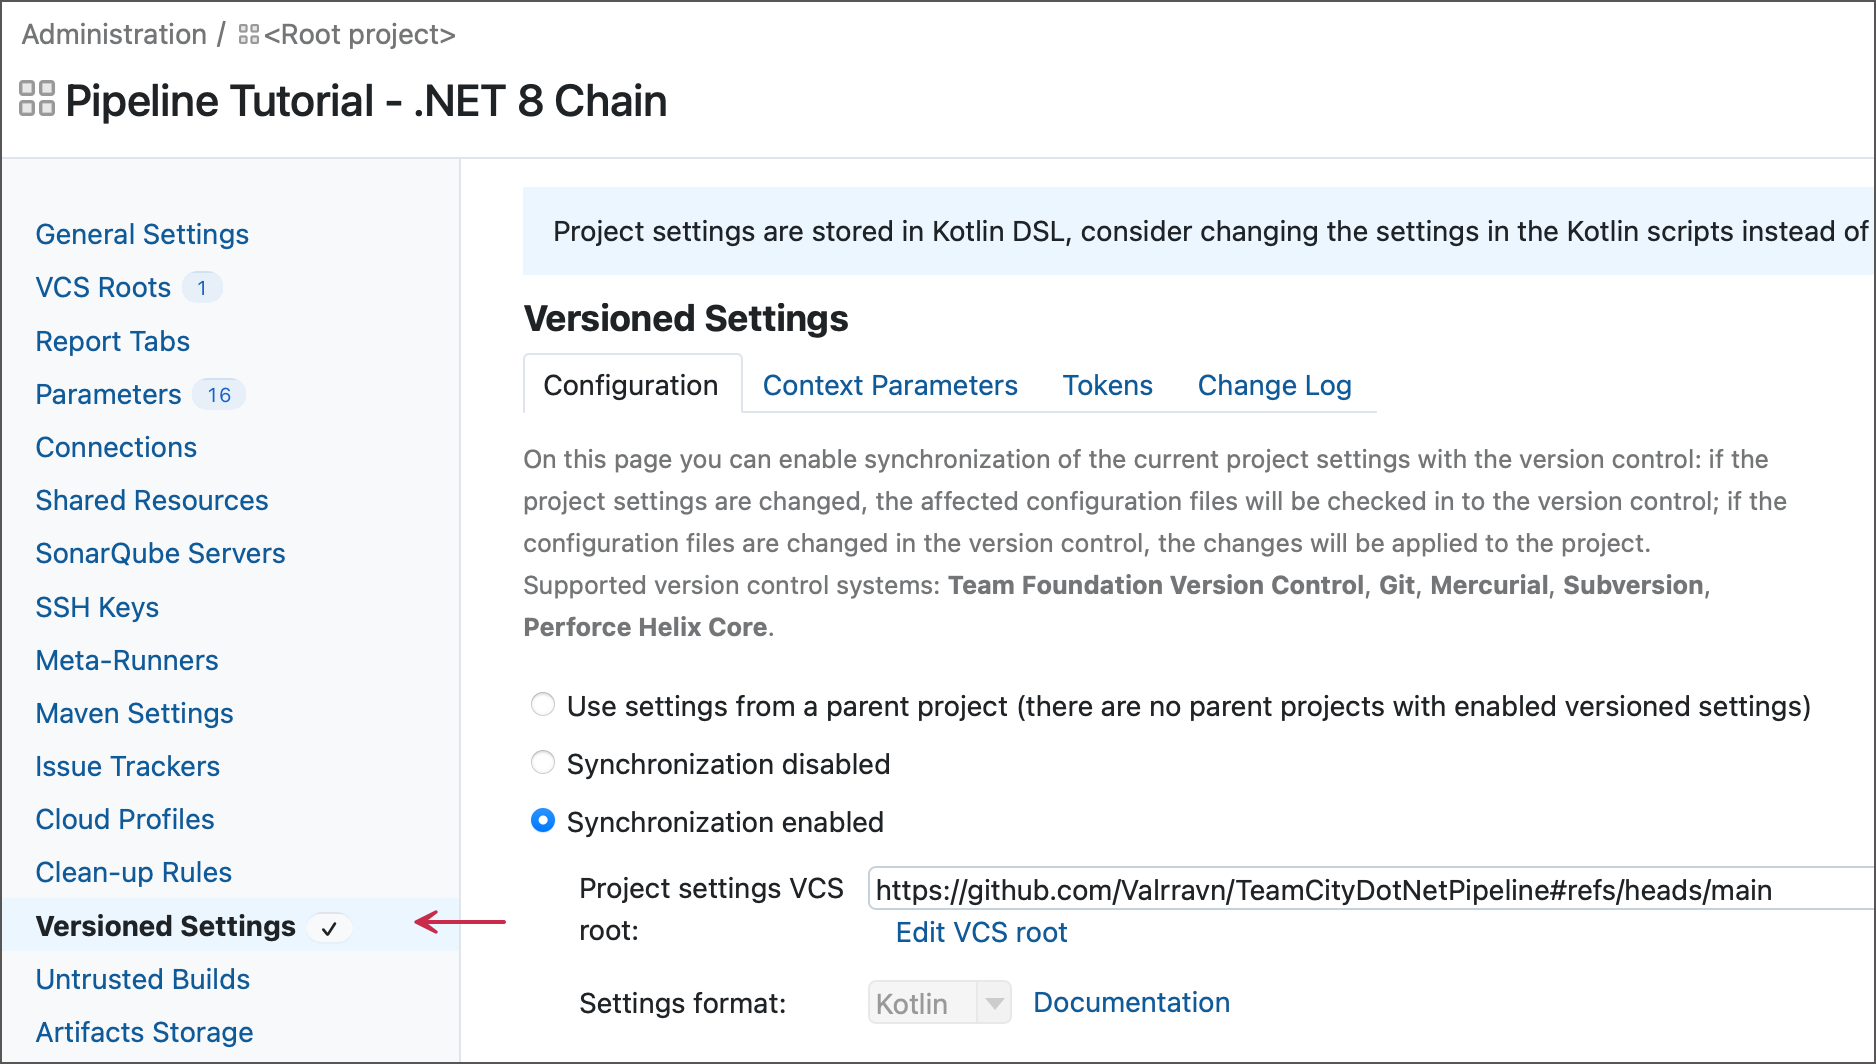
- synchronization settings: You can choose one of the following options on this page:
- Use the same settings as in the parent project (default).
- Disable synchronization.
- Enable synchronization. In this case, you can also define which settings to use when the build starts
- project settings VCS root: which remote repo to grab the kotlin DSL from and use settings from a
.teamcity/settings.ktsentrypoint.
As soon as you enable settings synchronization, TeamCity commits the current project tree and server settings to the remote repository. If the target location already stores project settings, a warning pops up.
This warning allows you to choose whether TeamCity should:
-
import from UI: overwrite the settings in the VCS with the current project settings on the TeamCity server (only if the two-way synchronization is enabled); or
-
import from code: import the settings from the VCS replacing the current project settings on the TeamCity server with those from version control.
Synchronization types
If synchronization is enabled, it can work in either two-way or one-way mode.
- two-way sync: The default mode is a two-way synchronization. This mode is enabled when the Allow editing project settings via UI option is checked.
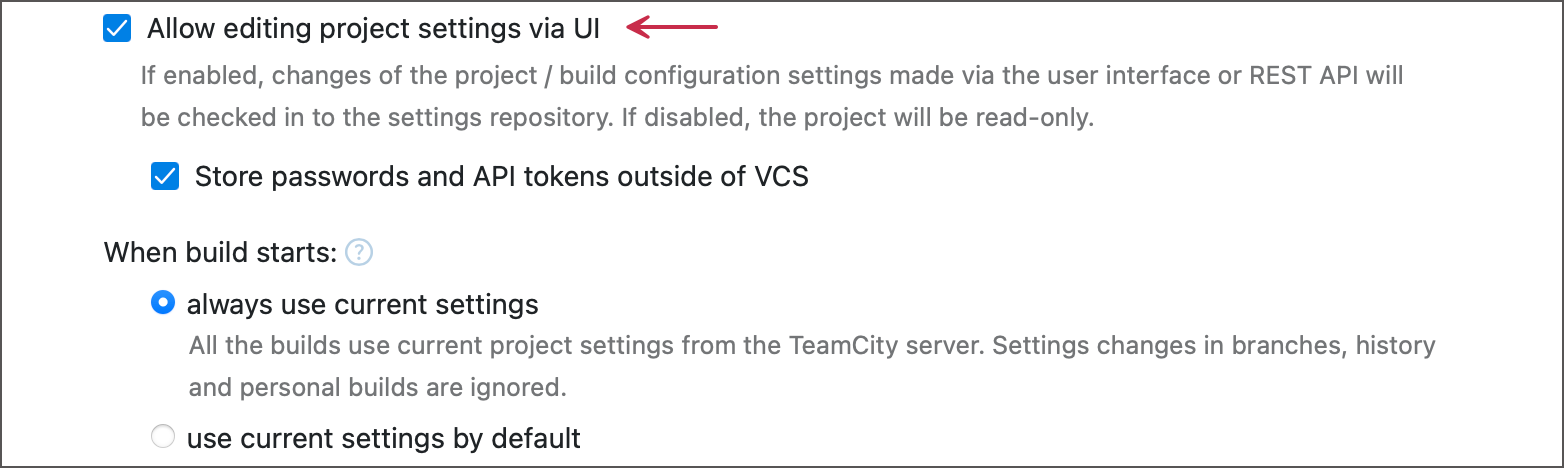
- one-way sync: If you disable the Allow editing project settings via UI option, the project settings become read-only in the UI and only reflect changes made on the VCS side. This is convenient if you prefer defining project settings' as code or load settings from a read-only VCS branch.
NOTE
Before applying the newly checked-in settings, TeamCity validates them. If the validation fails (for example, when a build configuration references a non-existent VCS root or has duplicate ID), the current project settings are left intact and an error is shown in the UI.
two-way sync
Here are the main rules and properties of two-way sync:
- UI changes become patches: Each administrative change made to the project settings in the TeamCity UI is committed to the version control system as a patch.
- The author of the commited changes matches the TeamCity user who made related project edits.
- Config as code is source of truth: If the changes are applied on the VCS side (if a Kotlin or XML settings file is edited), the TeamCity server detects them and modifies the project on the fly.
one-way sync
If you disable UI editing, then you are in one-way sync mode, where the config as code is the absolute source of truth and you can only change the project settings through Kotlin DSL.
Synchronization with subprojects
Enabling synchronization for a project also enables it for all its subprojects with the default " Use settings from a parent project " option selected.
- TeamCity synchronizes all changes to the project settings (including modifications of build configurations, templates, VCS roots, and so on) except SSH keys.
- To exclude individual subprojects from the synchronization, switch them to Synchronization disabled mode.
separate VCS roots
NOTE
Project settings can be saved to the same repo that hosts application sources, or a completely separate repository.
The default location for TeamCity project settings is the .teamcity folder in the root of the same repository that stores the target project. Depending on your workflow specifics and business needs, this default setup might not be optimal for your team.
For example, teams working with monorepos where stand-alone microservices and external libraries are hosted in adjacent directories would likely want to set up individual TeamCity projects that store their settings in separate directories. Using custom settings directories for each project ensures that projects targeting the same monorepo do not constantly override each other's settings.
Another scenario you might want to implement is moving TeamCity-specific files away from the sources. This approach obscures the specifics of your CI/CD ecosystem, hiding them from external parties. In addition, having a dedicated VCS repository that stores settings of your entire TeamCity server (each project has its own repository folder to store its settings) can also prove beneficial for settings maintenance and testing.
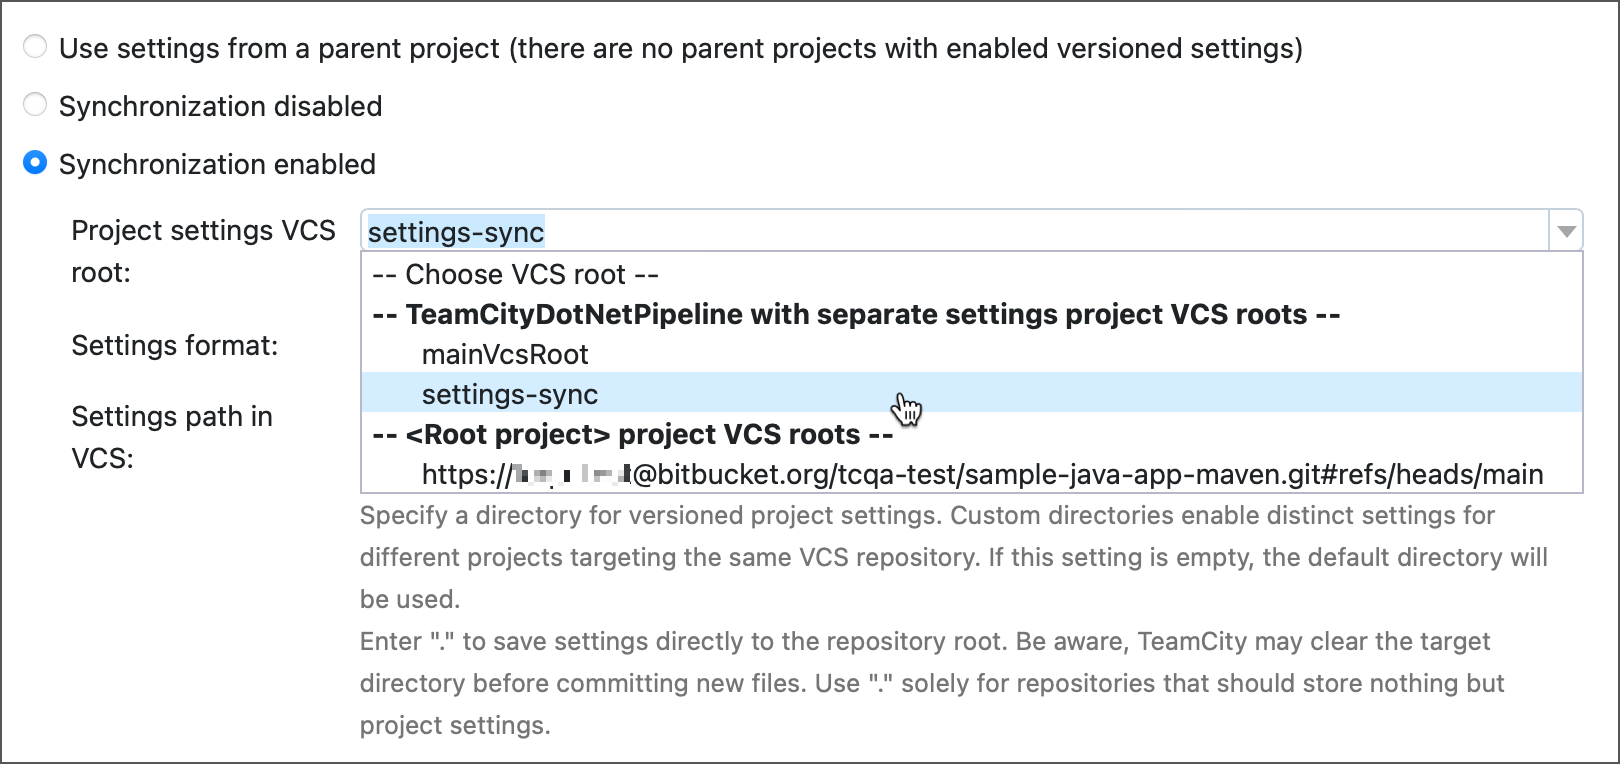
The Project settings VCS root selector allows you to choose which Configuring VCS Roots TeamCity should use to obtain and commit project settings.
You can choose any root owned by either this project directly, or by any of its parent projects.
NOTE
Note that the Project settings VCS root combo-box does not allow you to create new roots. You need to navigate to the VCS Roots tab of your project settings and set up a required root before you can start using it on the Versioned Settings page.
Here are the general steps to set a VCS root to use for versioned settings for a project
- Basically, if you want to use a repo for versioned settings to set the settings for a project, that repo must be added as a VCS root for the project.
- Then in the versioned settings, you can enable synchronization, then select the Kotlin DSL repo to choose for versioned settings.
Custom settings path
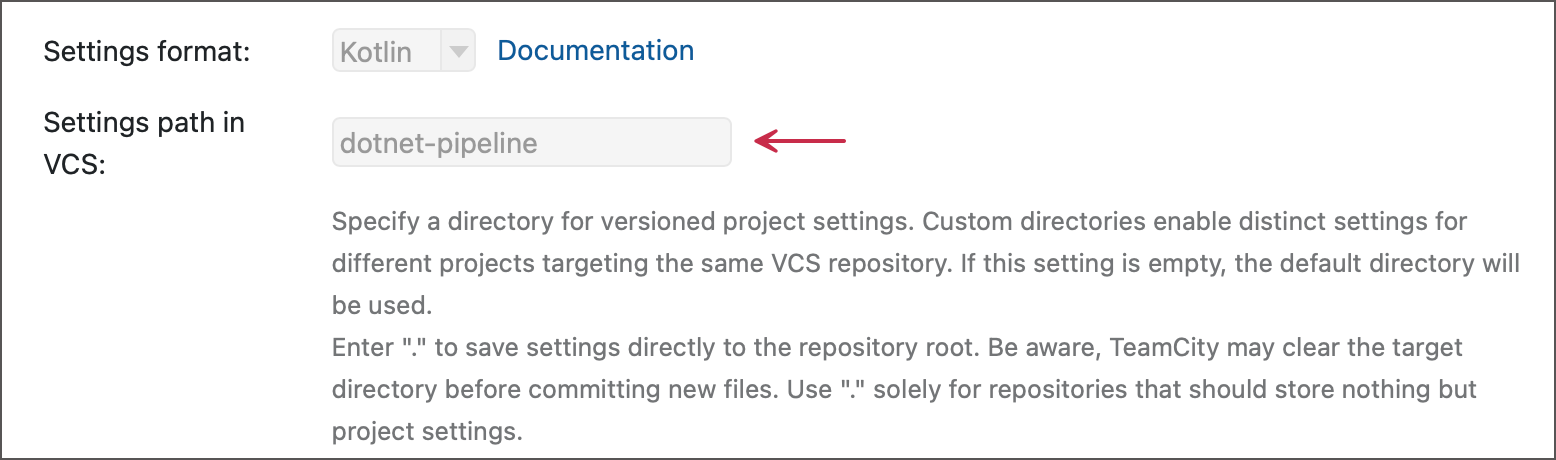
The Settings path in VCS option allows you to manually specify a path to the directory that stores project settings.
NOTE
What makes this useful?: the main use case is to reduce Kotlin DSL repo duplication by having multiple different settings.kts files, and you choose which ones to use depending on the use case.
You can change the default .teamcity value to any custom path:
- example:
.teamcity-settings/accountingwill search for asettings.ktsfile in that directory. - example:
.refers to the root of the repo, which allows you to save settings directly to the repository root, looking for asettings.ktsat the root of the repo.
[!DANGER] Before committing a new revision of project settings, TeamCity clears the target settings directory.
- To prevent TeamCity from wiping important files, make sure this directory is not used for anything but project settings.
- Be extra careful when specifying
.as the settings directory: this value should only be used if you want a dedicated repository that stores TeamCity project settings and nothing else.
To prevent unexpected errors caused by ambiguous settings source, TeamCity does not allow you to change the settings path when the synchronization is already active.
To modify this settings path, disable the synchronization and save the settings, then re-enable it and specify the required directory.
NOTE
When you create new projects, TeamCity currently detects existing project settings only if they are stored in the default .teamcity folder. If project settings are stored in a custom repository directory, TeamCity does not offer options to import these settings or start a new project from scratch. As a workaround, do the following:
-
Create a new project from a remote repository.
-
Navigate to project settings and enable synchronization on the Versioned Settings page.
-
Specify the path to existing project settings in the Settings path in VCS field.
-
Click Apply to save your settings, then Load project settings from VCS... at the bottom of the page.
Defining settings to apply to builds
When TeamCity needs to start a build, it can apply either of the two possible settings:
-
Current settings on the TeamCity server: These are settings that include all latest changes applied to the server either via TeamCity UI or via a commit to the project settings directory in the VCS.
-
Custom settings stored in the VCS: These are settings from the project settings directory stored in a non-default branch or in the specific revision selected for a build.
An ability to choose which of these two settings to apply grants you the following options:
-
multiple branch configuration: Have multiple branches with different settings in the project settings directory. This means your branch A can have parameters, steps, build features, artifact publishing rules and chain settings that differ from those in branch B.
-
personal builds: Start personal builds with changes made in the project settings directory, and these changes will affect the build behavior.
-
Add more flexibility to your history builds. TeamCity initially attempts to use the settings corresponding to the moment of the selected change. Otherwise, the current project settings will be used.
Adding a build configuration through Gitlab + Kotlin DSL
Here are the steps to set up Gitlab with Kotlin DSL to use config as code for defining everything within a project like build configurations, subprojects, and templates:
- To enable a Gitlab repo to push up Kotlin DSL to create a TeamCity project, you nned to modify the versioned control settings of a project to point to Gitlab.

- In your project repository, create a
.teamcitydirectory to hold Kotlin files. The create a Kotlin file (e.g.,build.gradle.kts) to define your project structure, including VCS roots and build configurations programmatically:
version = "2021.1"

project {
    vcsRoot {
        id("MyVcsRoot")
        name = "My Git Repo"
        url = "https://github.com/username/repo.git"
        branch = "refs/heads/main"
    }

    buildType {
        id("Build")
        name = "Build Node App"
        vcs {
            root("MyVcsRoot")
        }
        steps {
            script {
                scriptContent = "npm install && npm test"
            }
        }
    }
}
- Commit your Kotlin DSL configuration to the same repository. This allows versioning of your TeamCity configuration, enabling better management.
Adding parameters
If you have many build configurations that are similar or the only difference between them is the repo you're getting the source code from, then use teamcity parameters that you define at the project level or root level and then use that to dynamically read from those variables anywhere in the build config.
In teamcity, you can refer to parameters and read their values with the syntax below:
%parameter_name%
So here's an example where we want to create a dynamic repository parameter that we then set in teamcity project config:
- Create a new VCS root that uses the
repositoryvariable to dynamically define the Fetch URL of the repository

- Set the VCS root for the build configuration to the one we just created.

- Add a specific value for the recognized
repositoryconfiguration parameter in the settings -> parameters for the current build configuration:

- Edit parameter specs if necessary so you are prompted to provide the parameter values when creating the build configuration or running the build.

Subprojects
Subprojects help with organizing build configurations into individual subprojects but they also have granular control over permissions for who can run stuff in those subprojects.
SUbprojects appear like nested folders in a Teamcity server

Build configurations
Think of a build configuration as a collection of these three components working in tandem:
- VCS root: the source code repository to check out that the agent will run the build on
- build steps: the steps to run as part of the job on the VCS root codebase.
- trigger: when to run the build job, like whenever the VCS root gets a new commit.
Repository:
    github.com/company/app.git

Steps:
    ./gradlew build

Trigger:
    whenever Git changes
There are several problems with UI-only configuration:
Who changed the build?
What changed?
Can I review the change before applying it?
Can I reproduce this configuration on another TeamCity server?
Can I reuse the same configuration for 20 services?
Configuration as Code solves these problems by representing the configuration as source code.
VCS Triggers
VCS triggers in TeamCity are used to automatically initiate a build whenever there's a change in the associated VCS root (e.g., a commit or push to the source code repository).
NOTE
There is a big difference between a VCS trigger and version settings. Anything you push up in your Kotlin DSL version settings to a GitLab repo will automatically make the changes in the project but it will not create any runs. A VCS trigger is what actually triggers a pipeline: if the source code repo gets changed then the VCS root trigger activates, which is different than Kotlin DSL.
- You configure VCS triggers within a build configuration.
- Once a VCS trigger is set, TeamCity continuously monitors the linked VCS root for changes.
- When it detects a change, it queues a new build (you can configure these settings)
Creating a VCS trigger on a build configuration
- To achieve this we should add a Team City dedicated user to the GitLab repository
 2. After selecting the build configuration, navigate to the "Triggers" tab and add a new trigger of type "VCS Trigger.":

- For the VCS trigger, specify the branches that should be listened to for the trigger. By default, all branches trigger the trigger, but you can filter it down to only specific branches like so:

TIP
For more info on the special syntax and what it means, check out [[#Teamcity artifacts]].
Trigger configuration
How triggers work is through a polling schedule.
In this specific case, Teamcity checks every 60 seconds if there is a new push to the gitlab repo that should trigger the configured VCS trigger, and if so, then run the project and its build configurations.
You can configure this VCS trigger behavior like so:
- quiet period: the polling interval. By default, this is 60 seconds
- branch filter: the branches to amtch on for the trigger
+:*-rc: matches all branches that end in "rc"-:*-test: don't match any branches that end in "test"

You can also add extra advanced trigger rules which include matching on the following:
- specific VCS root: you can configure multiple possible VCS roots for a project aand then add different trigger rules for them
- gitlab username: trigger or don't trigger depending on the user who pushed the branch
- comment regex: trigger or don't trigger depending on the commit message content regex matching.
- example use case: skip build on commit with content
[skip ci]
- example use case: skip build on commit with content

You can also exclude certain filepaths from being tracked, and therefore don't trigger builds if they change within the VCS root repo.

Scheduled triggers
Scheduled triggers let you run build configurations on a cron schedule.

Build configuration artifacts
Artifact rules in TeamCity are used to organize build outputs into a specific directory structure and store them in a TeamCity artifact filesystem unique to the build configuration, where under the hood those artifacts are stored in S3 or something.
For a build configuration, you have two important settings when it comes to artifacts:
- publish artifacts: when to publish artifacts. You have these options:
- even if build fails: even if build fails, publish artifacts
- no publish on fail: if build fails, don't publish artifacts
- artifact paths: provide Team City-specific syntax for describing the source code artifact path mapping to the Team City build agent runner environment target directory.

Artifact path syntax
Two Golden Rules to Remember:
- Rules are Additive: TeamCity reads them one by one. If you include everything in one line and exclude specific files in the next, TeamCity follows both instructions.
- You Can't Rename: If you try to "rename" a file, TeamCity ignores the rename and just creates a new folder with that name instead. It is strictly for organizing into folders.
Here are the basic rules:
- Include/Exclude Logic: Rules start with
+:to include files or-:to exclude them - Source and Destination: The syntax follows a
source => destinationformat- Source: The pattern or path of files from your build agent. This is the folder on your build agent where the files currently live.
- Destination: The target directory structure you want to create within the build's artifact folder.
- This is the name of the folder you want to create in TeamCity.
- Using a dot
.just means the "root" (the main artifacts folder).
- Wildcards: You can use
*to match files in a directory or**to match files recursively through subdirectories
+: source => target   // to mount source code path to target path
-: source   // to ignore a source code path
Let's go more in depth into the language:
+: include-: exclude*: star glob pattern**: recursive star glob pattern
simple example
Here's a simple example:
- Rule:
+: data/* => results - Translation: "Take everything (
*) inside thedatafolder and put it into a new folder calledresultswithin the artifacts folder of the build configuration in TeamCity."
So this below:
+: **/* => target_dir
-: **/folder1 => target_dir
maps all files in the source code to the teamcity build runner filesystem but then removes/ignores folder1.
complex example
Let's dissect every single artifact syntax rule from this example:

calculator-service/artifacts/*: takes every file within the calculator-service/artifacts folder and adds it into the root artifacts folder.
NOTE
From this we learn that if you don't use the plus or minus syntax, then by default it's additive syntax and it's adding it to the root of the artifacts folder file system for the build configuration.

What about the addition of an additive rule and a subtractive rule?
+:calculator-service/artifacts/* => another_directory
-:calculator-service/artifacts/*.log => another_directory
These rules say to map every file in the calculator-service/artifacts directory and put it int the /another_directory folderpath in the artifacts filesystem, but exclude all files matching */log (exclude log files).

Build numbers
Build numbers are useful for versioning artifacts created by TeamCity, which is essential when moving to Octopus Deploy.
NOTE
Here's the main idea: add a build counter to create a build number string, then dynamically use that build number to add versioning to the naming convention of your build artifacts produced by Teamcity.

- Add a build counter variable, which starts at 1, then automatically increments each time TeamCity runs the build configuration and creates a new build.
- In the build number format, use the build counter variable via the TeamCity-managed
build.counterparam, which reads the build counter variable value for dynamically setting the value of the build number. - When creating artifacts in teamcity, it's useful to have these three parameter configurations for dynamic naming:
repository: a custom param you set to specify the gitlab repo name associated with the current build configuration.build.number: a TeamCity-managed param that retrieves the build number formatted string associated with the current build configuration.teamcity.build.branch: a TeamCity-managed param that retrieves the branch of the gitlab repo associated with the current build configuration.
Build features
Build features in a TeamCity project offer additional configuration for the build and let you do important side effects like auto-merging or other shit. I don't know.
- auto-merging: create a rule so that if a build succeeds, merge the source code branch into another branch like
main - commit status publisher: Create a rule so that you get Team City to automatically build on a pull request, and the pull request can only get merged if the build passes.
NOTE
Although build features are powerful, make sure to not overuse them because it will be confusing for other developers when they see build features do such things like change the content of the repository after a push. Only use build features that don't actually change anything in the source code.
Auto-merge
Here's what the below auto-merge thing example does:
- Watch for all branches except the
rc(release candidate) branch - Choose to perform the merge if the build is successful, specify to create a merge commit for that and with a specific message syntax.
- Merge the incoming branch into the
rcbranch

commit status publisher
- Specify the VCS root and the Teamcity Gitlab user that will be the one with access to the gitlab repo and able to do stuff like run pull request actions
- VCS root: the source code repository
- Publisher: the remote repository to add the integration to, like GIthub or Gitlab

- On your VCS root source code repo, push up some code, make a pull request, and a build will automatically start running.

Notifications
THe notifications build feature allows you to send an email or slack notification to someone after the build finishes.

Pull requests
Pull requests build feature allows you to run builds based on a pull request to the VCS root fo the build configuration.

You also have three additional filtering settings:
- filter by authors: only trigger builds on pull requests by a specific author(s)
- filter by source branch: only trigger builds on pull requests whose source branch match the branch syntax match pattern you provide to this textarea.
- filter by target branch: only trigger builds on pull requests whose target branch match the branch syntax match pattern you provide to this textarea.
Build chains
You can consider build configurations within a project as individual pipelines/jobs, and then if you want to do what github actions does in parallelizing and adding jobs as dependencies of each other, then you can look to build chains, where you can create a directed dependency graph of builds that depend upon other builds.
In teamcity, you can specify two behaviors when it comes to build chains:
- sequential execution: specify that a build needs another build to finish, so it executes sequentially after.
- parallel execution: specify that a build can run in parallel with another build.
Creating a build chain
You can create build chains where a build configuration depends on another build configuration sequentially by creating a new snapshot dependency and artifact dependency:
- Go to the dependencies settings of a build configuration and then add a new snapshot dependency:

- Configure the snapshot dependency

- Add a new artifact dependency so the dependent build configuration gets access to the artifacts of the previous job.

Agent requirements
On each build configuration, you can set the agent requirements for the build configuration, which restricts the build configuration to only be compatible with agents that pass the criteria you set:

You can add a requirement like so:

Failure conditions
Failure conditions allow you to add specific conditions to decide when a build should fail.
- Go to build configuration settings, then go to failure conditions
- Add a new failure condition

Build steps
Recipes
Recipes are custom configuration build steps that do not ship with TeamCity. Project administrators can add recipes by doing the following:
-
Extract a recipe from a regular build step.
-
Download a recipe created by TeamCity developers or community from the JetBrains Marketplace.
This section allows you to control whether the second option is available.
Related article: Working with Recipes
SSH build steps
You have several available build steps that let you use ssh to connect to a remote server and perform SFTP or RPC on those servers.
Here's the different types of ways you can do a build step that uses SSH somehow:
- command line build step: A vanilla command line build step where you construct an
sshbash command. - SSH exec step: executes a command after remotely connecting to a server via SSH. You define how to authenticate with the remote server, either by uploading a private key to the build configuration, or using Teamcity SSH agent.
- SSH file transfer step: remotely connects to a server via SSH and handles file transfer via SFTP. You define how to authenticate with the remote server, either by uploading a private key to the build configuration, or using Teamcity SSH agent.
SSH exec example
- Upload an SSH private key pair, name it.

- Add an SSH exec build type to your build configuration

Teamcity pipelines
TeamCity Pipelines is a CI/CD server designed to integrate seamlessly into a developer's workflow. It offers a visual pipeline editor that allows users to configure pipelines without needing to manually manage complex YAML files, though YAML configuration is also supported.
Key features include:
- Intelligent Configuration Assistance: The tool provides suggestions based on the build steps you define, such as optimizing Maven packages for test result collection or parallel execution.
- Environment Flexibility: Pipelines can run on various build agents, including Linux, macOS, and Windows.
- Smart Optimization: It includes features like job reuse, build caching, and easy parallelization for tests, which can be configured via simple sliders or buttons to reduce overall build time .
- Integrated Debugging: Users can view build logs, visualize pipeline progress, and even connect to a terminal on the running build agent for troubleshooting, all within the same interface.
- Configuration as Code: Pipelines support both YAML and Kotlin DSL, allowing you to define your pipeline structure as code that can be fully branched
Teamcity connections
A TeamCity connection is an entity that stores settings required to access resources on a 3rd-party service: a VCS hosting, a cloud hosting provider, an image registry, and so on. This section allows you to create connections available to all subprojects and build configurations owned by this project.
Related article: Configuring Connections
Teamcity + Gitlab SSH keys
NOTE
Why should we use SSH keys to connect Team City to a Gitlab VCS root? Because it removes the need for a username and password by having a direct SSH connection, we can avoid credentials being leaked.
Here's the grand overview for how we'll achieve this:
- Create SSH key pair: give the public key to Gitlab and the private key to Teamcity.
- Configure the connection: edit the VCS root to use SSH instead of standard HTTPS authentication with GitLab.
SSH keys for connecting to a GitLab repo from Team City live on the project level. For each project it needs its own individual SSH key pair to connect to a certain VCS root or multiple VCS roots.
Here are the steps:
- Create the ssh keys in the
.pemformat, which is what TeamCity requires:
ssh-keygen -f teamcity -m 'PEM'
- Uplaod the private key to Teamcity

- Upload the public key to GIthub (should end in
.pub)

- When editing the VCS root, make sure to change to the SSH
<user>@<host>syntax for specifying which repo to connect to for the VCS root:

- Change the authentication method to use SSH keys and specify the specific SSH key you set at the project level

Users, groups, and roles
- users: represent individual users in a Teamcity server with individual permissions
- group: represent groups of permissions just like user groups in AWS, where we can assign permissions to the group, and then users assigned to that group will gain the permissions of the group.
- roles:
Roles
Roles are disabled by default.
To enable roles, you must enable the per-project permissions.
Here’s how roles typically function in CI/CD systems like TeamCity:
-
Role Creation: Roles are created to group specific permissions. For example, a role may be labeled as "Project Developer," granting access to develop and manage project configurations.
-
Assigning Permissions: Once a role is created, you can assign various permissions to that role. For instance, you may assign permissions to run builds or manage specific project configurations.
-
User Assignment: Users or groups can then be assigned a particular role. This means that every user with this role will inherit the permissions it grants.
-
Project Level: Roles are generally assigned at the project level, allowing you to manage access effectively. For example, one user may be assigned the role of "Developer" for a .NET project while another may have restricted access on a different project.
Roles help in maintaining security and appropriateness within project teams, ensuring that users only have access to the areas necessary for their tasks.
Access tokens + API
Creating an access token
Here's how to create a teamcity access token:
- Create an access token

- Select permissions type, like read-only.
Teamcity MCP
This is how the teamcity configuration should be set up:
{
	"mcpServers": {
		"teamcityMCP": {
			"url": "<instance_url>/app/mcp",
			"headers": {
				"Authorization": "Bearer <teamcity_access_token>"
			}
		}
	}
}
- Then replace
<instance_url>with your specific self-hosted TeamCity instance origin likehttps://ci.compusearch.com. - Grab an access token so you can attach it as bearer auth for the
Authorizationheader for authorizing with the remote MCP server.
TeamCity CLI
Basics
Installation
# macOS / Linux
brew install jetbrains/utils/teamcity

# via a bash script
curl -fsSL https://jb.gg/tc/install | bash

# Windows
winget install JetBrains.TeamCityCLI

# via a powershell script
irm https://jb.gg/tc/install.ps1 | iex

# Connect to your server
teamcity auth login https://example.teamcity.com/
macOS (Homebrew):
brew install jetbrains/utils/teamcity
Linux:
curl -fsSL https://jb.gg/tc/install | bash
Windows (Winget):
winget install JetBrains.TeamCityCLI
npm:
npm install -g @jetbrains/teamcity-cli
Setup
- Login
teamcity auth login
Read-only mode
To enable read-only mode, set TEAMCITY_RO=1 as an env var, or run teamcity config set ro true:
teamcity config set ro true
Commands
teamcity run
teamcity run list: lists the 30 most recent teamcity runs
(prism-7.6.5-bug) PS C:\Users\amallick.ENGINEERS\Documents\work\prism-7.6.5-bug> teamcity run list
STATUS     RUN                              JOB               BRANCH  TRIGGERED BY  DURATION  AGE
* Running  375502  #40                      AutomationClm...  ...     ...           27m 35s   now
+ Success  375500  #20                      AutomationClm...  ...     ...           6m 32s    51m ago
+ Success  375501  #20                      AutomationClm...  ...     ...           8m 45s    48m ago
x Failed   375499  #32                      AutomationClm...  ...     ...           1h 24m    1h ago
+ Success  375498  #2649                    PrismModern_T...  -       vcs           1m 46s    2h ago
+ Success  375497  #2496                    TestingZone_T...  -       vcs           3m 43s    2h ago
+ Success  375496  #20                      AutomationClm...  ...     ...           8m 2s     2h ago
+ Success  375495  #21                      AutomationClm...  ...     ...           8m 23s    2h ago
+ Success  375494  #2026.2.0.24             Clm_CLM_Insta...  ...     ...           1m 4s     2h ago
+ Success  375493  #48                      PrismModern_O...  -       vcs           1m 15s    3h ago
+ Success  375492  #2026.2.0.24             Clm_AI_Pipeli...  ...     ...           2m 25s    3h ago
+ Success  375491  #2026.2.0.20             Clm_CLM_Insta...  ...     ...           1m 25s    3h ago
+ Success  375490  #47                      PrismModern_O...  -       vcs           2m 56s    3h ago
x Failed   375489  #29                      AutomationClm...  ...     ...           51m 34s   3h ago
+ Success  375488  #8                       PrismModern_P...  -       ...           3m 59s    3h ago
x Failed   375487  #27                      AutomationClm...  ...     ...           43m 34s   3h ago
+ Success  375486  #12                      PrismModern_A...  -       vcs           11m 23s   4h ago
+ Success  375485  #2648                    PrismModern_T...  -       vcs           1m 46s    5h ago
+ Success  375484  #2328                    PrismModern_T...  -       vcs           12m 53s   4h ago
+ Success  375483  #2495                    TestingZone_T...  -       vcs           3m 52s    5h ago
+ Success  375482  #2259                    TestingZone_T...  -       vcs           12m 49s   4h ago
+ Success  375481  #8.8.0.2382              Clm_ClmMergeR...  ...     vcs           23m 35s   4h ago
+ Success  375480  #8.8.0.2381              Clm_ClmMergeR...  ...     vcs           27m 3s    4h ago
+ Success  375477  #7.6.7.11.OTPortFeature  PrismModern_O...  -       ...           17m 57s   5h ago
+ Success  375479  #8.8.0.198               Clm_ClmTrunkC...  ...     vcs           31m 21s   5h ago
+ Success  375478  #11                      PrismModern_A...  -       vcs           13m 31s   5h ago
+ Success  375470  #8.8.0.2380              Clm_ClmMergeR...  ...     vcs           23m 15s   5h ago
+ Success  375469  #2647                    PrismModern_T...  -       vcs           1m 36s    5h ago
+ Success  375458  #8.8.0.2379              Clm_ClmMergeR...  ...     vcs           28m 28s   5h ago
+ Success  375467  #7.6.7.11.OTPortFeature  PrismModern_O...  -       ...           12m 18s   5h ago

! Showing only the first 30 results - use --limit 0 to fetch all
teamcity run view <job-id>: provides detailed info of a specific run
running locally
The teamcity run start <JobName> command lets you rerun a job in the teamcity cloud, specified by a job name.
The below command lets you run changes you made locally within your Kotlin DSL project.
teamcity run start <JobName> --local-changes --watch
NOTE
For running teamcity builds locally to work, you must be within a directory that has a .teamcity folder and a .teamcity/settings.kts file.
teamcity agent
The teamcity agent commands family lets you manage agents, SSH into them, and more.
teamcity agent list: lists all agents associated with your Teamcity serverteamcity agent term <agent-id>: SSH into a specific agentteamcity agent exec <agent-id> <cmd>: Execute a command within the context of an agent's terminal
Reference
Run teamcity <command> --help for usage
| Group | Commands |
|---|---|
| auth | login, logout, status |
| run | list, start, view, watch, log, tree, changes, tests, diff, cancel, download, artifacts, restart, pin/unpin, tag/untag, comment |
| job | list, view, create, tree, pause/resume, step list/view/add/delete, param list/get/set/delete, settings list/get/set |
| project | list, view, create, tree, vcs list/view/create/test/delete, ssh list/generate/upload/delete, cloud profile/image/instance, connection list/view/create github-app/create docker/authorize/delete, param, token get/put, settings export/status/validate |
| pipeline | list, view, create, validate, pull, push, schema, delete |
| queue | list, approve, remove, top |
| agent | list, view, term, exec, jobs, authorize/deauthorize, enable/disable, move, reboot |
| pool | list, view, link/unlink |
| server | plugin upload (optionally with --hot-reload) |
| api | Raw REST API access |
| link | Bind this repository to a TeamCity project via teamcity.toml |
| config | list, get, set |
| alias | set, list, delete |
| skill | list, install, remove, update |
| update | Check for CLI updates |
AI
The CLI ships with an Agent Skill that teaches coding agents (Claude Code, Cursor, and others) how to drive teamcity:
teamcity skill install           # auto-detects installed agents
teamcity skill install --project # install to current project only
teamcity skill update            # update to the version bundled with teamcity
teamcity skill remove            # uninstall
or specifically for Claude Code:
/plugin marketplace add JetBrains/teamcity-cli
/plugin install teamcity-cli@teamcity-cli
Teamcity DSL
If you want to write config as code much like how YAML files are used to create github action workflows, you can do the same thing as Teamcity with XML files that represent build configurations that live in the .teamcity folder within a repo, to have automatic gitOps configuration with teamcity when pushing up your repo.
Kotlin DSL for Teamcity compile into these XML files behind the scenes, so that's what we'll use for our config as code.
Teamcity to gitlab necessary setup
For more info, go here:
- Configure a git repo for source control:

- For the version settings of a project make sure to enable these settings.
- synchronization enabled: use project settings from VCS root
- VCS root: specify which repo and which branch to look inside for the
.teamcityfolder of configuration files. - build start settings: use the VCS as the source of truth for providing teamcity build configuration settings.
- settings format: Choose Kotlin to use the Kotlin DSL.

- Make sure you have a teamcity user on your gitlab repo that has READ/WRITE access to the repo
Teamcity Kotlin DSL syntax primer
TeamCity calls a build configuration a BuildType in its Kotlin DSL API. The API groups its settings into blocks such as vcs, steps, triggers, failureConditions, and features.
TeamCity UI                 Kotlin DSL

Project                     Project
Build Configuration         BuildType
VCS Root                    VcsRoot / GitVcsRoot
Build Step                  BuildStep
Build Template              Template
Basically, each object in TeamCity (project, build step, build configuration, etc.) corresponds to a class in the Kotlin DSL
Lambda receiver syntax
Consider:
project {

    buildType {

        name = "Build Application"

        steps {

            script {
                scriptContent = "./gradlew build"
            }
        }
    }
}
Do not read this as magic syntax.
Read it as:
configure project
    ↓
create/configure a build type
    ↓
configure its build steps
    ↓
create/configure a script step
    ↓
set its scriptContent property
The simplest Kotlin DSL setup
import jetbrains.buildServer.configs.kotlin.*
import jetbrains.buildServer.configs.kotlin.buildSteps.script

version = "YOUR_TEAMCITY_VERSION"

project {

    buildType {
        id("BuildApplication")
        name = "Build Application"

        steps {
            script {
                name = "Compile application"
                scriptContent = "./gradlew build"
            }
        }
    }
}
- Create a
Projectinstance with theproject { }block, which declares a project in Teamcity. - Create a
BuildTypeinstance with thebuildType { }block, which declares a build configuration within the project.- The
id("BuildApplication")creates a stable ID for the build configuration, which is what you use to uniquely identify the build configuration across all TeamCity projects. - The
steps {}block creates a list of build steps for the job
- The
id vs name
This distinction matters a lot in real projects.
id: used for creating a logical ID for the build configuration or templatename: used for creating a human-readable facing name for the build configuration or template.
You might have:
id("BuildBackend")
name = "Build Backend"
Later someone wants prettier wording:
name = "Compile Backend"
The identity should usually remain the same, because you should think of it as an unchanging logical ID
id("BuildBackend")
.teamcity folder structure
After enabling Versioned Settings and configuring the synchronization, TeamCity automatically creates a new .teamcity folder within your repository. This folder contains the following two initial required files:
pom.xml: This file defines the folder as a Maven project, which is necessary for IntelliJ IDEA to properly recognize and provide features like auto-completion for your configuration scripts.settings.kts: This is your primary Kotlin script file where the project's build configuration logic is stored.
my-application/
├── src/
├── build.gradle.kts
│
└── .teamcity/
    ├── settings.kts
    └── pom.xml
settings.kts
The settings.kts is the entrypoint for describing the Teamcity build configuration. A standard Teamcity build configuration will have many objects that compose a pipeline.
A standard, simple configuration file includes several key blocks:
- Version definition: At the top, the file specifies the TeamCity server version that generated the script, ensuring compatibility, using the
versionvariable
version = "2022.04"
- Project block: The
projectblock defines the scope of your TeamCity project, and you must define several sub blocks and objects here:buildType(buildConfiguration: BuildType): defines a build configuration job that runs multiple steps, associating aBuildTypeobject with the project.
project {
    subProject {
        id("CustomerPortalBuilds")
        name = "Customer Portal Builds"

        buildType(APIBuild)
        buildType(ReactBuild)
    }

    vcsRoot(PortalAppVcsRoot)
    vcsRoot(PortalApiVcsRoot)

    buildType(Publish)
}
-
Build types: Within the project, you define build types (equivalent to build configurations in the UI) by instantiating
BuildTypeobjects that TeamCity DSL recognizes. Here are the different things you can set on an individual build configuration:- VCS Roots (
vcs): Thevcsblock links your project to the repository.- The reference
DslContext.settingsRootensures the project uses the same repository as the configuration file itself
- The reference
object Build: BuildType({
	name = "build"
	id("build")

	vcs {
		root(DslContext.settingsRoot)
	}
}- Build steps (
steps): This defines the actual work, such as a Maven step with specific goals likeclean testto run project tests. It can also include runner arguments to control behavior, such as ensuring all tests execute
object Build: BuildType({
	name = "build"
	id("build")

	vcs {
		root(DslContext.settingsRoot)
	}

	steps {
	exec {
        name = "NPM Install"
        workingDir = ""
        path = "npm"
        arguments = "install"
    }

    exec {
        name = "NPM Build"
        workingDir = ""
        path = "npm"
        arguments = "run build"
    }

}- Build features: configuration for the build agent execution runner environment and also third-party stuff like running builds on pull requests, adding minimum CPU and compute constraints, and more.
object Build: BuildType({
	name = "build"
	id("build")

	vcs {
		root(DslContext.settingsRoot)
	}

	// add features
	features {
		// define build agent VM constraint
		freeDiskSpace {
			requiredSpace = "6gb"
			failBuild = true // fail build if not satisfied
		}
}- Triggers: A
triggerssection handles automation. An emptyvcstrigger configuration defaults to polling the repository for changes every 60 seconds
object Build: BuildType({
	name = "build"
	id("build")

	vcs {
		root(DslContext.settingsRoot)
	}

	// add triggers
	triggers {
		// confgure VCS trigger that creates trigger from VCS root
        vcs {
            quietPeriodMode = VcsTrigger.QuietPeriodMode.USE_CUSTOM
            quietPeriod = 300
            branchFilter = ""
        }
    }
}- dependencies: You can create build chains which are the equivalent of job dependencies in github actions to create sequential builds that depend on each other.
- VCS Roots (
Here's a basic, simple example that does the following:
- Registers a build configuration using the project's configured VCS root (configured on teamcity UI), steps to install and build with npm, and build triggers on VCS push
version = "2020.1"

// project configuration lives here
project {
	// 1. Use the build configuration specified by the Build object we created
	buildType(Build)
}

// 2. create a build configuration with the BuildType class
object Build: BuildType({
	name = "build"
	id("build")

	vcs {
		root(DslContext.settingsRoot)
	}

	steps {
		exec {
            name = "NPM Install"
            workingDir = ""
            path = "npm"
            arguments = "install"
        }

        exec {
            name = "NPM Build"
            workingDir = ""
            path = "npm"
            arguments = "run build"
        }

	}

	triggers {
        vcs {
            quietPeriodMode = VcsTrigger.QuietPeriodMode.USE_CUSTOM
            quietPeriod = 300
            branchFilter = ""
        }
    }

})
pom.xml
The pom.xml reads settings from the settings.kts to define the build configuration
<?xml version="1.0"?>
<project>
  <modelVersion>4.0.0</modelVersion>
  <name>Corporate_CustomerPortal Config DSL Script</name>
  <groupId>Corporate_CustomerPortal</groupId>
  <artifactId>Corporate_CustomerPortal_dsl</artifactId>
  <version>1.0-SNAPSHOT</version>

  <parent>
    <groupId>org.jetbrains.teamcity</groupId>
    <artifactId>configs-dsl-kotlin-parent</artifactId>
    <version>1.0-SNAPSHOT</version>
  </parent>

  <repositories>
    <repository>
      <id>jetbrains-all</id>
      <url>https://download.jetbrains.com/teamcity-repository</url>
      <snapshots>
        <enabled>true</enabled>
      </snapshots>
    </repository>
    <repository>
      <id>teamcity-server</id>
      <url>http://ci.compusearch.com/app/dsl-plugins-repository</url>
      <snapshots>
        <enabled>true</enabled>
      </snapshots>
    </repository>
  </repositories>

  <pluginRepositories>
    <pluginRepository>
      <id>JetBrains</id>
      <url>https://download.jetbrains.com/teamcity-repository</url>
    </pluginRepository>
  </pluginRepositories>

  <build>
    <sourceDirectory>${basedir}</sourceDirectory>
    <plugins>
      <plugin>
        <artifactId>kotlin-maven-plugin</artifactId>
        <groupId>org.jetbrains.kotlin</groupId>
        <version>${kotlin.version}</version>

        <configuration/>
        <executions>
          <execution>
            <id>compile</id>
            <phase>process-sources</phase>
            <goals>
              <goal>compile</goal>
            </goals>
          </execution>
          <execution>
            <id>test-compile</id>
            <phase>process-test-sources</phase>
            <goals>
              <goal>test-compile</goal>
            </goals>
          </execution>
        </executions>
      </plugin>
      <plugin>
        <groupId>org.jetbrains.teamcity</groupId>
        <artifactId>teamcity-configs-maven-plugin</artifactId>
        <version>${teamcity.dsl.version}</version>
        <configuration>
          <format>kotlin</format>
          <dstDir>target/generated-configs</dstDir>
        </configuration>
      </plugin>
    </plugins>
  </build>

  <dependencies>
    <dependency>
      <groupId>org.jetbrains.teamcity</groupId>
      <artifactId>configs-dsl-kotlin</artifactId>
      <version>${teamcity.dsl.version}</version>
      <scope>compile</scope>
    </dependency>
    <dependency>
      <groupId>org.jetbrains.teamcity</groupId>
      <artifactId>configs-dsl-kotlin-plugins</artifactId>
      <version>1.0-SNAPSHOT</version>
      <type>pom</type>
      <scope>compile</scope>
    </dependency>
    <dependency>
      <groupId>org.jetbrains.kotlin</groupId>
      <artifactId>kotlin-stdlib-jdk8</artifactId>
      <version>${kotlin.version}</version>
      <scope>compile</scope>
    </dependency>
    <dependency>
      <groupId>org.jetbrains.kotlin</groupId>
      <artifactId>kotlin-script-runtime</artifactId>
      <version>${kotlin.version}</version>
      <scope>compile</scope>
    </dependency>
  </dependencies>
</project>
Creating a project
The settings.kts should contain a single invocation of the project block, which is where all the build configuration, VCS settings, and subproject settings are configured.
VcsRoot, BuildType, Template, and subprojects objects can be registered inside the project using the vcsRoot(), buildType(), template(), and subProject() methods respectively:
project {
    subProject {
        id("CustomerPortalBuilds")
        name = "Customer Portal Builds"

        buildType(APIBuild)
        buildType(ReactBuild)
    }

    vcsRoot(PortalAppVcsRoot)
    vcsRoot(PortalApiVcsRoot)

    buildType(Publish)
}
Suppose we have:
object BuildApplication : BuildType({
    name = "Build Application"
})
You've created a Kotlin object representing a build configuration.
But the project still needs to include it:
project {
    buildType(BuildApplication)
}
Think:
Define object:

BuildApplication
       ↓

Register object with project:

project {
    buildType(BuildApplication)
}
The same principle applies to the VCS root and any other project-level teamcity object like a build configuration, template, subproject, or VCS root.
project {
    vcsRoot(ApplicationRepository)
}
Here's a list of what you have to explicitly register on a project in order for it to be included in the project settings:
- build configurations: register
BuildTypebuild configuration instances with thebuildType()method, which takes in aBuildTypeobject instance. - templates: register
Templatebuild configuration template with thetemplate()method, which takes in aTemplateobject instance. - subprojects: register a
SubProjectwith thesubProject()method, which takes in aSubProjectobject instance, registering a subproject within the project. - vcs roots: register a VCS root represented by the
GitVcsRootclass with thevcsRoot()method, which takes in aGitVcsRootobject instance. - build chains: the
sequential { }andparallel { }blocks allow you to create build chains and then register build configurations within those build chains with thebuildType()method, which takes in aBuildTypeobject instance.
creating VCS roots
In the projects block, you can register VCS roots for the project via the vcsRoot() function, which takes in a GitVcsRoot instance:
project {
    vcsRoot(PortalAppVcsRoot)
    vcsRoot(PortalApiVcsRoot)
}


object PortalAppVcsRoot : GitVcsRoot({
    name = "Portal App VCS Root"
    url = "git@gitlab.compusearch.com:corporatecomponents/customerportal/portalapp.git"
    branch = "main"
    authMethod = uploadedKey {
        uploadedKey = "tc_gitlab.id_rsa"
    }
})

object PortalApiVcsRoot : GitVcsRoot({
    name = "Portal API VCS Root"
    url = "git@gitlab.compusearch.com:corporatecomponents/customerportal/portalapi.git"
    branch = "main"
    authMethod = uploadedKey {
        uploadedKey = "tc_gitlab.id_rsa"
    }
})
Here are the basic properties that the GitVcsRoot object takes in:
name: the name to set for the VCS rooturl: either the HTTPS or SSH url of the repo to connect tobranch: the git branch to use as the source, like"main"
auth methods
There are two ways to authenticate with a Git repo when setting up the Git VCS root:
- Method 1 - HTTPS: for the
urlproperty you pass the HTTPS URL to your github repo, and then for theauthMethod, you specify HTTPS - Method 2 - SSH: for the
urlproperty you pass the SSH URL to connect to your github repo in<user>@<host>style, and then use theuploadedKeylambda to specify the public key in gitlab that should be used to connect to the private key in Teamcity (check out [[#Teamcity + Gitlab SSH keys]] for more info).
subprojects
complete example
import jetbrains.buildServer.configs.kotlin.v2019_2.*
import jetbrains.buildServer.configs.kotlin.v2019_2.buildSteps.*
import jetbrains.buildServer.configs.kotlin.v2019_2.vcs.GitVcsRoot
import jetbrains.buildServer.configs.kotlin.v2019_2.triggers.VcsTrigger
import jetbrains.buildServer.configs.kotlin.v2019_2.triggers.vcs

/*
The settings script is an entry point for defining a TeamCity
project hierarchy. The script should contain a single call to the
project() function with a Project instance or an init function as
an argument.

VcsRoots, BuildTypes, Templates, and subprojects can be
registered inside the project using the vcsRoot(), buildType(),
template(), and subProject() methods respectively.

To debug settings scripts in command-line, run the

    mvnDebug org.jetbrains.teamcity:teamcity-configs-maven-plugin:generate

command and attach your debugger to the port 8000.

To debug in IntelliJ Idea, open the 'Maven Projects' tool window (View
-> Tool Windows -> Maven Projects), find the generate task node
(Plugins -> teamcity-configs -> teamcity-configs:generate), the
'Debug' option is available in the context menu for the task.
*/

version = "2022.04"

project {
    subProject {
        id("CustomerPortalBuilds")
        name = "Customer Portal Builds"

        buildType(APIBuild)
        buildType(ReactBuild)
    }

    vcsRoot(PortalAppVcsRoot)
    vcsRoot(PortalApiVcsRoot)

    buildType(Publish)
}

object PortalAppVcsRoot : GitVcsRoot({
    name = "Portal App VCS Root"
    url = "git@gitlab.compusearch.com:corporatecomponents/customerportal/portalapp.git"
    branch = "main"
    authMethod = uploadedKey {
        uploadedKey = "tc_gitlab.id_rsa"
    }
})

object PortalApiVcsRoot : GitVcsRoot({
    name = "Portal API VCS Root"
    url = "git@gitlab.compusearch.com:corporatecomponents/customerportal/portalapi.git"
    branch = "main"
    authMethod = uploadedKey {
        uploadedKey = "tc_gitlab.id_rsa"
    }
})

object Publish : BuildType({
    name = "Publish"
    buildNumberPattern = "2026.4.0.%build.counter%"
    publishArtifacts = PublishMode.SUCCESSFUL

    steps {
        step {
            name = "Publish Package to Server"
            type = "octopus.push.package"
            param("octopus_space_name", "%allprojects.octopus.spacename.prodops%")
            param("octopus_host", "%allprojects.octopus.url%")
            param("octopus_packagepaths", """
                aggregateBuilds/** => COCO.CustomerPortal.%build.number%.zip
                database/sqlserver/** => COCO.CustomerPortalApi.SqlServerDB.%build.number%.zip
                database/oracle/** => COCO.CustomerPortalApi.OracleDB.%build.number%.zip
            """.trimIndent())
            param("octopus_forcepush", "false")
            param("octopus_publishartifacts", "true")
            param("secure:octopus_apikey", "credentialsJSON:385844c1-18e7-4a4d-b8eb-1b23541a94ef")
        }
        step {
            name = "Create Release"
            type = "octopus.create.release"
            param("octopus_space_name", "%allprojects.octopus.spacename.prodops%")
            param("octopus_channel_name", "%coco.octopus.channel.unified%")
            param("octopus_version", "3.0+")
            param("octopus_host", "%allprojects.octopus.url%")
            param("octopus_project_name", "Customer Portal - IIS")
            param("octopus_forcepush", "IgnoreIfExists")
            param("secure:octopus_apikey", "credentialsJSON:385844c1-18e7-4a4d-b8eb-1b23541a94ef")
            param("octopus_releasenumber", "%build.number%%coco.octopus.unified.prerelease%")
        }
    }

    params {
        param("param.rjs.package", "COCO.CustomerPortalApp.${ReactBuild.depParamRefs.buildNumber}.zip")
        param("param.net.package", "COCO.CustomerPortalApi.${APIBuild.depParamRefs.buildNumber}.zip")
        param("param.dbsql.package", "COCO.CustomerPortalApi.SqlServerDB.${APIBuild.depParamRefs.buildNumber}.zip")
        param("param.dbora.package", "COCO.CustomerPortalApi.OracleDB.${APIBuild.depParamRefs.buildNumber}.zip")
        param("coco.octopus.channel.unified", "Unified")
        param("coco.octopus.unified.prerelease", "%allprojects.octopus.prereleasetag%")
    }

    triggers {
        vcs {
            branchFilter = ""
            watchChangesInDependencies = true
        }
    }

    dependencies {
        dependency(APIBuild) {
            snapshot {
                onDependencyFailure = FailureAction.FAIL_TO_START
            }

            artifacts {
                cleanDestination = true
                artifactRules = """
                    %param.net.package%!** => aggregateBuilds
                    %param.dbsql.package%!** => database/sqlserver
                    %param.dbora.package%!** => database/oracle
                """.trimIndent()

            }
        }
        dependency(ReactBuild) {
            snapshot {
                onDependencyFailure = FailureAction.FAIL_TO_START
            }

            artifacts {
                cleanDestination = true
                artifactRules = "%param.rjs.package%!** => aggregateBuilds/build"
            }
        }
    }
})

object APIBuild : BuildType({
    id("APIBuild")
    name = "API Build"

    artifactRules = """
        CustomerPortalApi\bin\net10.0\publish\** => COCO.CustomerPortalApi.%build.number%.zip
        -: CustomerPortalApi\bin\net10.0\publish\Migrations => COCO.CustomerPortalApi.%build.number%.zip
        CustomerPortalApi\bin\net10.0\publish\Migrations\SqlServer\** => COCO.CustomerPortalApi.SqlServerDB.%build.number%.zip
        CustomerPortalApi\bin\net10.0\publish\Migrations\Oracle\** => COCO.CustomerPortalApi.OracleDB.%build.number%.zip
    """.trimIndent()
    buildNumberPattern = "2026.4.0.%build.counter%"
    publishArtifacts = PublishMode.SUCCESSFUL

    params {
        param("param.solution", "CustomerPortalApi.sln")
        param("system.DeployOnBuild", "true")
        param("system.PublishProfile", "FolderProfile")
    }

    vcs {
        root(PortalApiVcsRoot, "+:. => .", "-: .teamcity", "-: .idea", "-: .gitignore")
    }

    steps {
        powerShell {
            name = "Pull SlowCheetah"
            platform = PowerShellStep.Platform.x64
            scriptMode = script {
                content = """
            %teamcity.tool.NuGet.CommandLine.DEFAULT%\tools\nuget install SlowCheetah -OutputDirectory packages -Source "C:\Program Files (x86)\Microsoft SDKs\NuGetPackages;https://api.nuget.org/v3/index.json"
        """.trimIndent()
            }
        }

        powerShell {
            name = "Run Project Transform Version Update"
            platform = PowerShellStep.Platform.x64
            scriptMode = file {
                path = "%devops.teamcity.tools.dir%/General/Invoke-MsBuildXmlTransform.ps1"
            }
            param("jetbrains_powershell_scriptArguments", "-NuGetRootPath %teamcity.build.workingDir%/packages -BaseFile %teamcity.build.workingDir%/CustomerPortalApi/log4net.config -TransformFile %teamcity.build.workingDir%/CustomerPortalApi/log4net.Release.config -TargetPath %teamcity.build.workingDir%/CustomerPortalApi/log4net.config")
        }

        dotnetRestore {
            name = "Restore Packages"
            projects = "%param.solution%"
            sources = """
                https://nuget.compusearch.com/v3/index.json
                https://api.nuget.org/v3/index.json
            """.trimIndent()
            param("dotNetCoverage.dotCover.home.path", "%teamcity.tool.JetBrains.dotCover.CommandLineTools.DEFAULT%")
        }
        dotnetMsBuild {
            name = "Run Build"
            projects = "%param.solution%"
            version = DotnetMsBuildStep.MSBuildVersion.CrossPlatform
            targets = "Rebuild"
            configuration = "Release"
            param("dotNetCoverage.dotCover.home.path", "%teamcity.tool.JetBrains.dotCover.CommandLineTools.DEFAULT%")
        }
        dotnetPublish {
            name = "DotNet Publish"
            projects = "%param.solution%"
            configuration = "Release"
            skipBuild = true
            args = "/p:PublishProfile=%system.PublishProfile%"
            param("dotNetCoverage.dotCover.home.path", "%teamcity.tool.JetBrains.dotCover.CommandLineTools.DEFAULT%")
        }
        reSharperInspections {
            name = "Run Inspections"
            enabled = false
            solutionPath = "%param.solution%"
            cltPath = "%teamcity.tool.jetbrains.resharper-clt.DEFAULT%"
            cltPlatform = ReSharperInspections.Platform.X64
            customCmdArgs = "-s=WARNING"
        }
        dotnetVsTest {
            name = "Run Tests"
            assemblies = """
                Unison.Corporate.CustomerPortal.Tests\bin\Release\net10.0\Unison.Corporate.CustomerPortal.Tests.dll
            """.trimIndent()
            version = DotnetVsTestStep.VSTestVersion.V15
            filter = testCaseFilter {
                filter = "TestCategory!=Integration"
            }
            platform = DotnetVsTestStep.Platform.Auto
            coverage = dotcover {
                toolPath = "%teamcity.tool.JetBrains.dotCover.CommandLineTools.DEFAULT%"
                assemblyFilters = "-:Unison.Corporate.*.Tests"
            }
        }
    }

    requirements {
        doesNotEqual("system.agent.name", "LXCI01")
    }

    triggers {
        vcs {
            quietPeriodMode = VcsTrigger.QuietPeriodMode.USE_CUSTOM
            quietPeriod = 300
            branchFilter = ""
        }
    }
})

object ReactBuild : BuildType({
    id("ReactBuild")
    name = "React Build"

    artifactRules = """build\** => COCO.CustomerPortalApp.%build.number%.zip"""
    buildNumberPattern = "2026.4.0.%build.counter%"
    publishArtifacts = PublishMode.SUCCESSFUL

    vcs {
        root(PortalAppVcsRoot, "+:. => .", "-: .teamcity", "-: .idea", "-: .gitignore")
    }

    steps {
        exec {
            name = "NPM Install"
            workingDir = ""
            path = "npm"
            arguments = "install"
        }

        exec {
            name = "NPM Build"
            workingDir = ""
            path = "npm"
            arguments = "run build"
        }
    }

    triggers {
        vcs {
            quietPeriodMode = VcsTrigger.QuietPeriodMode.USE_CUSTOM
            quietPeriod = 300
            branchFilter = ""
        }
    }
})
Build types in depth
VCS roots with build configurations
Due to one of the rules of teamcity projects (see [[#TeamCity projects]]), build configurations inherit settings from the project they are scoped under, such as VCS roots.
However, you can override the VCS roots a build configuration uses with the vcs { } block, and then use the root(GitVcsRoot) method to register a GitVcsRoot instance as the VCS root for that build configuration.
import jetbrains.buildServer.configs.kotlin.*
import jetbrains.buildServer.configs.kotlin.buildSteps.script
import jetbrains.buildServer.configs.kotlin.vcs.GitVcsRoot

version = "YOUR_TEAMCITY_VERSION"

project {
    vcsRoot(ApplicationRepository)
    buildType(BuildApplication)
}

object ApplicationRepository : GitVcsRoot({
    name = "Application Repository"

    url = "https://github.com/example/my-application.git"

    branch = "refs/heads/main"
})

object BuildApplication : BuildType({

    name = "Build Application"

    vcs {
        root(ApplicationRepository)
    }

    steps {
        script {
            name = "Build"
            scriptContent = "./gradlew clean build"
        }
    }
})
Triggers
You define triggers on a build type with the BuildType.triggers object block.
VCS triggers
object BuildApplication : BuildType({

    name = "Build Application"

    vcs {
        root(ApplicationRepository)
    }

    steps {
        script {
            name = "Build"
            scriptContent = "./gradlew clean build"
        }
    }

    triggers {
        vcs {
        }
    }
})
Build outputs and variable interpolation
In kotlin you can obviously use template string interpolation with the ${} syntax, but did you know you can access TeamCity Kotlin DSL variables as well? Here's what you have access to:
- build output variables: when you instantiate a
BuildTypeobject, you're just creating a normal Kotlin object, so of course you can access properties on it. - vcs root variables: Root IDs are used in build parameters that allow you to read root properties, for example
vcsroot.<ProjectName>_<RootName>.branchandvcsroot.<ProjectName>_<RootName>.url
Build chains
You can consider build configurations as jobs/pipelines, and in order to orchestrate sequential and parallel jobs running according to a specific order, we have to create build chains, which describe dependencies of build configurations on other build configurations via snapshot dependencies and artifact dependencies.
There are two ways to create a build chain (configuring sequential dependencies of build configuration files and thus pipelines):
- Method 1 - Use
BuildType.dependencies: Specify which other builds an individual BuildType instance depends on via thedependenciesblock.- Pro: granular
- Con: gets messy and has messy logic
- Method 2 - specify job order in
projectblock: Specify sequential chains of builds in thesequentialblock in theprojectblock, and parallel blocks with theparallelblock.- Pro: super easy and readable
- Con: lower granularity, can't access individual snapshot properties.
IMPORTANT
Then an important thing to understand once you configure a build chain is that the VCS trigger should only be on the LAST build type in the chain.
Explicit dependencies methods
Here's an example using Method 1:
- Create the two jobs
object APIBuild : BuildType({
    id("APIBuild")
    name = "API Build"

    vcs {
        root(PortalApiVcsRoot, "+:. => .", "-: .teamcity", "-: .idea", "-: .gitignore")
    }

    steps {
        powerShell {
            name = "Pull SlowCheetah"
            platform = PowerShellStep.Platform.x64
            scriptMode = script {
                content = """
            %teamcity.tool.NuGet.CommandLine.DEFAULT%\tools\nuget install SlowCheetah -OutputDirectory packages -Source "C:\Program Files (x86)\Microsoft SDKs\NuGetPackages;https://api.nuget.org/v3/index.json"
        """.trimIndent()
            }
        }
	}

    triggers {
        vcs {
            quietPeriodMode = VcsTrigger.QuietPeriodMode.USE_CUSTOM
            quietPeriod = 300
            branchFilter = ""
        }
    }
})

object ReactBuild : BuildType({
    id("ReactBuild")
    name = "React Build"


    vcs {
        root(PortalAppVcsRoot, "+:. => .", "-: .teamcity", "-: .idea", "-: .gitignore")
    }

    steps {
        exec {
            name = "NPM Install"
            workingDir = ""
            path = "npm"
            arguments = "install"
        }

        exec {
            name = "NPM Build"
            workingDir = ""
            path = "npm"
            arguments = "run build"
        }
    }

    triggers {
        vcs {
            quietPeriodMode = VcsTrigger.QuietPeriodMode.USE_CUSTOM
            quietPeriod = 300
            branchFilter = ""
        }
    }
})
- Create a job that is dependent on those two jobs:
object Publish : BuildType({
    name = "Publish"
    buildNumberPattern = "2026.4.0.%build.counter%"
    publishArtifacts = PublishMode.SUCCESSFUL

    steps {
        step {
            name = "Publish Package to Server"
            type = "octopus.push.package"
            param("octopus_space_name", "%allprojects.octopus.spacename.prodops%")
            param("octopus_host", "%allprojects.octopus.url%")
            param("octopus_packagepaths", """
                aggregateBuilds/** => COCO.CustomerPortal.%build.number%.zip
                database/sqlserver/** => COCO.CustomerPortalApi.SqlServerDB.%build.number%.zip
                database/oracle/** => COCO.CustomerPortalApi.OracleDB.%build.number%.zip
            """.trimIndent())
            param("octopus_forcepush", "false")
            param("octopus_publishartifacts", "true")
            param("secure:octopus_apikey", "credentialsJSON:385844c1-18e7-4a4d-b8eb-1b23541a94ef")
        }
        step {
            name = "Create Release"
            type = "octopus.create.release"
            param("octopus_space_name", "%allprojects.octopus.spacename.prodops%")
            param("octopus_channel_name", "%coco.octopus.channel.unified%")
            param("octopus_version", "3.0+")
            param("octopus_host", "%allprojects.octopus.url%")
            param("octopus_project_name", "Customer Portal - IIS")
            param("octopus_forcepush", "IgnoreIfExists")
            param("secure:octopus_apikey", "credentialsJSON:385844c1-18e7-4a4d-b8eb-1b23541a94ef")
            param("octopus_releasenumber", "%build.number%%coco.octopus.unified.prerelease%")
        }
    }

	// dependent on those two builds because it uses outputs from them
    params {
        param("param.rjs.package", "COCO.CustomerPortalApp.${ReactBuild.depParamRefs.buildNumber}.zip")
        param("param.net.package", "COCO.CustomerPortalApi.${APIBuild.depParamRefs.buildNumber}.zip")
        param("param.dbsql.package", "COCO.CustomerPortalApi.SqlServerDB.${APIBuild.depParamRefs.buildNumber}.zip")
        param("param.dbora.package", "COCO.CustomerPortalApi.OracleDB.${APIBuild.depParamRefs.buildNumber}.zip")
        param("coco.octopus.channel.unified", "Unified")
        param("coco.octopus.unified.prerelease", "%allprojects.octopus.prereleasetag%")
    }

    triggers {
        vcs {
            branchFilter = ""
            watchChangesInDependencies = true
        }
    }

    dependencies {
        dependency(APIBuild) {
            snapshot {
                onDependencyFailure = FailureAction.FAIL_TO_START
            }

            artifacts {
                cleanDestination = true
                artifactRules = """
                    %param.net.package%!** => aggregateBuilds
                    %param.dbsql.package%!** => database/sqlserver
                    %param.dbora.package%!** => database/oracle
                """.trimIndent()

            }
        }
        dependency(ReactBuild) {
            snapshot {
                onDependencyFailure = FailureAction.FAIL_TO_START
            }

            artifacts {
                cleanDestination = true
                artifactRules = "%param.rjs.package%!** => aggregateBuilds/build"
            }
        }
    }
})
parallel and sequential
here's method 2 in action:
projects {
	sequential {
		// run the build first
		buildType(Build)

		// run tests in parallel
		parallel {
			buildType(UnitTest)
			buildType(IntegrationTest)
			buildType(e2eTest)
			buildType(SAST)
			buildType(DAST)
		}

		// deploy last
		buildType(Deploy)
	}
}
If you want to refactor using functions and classes as abstractions over creating BuildType instances, here is what you should do, where now you are using trailing lambda syntax and dynamically registering build types:
project {
	// 1. define build chain, get all BuildType objects back in Collection
    val bts = sequential {
        buildType(Maven(name = "Build", goals = "clean compile"))
        parallel {
            buildType(Maven(name = "Fast Test", goals = "clean test"))
            buildType(Maven(name = "Slow Test", goals = "clean test"))
        }
        buildType(Maven(name = "Package", goals = "clean package"))
    }.buildTypes()

	// 2. register all BuildType instances
    bts.forEach { buildType(it) }

    // 3. Set the VCS trigger on the last build in the build chain
    bts.last().triggers {
	    vcs {

	    }
    }
}

class Maven(public var name: String, public var goals: String): BuildType({
	name = this.name,
	goals = this.goals
})
Patches
In TeamCity, when your project configuration is stored as Kotlin DSL in version control, the system tries to automatically commit changes made in the web UI back to your code.
However, DSL patches are created when TeamCity cannot automatically map a UI-driven change to your existing Kotlin code structure.
Here's how they work
- Trigger: Patches occur when you have customized your Kotlin files in a way that TeamCity cannot parse or reconcile automatically, such as by introducing custom variables or complex logic
- Mechanism: When a conflict occurs, TeamCity commits a new folder to your repository named
patches. Inside, you will find abuild.ktsfile representing the change - Resolution: These files are not automatically merged. You must follow these steps:
- You must manually review the patch file to understand the required setting change, then update your primary
settings.ktsfile to reflect that change - Delete the
patchesfolder entirely to apply the fix and resolve the state mismatch - Commit and push the latest changes
- You must manually review the patch file to understand the required setting change, then update your primary
This approach works well because we treat the VCS with the kotlin DSL as the source of truth, and any changes made in the UI as a "nice suggestion" we can choose to include in the code as config or not.
Local testing
Local validation by building config
Another habit we'll build is validating configuration before committing it.
The generated TeamCity Kotlin DSL Maven project can generate the corresponding configuration locally using:
mvn teamcity-configs:generate
Generated configuration is placed under:
.teamcity/target/generated-configs
and generation performs DSL validation, which can catch missing mandatory settings before TeamCity applies them.
So a useful development cycle is:
Edit DSL
   ↓
IDE compile/autocomplete
   ↓
mvn teamcity-configs:generate
   ↓
review Git diff
   ↓
commit
   ↓
TeamCity applies settings
Teamcity AI
Teamcity MCP
This is how you add the teamcity MCP server to your AI agent:
- Get your teamcity auth token, and then set it in the current environment as the
TC_AUTH_TOKENenv var
export TC_AUTH_TOKEN="your token here"
- Add this MCP json, pointing to your teamcity server URL if self hosted
{
  "mcpServers": {
        "TeamCity nightly": {
            "type": "http",
            "url": "<TeamCity-server-URL>/app/mcp",
            // Skip setting up auth settings
            //"headers": { "Authorization": "Bearer $TC_AUTH_TOKEN" }
        }
  }
}
- Authenticate with your harness:
codex mcp login <server-name>
Look here for more examples like how to do it with Claude, etc.
Octopus Basics
How Octopus works
Servers, tentacles, calamari
Octopus has these components:
- octopus deploy server: stores all CD info and configurations, communicates with the deploy tentacles to perform tasks.
- octopus deploy tentacle: manage of execution of deployment pipelines and to deploy the final result to target servers. There are two types of tentacles:
- listening tentacle: long-running process on a cloud server, or running on port 10933 locally if self-hosting, listens for commands from the deploy server and then executes those commands.
- polling tentacle: periodically connects to the Octopus deploy server and polls it for new commands to execute.
- worker tentacle: performs tasks on behalf of Octopus Deploy
- calamari: what does the actual legwork of executing the deploy pipeline, controlled via tentacles. Tentacle can run multiple instances of calamari to perform multiple tasks in parallel.
NOTE
The important thing to understand here is that you'll only use Tentacles mainly and install them on virtual machines if you're hosting on-premises. If you own the virtual machines and infra, then you would need to install Tentacles on those virtual machines.

NOTE
You must put your tentacles on your target servers. If there is a server you want to deploy something to, then it must have a tentacle on it.
Hierarchy
Here is what lives at the same level:
- environments: stuff like
dev,qa, etc., which you can use to tag deployment targets with. - spaces: organize projects
- project groups: organize projects
- projects: contain the configuration for deployments
Environments
Octopus Deploy allows you to create several environments, like Dev, Test, and QA, which allow you to specify target environments to deploy to for the same package.
- Definition: Environments are groupings of your deployment targets that represent different stages of your deployment pipeline.
- Purpose: They help organize targets so you can manage releases as they move through your infrastructure.
For practical use, apply the same environments across multiple projects rather than creating unique sets for every project.
- Naming: Use common company terminology, such as Development (dev), Test (qa), Staging (pre-prod), and Production.
- Abbreviations: Only use industry-standard abbreviations (e.g., QA) to avoid team confusion.
In Octopus Deploy, managing deployment targets is primarily achieved by organizing them into Environments. Environments act as containers for your targets, representing the different stages of your deployment pipeline
On the environments page, you can see how many deployment targets are assigned to each environment—for example, you might see that your Development environment contains three targets, while your Test environment holds eleven.
Deployment targets and roles
Prereqs: [[#Creating deployments]].
- Deployment Targets: The specific machines, services, or environments (e.g., Windows/Linux servers, Azure, AWS, Kubernetes) where applications are deployed.
- Environments: The stages in a software lifecycle (e.g., Development, Test, Production) where targets are assigned.
- Roles: Descriptive tags used to identify the function of a deployment target (e.g., "Web Server"). Roles allow specific steps in a deployment process to execute on relevant targets.
When registering a deployment target there are two things that must be specified:
- environments: the environments to tag the deployment target with, meaning that only when deployment processes run on those environments will the deployment target be deployed to.
- target roles: Descriptive tags used to identify the function of a deployment target

During a release, Octopus checks which deployment targets match the assigned environments and roles defined in the deployment step, ensuring the application is deployed to the correct deployment target.
NOTE
Basically you can use the combination of both roles and environments to get really granular with how you select specific deployment targets a step in a deployment process applies to.
roles in depth
Roles are assigned to deployment targets and dictate how Octopus Deploy selects machines during a deployment or runbook run.
- Generic Roles: Describe server types (e.g., IIS Server 2019).
- Specific Roles: Describe application-specific functions (e.g., Hello World API).
A deployment target can have multiple roles:

If a step is assigned multiple roles, Octopus Deploy uses logic to select targets.
- OR Logic: Multiple roles on a single step are treated as an OR statement. If a server has either role, it is selected.
- Target Assignment: Assigning both UI and API roles to a server allows it to be picked up by multiple different project steps.
Best practices for roles
- Specific Roles: Use for deployments and application-specific runbooks to cleanly model environments.
- Generic Roles: Use for maintenance runbooks (e.g., OS updates, software installation), by targeting by software/VM type, like
nginxorwindows-server-2019 - Dual Assignment: It is recommended to assign both generic and application-specific roles to a single target to maximize utility.
Spaces
Octopus Deploy offers an analog to folders called Spaces, which allows you to organize your deployments into different categories/buckets.
Projects
- Projects: Used to define deployment processes, runbooks, and variables to deploy software across defined environments.
- Project Groups: Used to organize related projects, typically by application, to keep your instance tidy.
Here is the general process that showcases the hierarchy of what you're mainly going to do in Octopus:
- Create a project group
- Within that project group, create a project
- Within that project, create a new deployment
Tentacles and deployment targets
Adding tentacles
Here are the steps to add a tentacle on a Windows Server VM you own to make that VM a deployment target:
- Go to the deployment targets tab. Click on Add Deployment Target

- Choose the deployment target as Windows and choose a listening tentacle type:
 3. Download the powershell script to install the tentacle, remember the thumbprint, then SSH into your windows server, and then run the powershell script

- Specify environment and role
- environment: the environment(s) to deploy on, like Dev or QA. This tells Octopus that we only want to deploy to this deployment target when a deployment process runs on that environment.
- target role: labels that you can then programmatically reference to target certain tentacles only for deployment. They describe the functionality of the target and are used by the deployment process
 5. Upgrade calamari as a good practice. The first time you deploy a tentacle, you should upgrade calamari

- Now in your deployment process, target your deployment target via the target role

Best practices of creating deployment targets
- Naming Conventions: Use descriptive names for roles based on application names and server functions (e.g., Hello-World-Web-Server).
- Tentacle Selection: Prioritize Listening Tentacles over polling unless network restrictions necessitate otherwise.
- Environment Flexibility: A single deployment target can be mapped to one or multiple environments (e.g., a server shared between Development and Test).
Deploying packages directly to tentacles
Deployment in Octopus Deploy requires special rules for packages (same thing as build artifacts):
- file type: package type should be either a
.zipfile or a.nupkgfile - naming: the package name must follow a standard convention including the package name and package version, in this syntax:
package_name: the package name, alphabeticpackage_version: the package version, in the syntax<version_number>-<tag-selector>, like10.2.1-releaseis a valid package version with tag.
<package_name>.<package_version>.<file-extension>

A common approach where tags come in handy is when we have different branches and we want to create and deploy packages based on those different branches. We would use the branch name as the tag name, like the below example:

Connecting TeamCity to Octopus
Here's a high level overview of how it works:
- Whether you're using the TeamCity Kotlin DSL or manually creating a build step in TeamCity to publish to Octopus Deploy, you need to install the Octopus Deploy plugin for TeamCity in order to do any of this.
- You then need to add API key from Octopus to the TeamCity project root config so you actually have authorization to publish to Octopus directly via TeamCity.
Here are the steps in depth
- Install a plugin on TeamCity so it can connect to Octopus Deploy

- Go to your plugins list and enable the uploaded plugins:

- Go to Octopus Deploy and create a new API key.

- In your build configuration, add an extra step whose step type is OctopusDeploy: Push Packages, and specify the following info:
- Octopus server URL: Octopus server URL is either going to be on the cloud or some self-hosted IP address.
- API key: The OctopusDeploy API key you created
- Space name: the name of the space to deploy to on your Octopus Server.
- package paths: the artifact mapping from your source code to the one produced by team city
- publish packages as build artifacts: if checked, uses the package paths configuration as the naming scheme to find packages and publish them.

- From your general settings of your project, remove the artifact paths to avoid overriding the ones you specified with Octopus Deploy:

Octopus projects overview
Here's an overarching mental model:
Project
│
├── Deployment process
│   └── Defines WHAT Octopus does
│
├── Channel
│   └── Defines WHICH release lane is used
│
├── Lifecycle
│   └── Defines WHERE and in WHAT ORDER the release goes
│
└── Release
    └── A deployable snapshot of packages, process, and variables
Configuring dashboard to view project groups
You can select which project groups and projects are visible in the dashboard by following these steps:
- Search for and then click on configure dashboard

- Configure the dashboard

Users, roles, permissions, and teams
- permissions: A single policy for an action
- Example: creating a project, creating a release, running a deployment process
- roles: a grouping of one or more permissions
- Example: project deployer role would be able to create projects, releases, and deployment processes.
- teams: Each team contains one or more roles, and is thus a large grouping of permissions
- users: users are added to teams and then assume the permissions of the roles within the team

Octopus Deployments
Intro
In Octopus Deploy, the normal design is:
- Project/process = how DIS is deployed
- Environment = where it is deployed, such as Dev, QA, or Production
- Release = a versioned snapshot of the process, packages, and variables that gets promoted through those environments
Here's an overarching mental model:
Project
│
├── Deployment process
│   └── Defines WHAT Octopus does
│
├── Channel
│   └── Defines WHICH release lane is used
│
├── Lifecycle
│   └── Defines WHERE and in WHAT ORDER the release goes
│
└── Release
    └── A deployable snapshot of packages, process, and variables
A useful shorthand is:
- Process: What deployment actions happen?
- Environment: Where does the application run?
- Lifecycle: In what order may environments receive a release?
- Channel: Which release strategy or lane does the release follow?
- Release: Which version is being deployed?
Creating deployments
A deployment requires these components:
- Deployment Process: A set of steps defined within an Octopus Deploy project that the server runs to deploy software.
Creating a deployment process
- Add a step to the deployment process

- Configure the step to run on specific deployment targets.

Email notifications
To add email notifications into the deployment process, just use the Send an email step:

Here are some best practices when using the email-sending action:
- use variables for email addresses: it's best to use a variable for the destination email address since you may want to send to different email addresses depending on the current environment the release or deployment process is executing for.
- use the environment name for dynamic emails: Use the system variable
Octopus.Environment.Namefor dynamic emails for different environments
Adding a manual intervention step
Adding a manual intervention step into the deployment process is a great way for us to require a human in the loop and notify people when pushing or creating an important deployment process execution in something important like prod.
That's when something like a manual intervention step would be necessary and then an Octopus administrator can step in and approve the deployment process execution to go ahead.
Deployment examples
Octopus and creating an IIS pipeline
When creating an octopus project, you can configure the pipeline with prebuilt step recipes, and Octopus offers a prebuilt step for deploying to IIS app pools.
- Choose the "Deploy to IIS" prebuilt step template:

- Configure the deploy to IIS step by specifying the target environment, which will automatically deploy to the IIS app pools on all tentacles tagged by that target environment.
 3. Select the specific package (artifact) to deploy

Releases
Releases are a snapshot of the deployment process and the associated artifacts/assets as they existed when the release was created.
From a single versioned release, you can deploy to different environments, which then deploys to the actual deployment targets/tentacles.
NOTE
The primary philosophy of Octopus Deploy is that how you deploy to dev and test should be the same way you deploy to production. You can do this by creating a release abstraction and the release abstraction is the thing that actually handles the individual configuration and parameter injection to deploy to test, dev, and prod with a unified interface.
- You can have one release generator per project
- You can create releases either from deployment processes or from packages.
Here are the prereqs:
- deployment process: Can't release shit without a deployment process.
Ok now here are the steps:
- Click on Create Release button

- Specify version and release notes

- Choose the lifecycle (see [[#Lifecycles]]) that you want this release to follow, and then deploy it to the first environment in the lifecycle

- Choose to deploy now or schedule later, then click the Deploy button to start the deployment

- Once it starts to get deployed, you can view the deployment pipeline status and progress via the task list, which gives complete observability over the individual deployment process steps.

Creating a release from a package
- Create a release from a package, sele

Variables
Variables allow your applications to run in deployment pipelines and get deployed to different environments and infrastructure without having to manually hardcode parameters or config settings.
- Purpose: To parameterize deployment processes and runbooks.
- Benefit: Enables applications to function across various infrastructure stages without hardcoding or manually updating configuration settings.
There are two types of variables in Octopus Deploy:
- system variables: Variables managed by Octopus, available under the
Octopusnamespace, available system wide or specific ones that inject project-specific values. - project variables: user-created variables that you make available at the project level. You can further constrain the use of these variables by scoping them to certain environments, target roles, target servers/tentacles, and specific deployment steps.
- Scopes allow you to supply different variable values for each scope, namespaced under a single variable.
You can add variables for a project via the project variables tab, which lets you use the variable anywhere inside the project.
IMPORTANT
Once you create variables, you can use them anywhere when configuring Octopus pipelines or releases via template string interpolation, with the #{} syntax.
- Create a project variable
 2. You can also scope the variable to restrict its use more and provide conditional, scoped values for the variable.


- Use the variable to make steps in a deployment process more dynamic:

Extra variable configuration
If you want extra variable configuration, you have these options:
- Edit an existing variable
 2. Add configuration, like dropdowns, prompts, etc.

A caveat here is that if you decide to provide extra configuration for your variable and prompt for its value, then for project scopes you can only scope by environment and nothing else (because that's the only thing known beforehand).

System variables
Here are the important namespaces:
Octopus.Environment: object with info about the environment being deployed to.Octopus.Action.Package: object with info about the current package that is trying to be deployed.Octopus.Deployment: object with info about deployments
Variable interpolation and filters
You already know that you can use template string interpolation with the #{} syntax to retrieve the values of variables and inject them into a string.
But you can also invoke functions on those variables and transform them before they get interpolated, using filters:

THen you can use them in this syntax:
#{variableName | filterFn }

Lifecycles
A lifecycle defines the path that a release can take through deployment environments.
Think of it as the project’s promotion roadmap:
Development → QADEMO → QA
A lifecycle can control:
- The environments available to a release
- The order in which releases move through environments
- Whether an environment or phase is required or optional
- Whether deployment to an environment begins automatically
- How many releases and deployment files are retained
Octopus calls each stage in a lifecycle a phase, where a phase can contain one environment or multiple environments.
- You can configure a lifecycle to require a successful deployment to an earlier phase before a later phase becomes available.
- In the case of multiple environments in a phase, a deployment process has to successfully complete for all of those environments in order to graduate to the next phase.
NOTE
Think of a phase as a stage in your product life cycle that your application is deployed to.
By default, Octopus creates a default lifecycle for each project which creates a phase for each environment you have and creates a sequential ordering of those phases.


Creating lifecycles
- Go the the lifecycles tab, then click on create lifecycle, then name the lifecycle:

- Add a new phase, filling in this info:
- phase name: how the phase should be named
- environments: a list of environments that make up the phase
- required to progress: the strictness of how many environments need to have successful deployment process executions within the phase before you consider a phase successful and then you can pass on to the next one.

- For each environment you add, you can specify if you want to automatically deploy to the deployment targets tagged by that environment or if you need to manually deploy to that environment via clicking a button.

- Finish adding all the phases the same way, then save the lifecycle.
- Change the lifecycle of your deployment process to your newly created lifecycle


Channels
NOTE
Channels are lifecycles for packages.
A channel is a release lane inside a project, where we can enforce lifecycles for packages based on the branch, not just on the environment like lifecycles do.
Channels let one Octopus project support different release strategies without duplicating the project. Every release belongs to a channel, and the channel can determine:
- Which lifecycle the release follows
- Which package versions are allowed
- Which process steps run
- Which variables apply
- Which tenants apply
NOTE
So what makes channels different to life cycles?
With channels you can get even more granular than life cycles and specify additional rules that will do basically the same thing as life cycles (where you force a certain progression in phases), but you can do it based on the package name that you're trying to deploy.
NOTE
Each channel can behave differently while still using the same underlying project.
Octopus supports channel-specific lifecycles, process steps, variables, tenants, and package-version rules.
Every project has a default channel, and additional channels can be created when genuinely different release behavior is needed.

Creating a new channel
- Create a new channel and choose its lifecycle

- Add package version rules for creating releases in the channel, apply the rule to steps in the deployment process, then create the channel.
- package steps: the deployment process steps where the package name is available
- version range: a certain range of versions to include for the channel
- pre-release tag: the tag on the package branch, where only the packages with this tag will get deployed to the channel.

Channel version ranges
Here is the syntax for defining the version ranges for channels:

Creating a release from channels
Now that you created a channel, you can use channels in your releases to further scope which packages will actually get deployed and follow a lifecycle as well.
NOTE
The advantages of creating a channel and then using that channel for releases are that now you have further scopes and filters on what packages are even available to get deployed at each stage, sort of like life cycles but for packages.
- Select the channel to use for creating a release

Tenants
Tenants are an extra layer over environments where a single consumer or developer can get a parameterized individualized version of an environment deployment.

Here are the rules of tenants:
- Each tenant must be associated with a project and at least one environment.
- You can provide variable templates for each tenant to parameterize them at runtime and inject each tenant with individual values
Here's how to create a tenant:
- Go to the Tenants tab and click on the Add Tenant button.

- coNNECT THe tenant to a project and environment
 3. Go to project templates within a project, and then click on the "add template" button to add a variable for a tenant, then repeat this for as many variables as you need.

- Specify the name and variable type for the variable you want to add

- Go to the tenants tab and then fill out the variable values for each individual tenant for whom you created a project variable template in a project the tenants are connected to.

- Now you have to configure tenanted deployments for the deployment targets. Go to Infrastructure -> Deployment targets then click on the individual deployment target(s) that are deployment targets for the projects and environments you tenants are connected to.

- Change the tenanted deployments setting on the deployment target to include both tenanted and untenanted deployments:
 8. Associate this deployment target with the specific tenants you want to deploy for, then hit save.

- When creating a release, choose the tenants you want to deploy to.

Octopus REST API
Creating an API key
With an Octopus API key, you can connect Octopus with TeamCity directly and also use the Octopus Server REST API .
Service accounts
Service accounts allows non-human entities (like build servers) to interact with the Octopus Deploy RESTful API securely while obeying the principle of least privilege.
NOTE
It's sorta like Github apps
- Login Restrictions: Service accounts cannot log in to the Octopus Deploy UI using a password.
Here's the overview:
- Create a service account for a use case, then save the API key
- Add a service account to a team to give it permissions, accounting for the principle of least privilege
- Use the service account API key to access the REST API, granted with the permissions it gained from the team it was added to.
Forbidden Knowledge from Michael Jordan (Joseph Dempsey) to Lebron James (Rohit Ramakrishnan) to Tony Snell (Aadil Mallick), with special appearances by Allen Iverson (Clint Smith)
Teamcity to Veracode
- Go to your organization's dashboards in veracode
 2. Click on the one named "findings, filtration, customization date"
 3. Filter the table for high and very high vulnerabilities within the past month:

- Download the data
